
Asus X5511M-RCLN03 Battery Replacement

Last updated on May 1, 2017
Views: 2.4K
View statistics:
- Past 24 Hours:
- 2
- Past 7 Days:
- 15
- Past 30 Days:
- 78
- All Time:
- 2,441
Comments: 3
3 guide comments.
Go to guide commentsCompleted: 3 4
3 people have marked this guide "completed." Will you be next?
4 people have marked this guide "completed." Including you — great job!
Favorites: 0 1
No one has favorited (and subscribed to) this guide. Will you be the first?
1 person has favorited (and subscribed to) this guide — and that's you!
Action Shots
Be an action hero! This guide needs images that better demonstrate how to perform specific actions.
Needs Better Images
Better photos will improve this guide. Help out by taking, editing, or uploading new ones!
Introduction
Go to step 1 ↓In this guide, you will learn how to remove or replace the battery of your laptop.
What you need


-
-
-
-
Carefully pry up the keyboard cover with your fingers or with a plastic spudger.
-
-
-
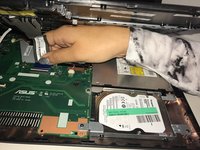
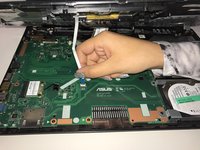
Remove electrical ribbons by gently lifting up the tab that is holding them down, then pulling them gently.
-

 Ask FixBot



To reassemble your device, follow these instructions in reverse order.
Cancel: I did not complete this guide.
3 other people completed this guide.

Team

Oakland University, Team 2-5, Ruskiewicz Winter 2017 Member of Oakland University, Team 2-5, Ruskiewicz Winter 2017
OAK-RUSKIEWICZ-W17S2G5
3 Members
24 Guides authored
3 Guide Comments
Peer review:
Step 1: This step is unclear and seems unnecessary. It should be removed or reworded to be more specific: "Position the laptop with the back cover facing upward."
Step 3: This step is also unclear and seems unnecessary. It should be removed or reworded: "Re-position the laptop with the back cover facing downward."
Step 5: This step is grammatically confusing and should be reworded. Example: "Lift up the tab covering the electrical ribbons. Pull the ribbons gently to remove them."
Steps 5 and 6 are missing photos so the instruction is not clear.
This was a easy and strait forward repair it took longer to find the tools than to do the repair. The hardest part for me was plugging the flex cables back in as I have a tremor in my hands. the repair took about 10 minutes.
