Introduction
When removing the battery, it may get damaged. The battery is rechargeable however may need replacement if it is broken.
What you need
-
-
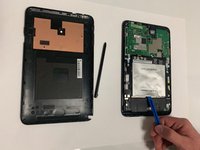
Remove the pen and memory card if you have them; they may get in the way when you are opening the device.
-
Pry open the edges of the cover using the plastic opening tool. The memory card slot is very useful for getting started.
 Ask FixBot
-
-
-
Move the opening tool along the edges of the tablet and push up wherever you can. You may need to open up all of the sides to take the panel off.
-
Pull apart the sides of the casing by hand.
-
-
-
-
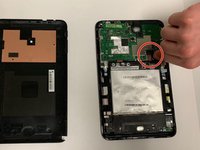
Disconnect the battery from the motherboard by pulling the side of the black plastic up.
-
-
-
Use a plastic opening tool to pry up the battery.
-
After the tape is loose take the battery out.
-


To reassemble your device, follow these instructions in reverse order. You will need adhesive to keep the battery stuck if the tape stops working.
Cancel: I did not complete this guide.
2 other people completed this guide.