
Asus TUF Gaming FX505DY Touchpad Replacement

What you need

  1. Asus TUF Gaming FX505DY Touchpad Replacement, Motherboard: step 1, image 1 of 3 Asus TUF Gaming FX505DY Touchpad Replacement, Motherboard: step 1, image 2 of 3 Asus TUF Gaming FX505DY Touchpad Replacement, Motherboard: step 1, image 3 of 3
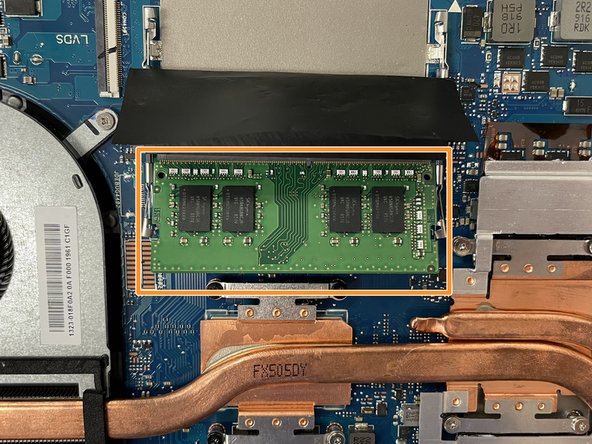
    • With a Phillips 0-bit screwdriver, remove eight 5.0 mm screws on the silver brackets

    • With a Phillips 0-bit screwdriver, remove two 5.0 mm screws holding the edge of the fans in place

  2. Asus TUF Gaming FX505DY Touchpad Replacement: step 2, image 1 of 3 Asus TUF Gaming FX505DY Touchpad Replacement: step 2, image 2 of 3 Asus TUF Gaming FX505DY Touchpad Replacement: step 2, image 3 of 3
    • Gently remove all power cables connecting the fans to the motherboard.

    • Once all cables and screws are removed, carefully lift up and remove the fans and heat sink

  3. Asus TUF Gaming FX505DY Touchpad Replacement: step 3, image 1 of 2 Asus TUF Gaming FX505DY Touchpad Replacement: step 3, image 2 of 2
    • With a Phillips 0-bit screwdriver, unscrew four 5.0 mm screws.

    • Disconnect the primary connector cable located at the bottom left and carefully remove the module.

  4. Asus TUF Gaming FX505DY Touchpad Replacement: step 4, image 1 of 3 Asus TUF Gaming FX505DY Touchpad Replacement: step 4, image 2 of 3 Asus TUF Gaming FX505DY Touchpad Replacement: step 4, image 3 of 3
    • Removing the ram, push down unto the ram and move the metal locking tabs to the side by lifting upward slightly then moving each to their outside.

    • Pull the ram out toward the angle when the ram is sticking up at an angle when released.

  5. Asus TUF Gaming FX505DY Touchpad Replacement: step 5, image 1 of 2 Asus TUF Gaming FX505DY Touchpad Replacement: step 5, image 2 of 2
    • With a Phillips 0-bit screwdriver, unscrew four 5.0 mm top screws holding the hard drive in place.

    • Pinch the top left corner with your finger and slide the harddrive out of its casing.

  6. Asus TUF Gaming FX505DY Touchpad Replacement: step 6, image 1 of 2 Asus TUF Gaming FX505DY Touchpad Replacement: step 6, image 2 of 2
    • With a Phillips 0-bit screwdriver, unscrew two 5.0 mm screws holding SSD down to the motherboard on the right side of the board

    • Slide module out of protective casing to remove piece.

  7. Asus TUF Gaming FX505DY Touchpad Replacement: step 7, image 1 of 3 Asus TUF Gaming FX505DY Touchpad Replacement: step 7, image 2 of 3 Asus TUF Gaming FX505DY Touchpad Replacement: step 7, image 3 of 3
    • With a size 0 Phillips screwdriver, unscrew three center 5 mm screws securing the board in place.

    • Carefully lift the board and place in a safe area.

  8. Asus TUF Gaming FX505DY Touchpad Replacement, Touchpad: step 8, image 1 of 3 Asus TUF Gaming FX505DY Touchpad Replacement, Touchpad: step 8, image 2 of 3 Asus TUF Gaming FX505DY Touchpad Replacement, Touchpad: step 8, image 3 of 3
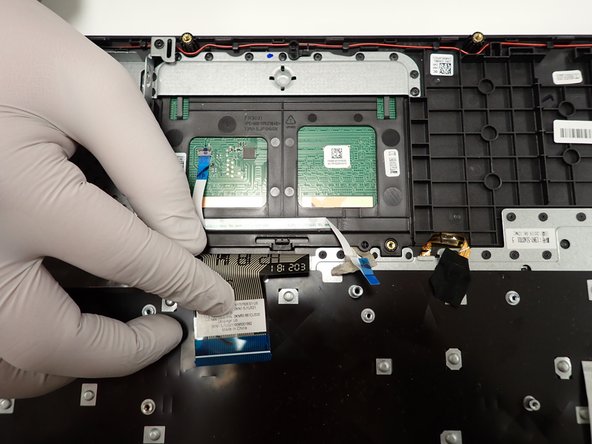
    • With a size 0 Phillips screwdriver, unscrew two 5 mm screws holding the trackpad in place located at the bottom of the trackpad.

    • Carefully unclip the connector base to remove the two touchpad cables.

    • Remove the trackpad by sliding forward and lifting up.

Conclusion

To reassemble your device, follow these instructions in reverse order.

One other person completed this guide.

0 Comments

Add Comment

View Statistics:

Past 24 Hours: 4

Past 7 Days: 15

Past 30 Days: 55

All Time: 784