Introduction
The Zephyrus G15 has 2 slots for storage: a primary M.2 slot, and a slot that can be populated by either a 2.5 inch drive or a second M.2 SSD. This guide assumes that the second drive is unpopulated and that the reader would like to install an M.2 SSD into that slot.
What you need
-
-
Have everything you will need on-hand at your workspace. This includes:
-
Your laptop, powered off and with its backplate facing up.
-
Your tools:
-
A Philips #0 screwdriver
-
Opening pick
-
Your choice between the spudger and the iFixit opening tool
-
The new SSD you wish to upgrade to.
-
A safe place to keep your screws organized.
-
-
-
If present, use the spudger to remove the rubber screw caps over the 3 screws in the center of the backplate.
-
Start by removing the center 3 screws, which are shorter than the top 6 of the outer 10 screws.
-
Then, remove the outer screws, with exception of the bottom corner screws. Note: The bottom 4 screws are the same length as the center 3
-
Finally, remove the two bottom corner screws. The one on the bottom right should lift the cover, making it easier to insert the opening pick in the next step. However, you cannot remove the bottom right screw.
-
-
-
-
As mentioned in the previous step, the captive bottom right screw lifts up the cover. Use this as a starting point for your opening pick.
-
Move your pick clockwise in the seam between the cover and the laptop, gently lifting the plastic clips that are holding them together.
-
Once you reach the hinge, go back to the starting point and use the pick to release the clips holding the cover on the right side. Be careful to work around the ethernet port and the audio jack.
-
Once those clips have been release, gently lift the cover with your hands, releasing the clips along the hinge.
-
-
-
You'll want to disconnect the battery to avoid any possible issues.
-
Gently push the metal clip holding the battery connector in place back using your spudger or your fingers.
-
Gently lift the white battery connector up from its housing.
-
-
-
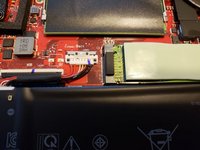
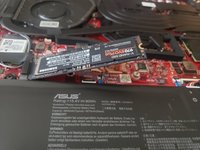
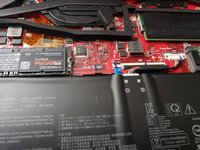
You should see an empty M.2 slot with a screw for your new drive. Carefully remove the screw.
-
-
-
Insert your new M.2 drive at a 35-45 degree angle.
-
Press down on the end of the drive to bring it against the motherboard and secure with the screw from the previous step.
-


To reassemble your device, follow these instructions in reverse order. And do not forget to reconnect your battery.
Once the drive has been installed, you’ll need to format your drive. Seagate has a helpful tutorial on how to do that here: https://youtu.be/Pijxdu7BKF8?t=132
Cancel: I did not complete this guide.
11 other people completed this guide.

5 Guide Comments
step 5. Motherboard flexing due to tight screw.
Would the flexing cause any problems? I had to press down hard to get leverage, it did flex quite a bit.
And how it "can be populated by either a 2.5 inch drive" ???
great instructions, might stress what way the battery clip moves back, other than that awesome!