
Asus ROG G750JH-DB71 Graphics Card Replacement

What you need

  1. Asus ROG G750JH-DB71 Graphics Card Replacement, Battery: step 1, image 1 of 2 Asus ROG G750JH-DB71 Graphics Card Replacement, Battery: step 1, image 2 of 2
    • Ensure the laptop is powered off and unplugged before beginning.

    • Flip the laptop over so the bottom case is facing up.

  2. Asus ROG G750JH-DB71 Graphics Card Replacement: step 2, image 1 of 3 Asus ROG G750JH-DB71 Graphics Card Replacement: step 2, image 2 of 3 Asus ROG G750JH-DB71 Graphics Card Replacement: step 2, image 3 of 3
    • Push the switch near the front of the laptop to release the battery from the computer.

    • Pull the battery out and away from the center of the computer.

  3. Asus ROG G750JH-DB71 Graphics Card Replacement, Asus ROG G750JH-DB71: step 3, image 1 of 3 Asus ROG G750JH-DB71 Graphics Card Replacement, Asus ROG G750JH-DB71: step 3, image 2 of 3 Asus ROG G750JH-DB71 Graphics Card Replacement, Asus ROG G750JH-DB71: step 3, image 3 of 3
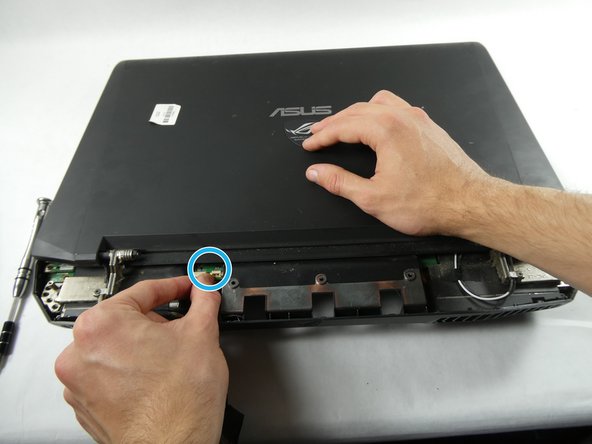
    • Use a spudger or your finger to lift up the plastic cover on the bottom of the laptop.

    • Under the plastic cover is a captive screw; unscrew it using a Phillips #00 screwdriver.

  4. Asus ROG G750JH-DB71 Graphics Card Replacement: step 4, image 1 of 2 Asus ROG G750JH-DB71 Graphics Card Replacement: step 4, image 2 of 2
    • Remove the cover.

    • If your goal is to replace/remove only the hard drive, you don't have to complete the following disassembly steps and can go on to the hard drive replacement guide.

  5. Asus ROG G750JH-DB71 Graphics Card Replacement: step 5, image 1 of 3 Asus ROG G750JH-DB71 Graphics Card Replacement: step 5, image 2 of 3 Asus ROG G750JH-DB71 Graphics Card Replacement: step 5, image 3 of 3
    • Remove the hard drive by unscrewing the 4.4 mm Phillips #00 screws.

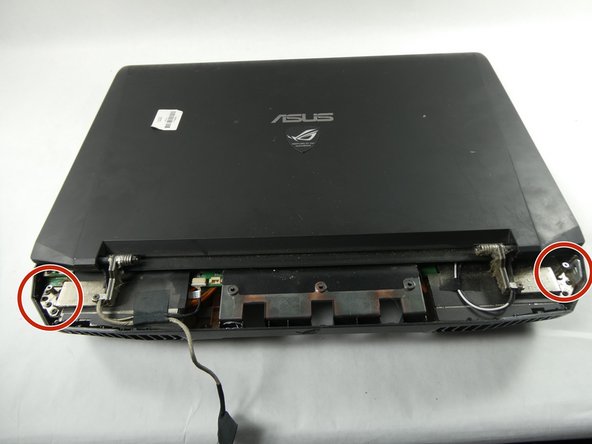
    • Remove all of the plastic caps around the edges using a pick or flathead screwdriver, and remove the screws underneath them. (one 13 mm Phillips #00, six 8 mm Phillips #00)

    • Remove the remaining screws underneath the cover . (six 8mm Phillips #00, three 1 mm Phillips #00)

  6. Asus ROG G750JH-DB71 Graphics Card Replacement: step 6, image 1 of 3 Asus ROG G750JH-DB71 Graphics Card Replacement: step 6, image 2 of 3 Asus ROG G750JH-DB71 Graphics Card Replacement: step 6, image 3 of 3
    • You will find a metal tab holding the CD Rom in place. Push on the tab with a flathead screwdriver or an iFixit tool to remove the CD Rom. It is located below a previously removed screw.

    • Do not pull the CD rom out from the side before pushing the metal tab as it will only damage the cover.

    • Remove the three (4 mm Phillips #00) screws that were previously covered by the CD rom.

  7. Asus ROG G750JH-DB71 Graphics Card Replacement: step 7, image 1 of 3 Asus ROG G750JH-DB71 Graphics Card Replacement: step 7, image 2 of 3 Asus ROG G750JH-DB71 Graphics Card Replacement: step 7, image 3 of 3
    • Once the screws are out and the CD rom is removed, the back cover can be taken off by hand.

    • Disconnect the speaker cables located in picture 1 and 2.

    • Remove two 8 mm Phillips #00 screws on each corner shown in picture 3.

  8. Asus ROG G750JH-DB71 Graphics Card Replacement: step 8, image 1 of 3 Asus ROG G750JH-DB71 Graphics Card Replacement: step 8, image 2 of 3 Asus ROG G750JH-DB71 Graphics Card Replacement: step 8, image 3 of 3
    • Pry the keyboard gently using the iFixit prying tool.

    • Make sure to unhook the cables and wires from the keyboard gently in Picture 3.

  9. Asus ROG G750JH-DB71 Graphics Card Replacement: step 9, image 1 of 2 Asus ROG G750JH-DB71 Graphics Card Replacement: step 9, image 2 of 2
    • Now you can pull the keyboard off but make sure to do so carefully without damaging or scuffing any components.

    • Pull up and out at an angle to avoid damaging the internals of the laptop.

  10. Asus ROG G750JH-DB71 Graphics Card Replacement, Fan: step 10, image 1 of 1
    • Remove the Data and Wi-fi cables from the sockets shown.

  11. Asus ROG G750JH-DB71 Graphics Card Replacement: step 11, image 1 of 3 Asus ROG G750JH-DB71 Graphics Card Replacement: step 11, image 2 of 3 Asus ROG G750JH-DB71 Graphics Card Replacement: step 11, image 3 of 3
    • Slowly close the lid and turn the device around.

    • Remove the 6 screws (3 on each side) from the edges of the device. (8mm Phillips 00)

    • Remove the Webcam cable.

  12. Asus ROG G750JH-DB71 Graphics Card Replacement: step 12, image 1 of 3 Asus ROG G750JH-DB71 Graphics Card Replacement: step 12, image 2 of 3 Asus ROG G750JH-DB71 Graphics Card Replacement: step 12, image 3 of 3
    • Carefully lift the lid away from the rest of the device.

    • There may be tape covering the fans or other components. Remove it slowly as to not damage anything.

  13. Asus ROG G750JH-DB71 Graphics Card Replacement: step 13, image 1 of 3 Asus ROG G750JH-DB71 Graphics Card Replacement: step 13, image 2 of 3 Asus ROG G750JH-DB71 Graphics Card Replacement: step 13, image 3 of 3
    • Remove the three screws surrounding each fan shown along with the ribbon cables connecting them to the motherboard. (4mm Phillips 00)

    • Remove the USB port board blocking the rightmost fan.

    • Remove the fans from the board.

  14. Asus ROG G750JH-DB71 Graphics Card Replacement, Graphics Card: step 14, image 1 of 2 Asus ROG G750JH-DB71 Graphics Card Replacement, Graphics Card: step 14, image 2 of 2
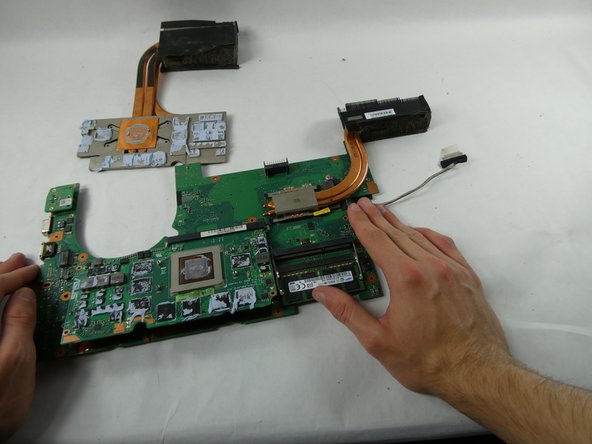
    • Use a Phillips #00 to remove seven 4.0 mm screws connecting the motherboard to the case.

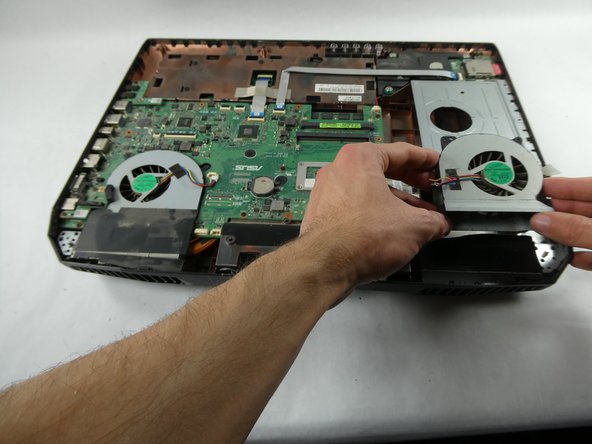
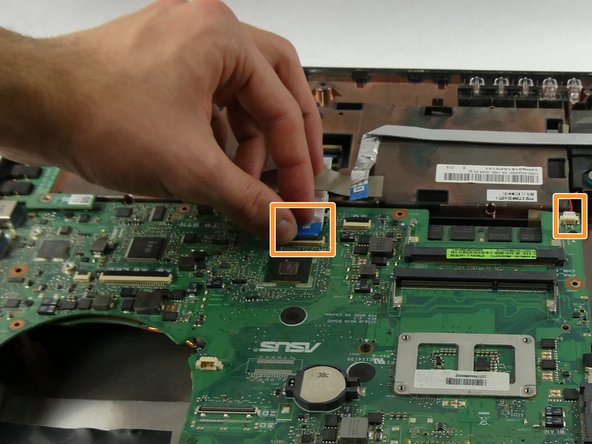
    • Disconnect the cables still attached to the main board.

  15. Asus ROG G750JH-DB71 Graphics Card Replacement: step 15, image 1 of 2 Asus ROG G750JH-DB71 Graphics Card Replacement: step 15, image 2 of 2
    • Slowly lift the main board out of the chassis.

  16. Asus ROG G750JH-DB71 Graphics Card Replacement: step 16, image 1 of 3 Asus ROG G750JH-DB71 Graphics Card Replacement: step 16, image 2 of 3 Asus ROG G750JH-DB71 Graphics Card Replacement: step 16, image 3 of 3
    • Use a Phillips #00 screwdriver to remove the four 4 mm screws connecting to the heat sink.

    • Use a Phillips #00 screwdriver to remove the three 1 mm screws connected to the board.

    • Lift the graphics card off to remove it from the main board.

Conclusion

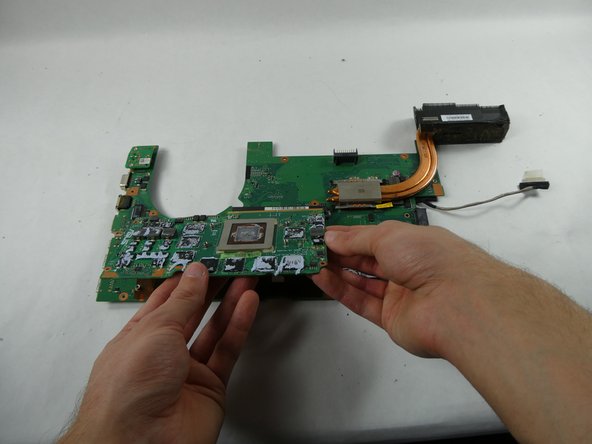
To reassemble your device, follow these instructions in reverse order.

James Mills

Member since: 10/25/22

471 Reputation

4 Guides authored

Team

0 Comments

Add Comment

View Statistics:

Past 24 Hours: 0

Past 7 Days: 3

Past 30 Days: 10

All Time: 245