Introduction
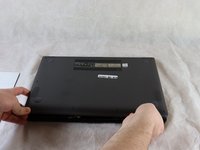
If you need to access any of the various components within the Asus Q525U, the back cover must be removed. Since the back cover protects the internal pieces of the laptop from the surrounding environment, careful attention must be made in order to fully remove and replace it.
Before beginning this repair, turn off your device and unplug from the power adapter.
What you need
-
-
-
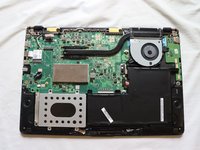
Carefully remove the two longer 9.5 mm screws on the corners with a Phillips #1 screwdriver.
-
Remove the eight 7.5 mm Phillips #1 screws on the back of the device.
 Ask FixBot
-
-
-
-
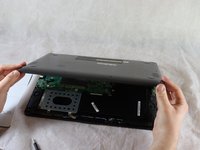
Once the cover has been separated from the device, carefully lift the back cover off the device (begin by lifting from the front of the cover first).
-
-


To reassemble your device, follow these instructions in reverse order.
Cancel: I did not complete this guide.
One other person completed this guide.

Team

Clemson, Team 2-5, Hunter Spring 2022 Member of Clemson, Team 2-5, Hunter Spring 2022
CLEM-HUNTER-S22S2G5
4 Members
12 Guides authored