
Asus Eee PC 1201N Keyboard Replacement

Trae Mikesell and
Last updated on Dec 20, 2016
Views: 1K
View statistics:
- Past 24 Hours:
- 2
- Past 7 Days:
- 21
- Past 30 Days:
- 84
- All Time:
- 1,039
Comments: 0
No one has left comments on this guide. Will you be first?
Go to guide commentsCompleted: 1 2
1 person has marked this guide "completed." Will you be next?
2 people have marked this guide "completed." Including you — great job!
Favorites: 0 1
No one has favorited (and subscribed to) this guide. Will you be the first?
1 person has favorited (and subscribed to) this guide — and that's you!
Introduction
Go to step 1 ↓If your keyboard is not working anymore you can easily replace the whole keyboard by following these few steps. Be sure to be careful when removing the keyboard that you do not pull it too far up before unlocking the ribbon connecting it to the motherboard.
What you need
Tools

-
-
-
-
Pull the tab on the right open, while you remove battery with your other hand.
-
-
-
-
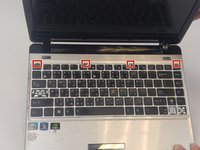
Open the netbook to find the four small grooves along the top of the keyboard.
-
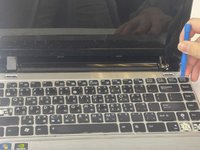
Pry the keyboard up using the plastic opening tool.
-
-
-
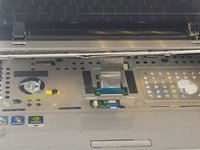
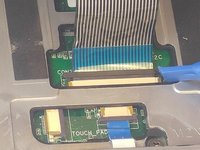
Tilt the keyboard away from you to access the connector. Gently push the lock toward the screen to unlock it and slide the ribbon out.
-
Remove the keyboard.
-
-

 Ask FixBot




To reassemble your device, follow these instructions in reverse order.
Cancel: I did not complete this guide.
One other person completed this guide.

Team

USF Tampa, Team 2-3, Nance Fall 2016 Member of USF Tampa, Team 2-3, Nance Fall 2016
USFT-NANCE-F16S2G3
4 Members
72 Guides authored
