Assembly Guide

Last updated on Nov 5, 2026
Views: 28
View statistics:
- Past 24 Hours:
- 28
- Past 7 Days:
- 28
- Past 30 Days:
- 28
- All Time:
- 28
Comments: 0
No one has left comments on this guide. Will you be first?
Go to guide commentsCompleted: 0 1
No one has marked this guide "completed." Will you be the first?
1 person has marked this guide "completed." It's you — great job!
Favorites: 0 1
No one has favorited (and subscribed to) this guide. Will you be the first?
1 person has favorited (and subscribed to) this guide — and that's you!
Introduction
Go to step 1 ↓Assembly guide for Bear X axis and carriage for Bondtech Prusa upgrade extruder
-
-
-
Follow the Bondtech Prusa i3 MK*** Upgrade Kit - Installation guide to assemble the Bondtech extruder body.
 Ask FixBot
-
-
-
Follow steps of Bear extruder assembly guide 1. Preflight check and disassembly
-
-
-
Assemble the Bear X axis using the Bear extruder guide 2. X axis.
-
-
-
-
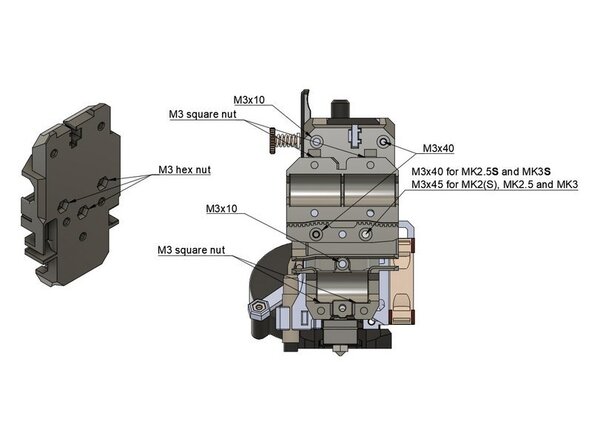
Attach the Bear X carriage to the Bondtech extruder following the images.
-
-
-
Assemble the Bondtech extruder on the Bear X axis using the Bear extruder guide 4. Extruder and X axis assembly.
-
-
-
Download the latest firmware from the Bondtech site: https://www.bondtech.se/en/knowledge-bas...
-
-
-
Finalize the assembly with the Bear extruder guide 5. Final adjustments and calibration using the firmware you have downloaded in the previous step.
-
-
-
Congratulations, you have finished to install and calibrate your Bondtech Prusa Upgrade extruder on Bear X axis.
-
Happy printing :)
-
-