
Apple Time Capsule Model A1302 Power Supply Replacement

What you need

  1. Apple Time Capsule Model A1302 Power Supply Replacement, Remove the rubber base: step 1, image 1 of 2 Apple Time Capsule Model A1302 Power Supply Replacement, Remove the rubber base: step 1, image 2 of 2
    • Place a piece of cloth or a similar soft material on a clean, flat surface. Place the device upside down on top of the fabric.

    • Open the Time Capsule by exposing the screws that hold the device together. The screws are concealed by the rubber base, which is the bottom surface of the device.

    • Use a heat gun or hair dryer to heat the rubber base, which softens the adhesive holding it on.

    • Starting in a corner, carefully lift the rubber base to prevent tearing. You can use a guitar pick or a small, plastic ruler to help separate the rubber from the metal.

    • Take your time to prevent tearing the adhesive. Ensure that you don't overheat the device.

    • If you tear some of the adhesive, don't worry. The existing adhesive is more than enough to allow the rubber base to stick back onto the unit during reassembly.

    • During reassembly, you can apply heat to the rubber base. This will enable the adhesive to flow and form a better bond with the device's metal casing.

  2. Apple Time Capsule Model A1302 Power Supply Replacement, Remove the screws: step 2, image 1 of 2 Apple Time Capsule Model A1302 Power Supply Replacement, Remove the screws: step 2, image 2 of 2
    • Once the rubber base is separated from the device, remove the 8 Phillips PH00 screws that attach the metal bottom of the case to the plastic top of the case.

    • Use the Philiips #00 Screwdriver.

    • Some revisions of the Time Capsule have 10 screws. The A1254 revision has two screws in the upper right and lower left corners, as shown in the second image. In this situation, be sure to remove all 10 screws.

  3. Apple Time Capsule Model A1302 Power Supply Replacement, Open the Time Capsule: step 3, image 1 of 2 Apple Time Capsule Model A1302 Power Supply Replacement, Open the Time Capsule: step 3, image 2 of 2
    • Position the rear side of the device (the side with Ethernet connectors) so that it is facing you.

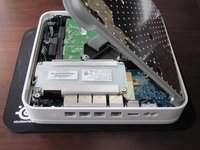
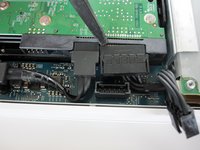
    • Lift up the left side of the metal plate and slowly flip it over the right edge of the device.

    • To prevent damage, do not lift the metal plate straight up or use force. As shown in the second picture, the fan is attached to the metal plate and connected to the logic board next to the power connector.

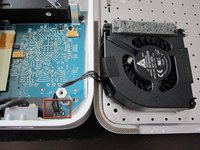
    • Since many people have had serious problems with the fan power connnector breaking, it is advisable to NOT try to disconnect the fan power connector. Be VERY careful with this connector. It is extremely fragile. If you absolutely have to disconnect the fan from the logic board, VERY carefully use a spudger or tweezers to do so.

  4. Apple Time Capsule Model A1302 Power Supply Replacement, Power Supply: step 4, image 1 of 2 Apple Time Capsule Model A1302 Power Supply Replacement, Power Supply: step 4, image 2 of 2
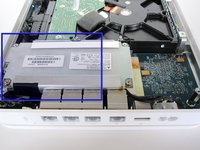
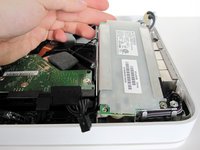
    • Power supply shown in blue

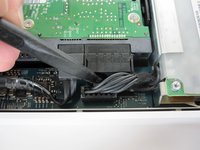
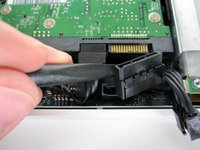
    • Start by removing the AC plug by lifting it straight up.

  5. Apple Time Capsule Model A1302 Power Supply Replacement: step 5, image 1 of 3 Apple Time Capsule Model A1302 Power Supply Replacement: step 5, image 2 of 3 Apple Time Capsule Model A1302 Power Supply Replacement: step 5, image 3 of 3
    • Using a spudger, unplug the cable that supplies the motherboard with power. There's a clip to release the locking mechanism; make sure to press and release the clip before pulling up on the connector.

    • Then, using the same spudger, unplug the HDD power cable.

    • If you're not used to working with data plugs in tight spaces it could be a good idea to remove the HDD first. Consult the HDD removal guide for instructions.

  6. Apple Time Capsule Model A1302 Power Supply Replacement: step 6, image 1 of 2 Apple Time Capsule Model A1302 Power Supply Replacement: step 6, image 2 of 2
    • Lift the power supply out of its mountings.

    • The mounts can snag the motherboard somewhat. Just fiddle it a little and it will come loose.

Conclusion

To reassemble your device, follow these instructions in reverse order.

93 other people completed this guide.

rousp

Member since: 02/18/10

6,653 Reputation

4 Guides authored

13 Comments

Hi there,

thanks a lot for this topic,

I have no problems getting there to change the power supply, my only concern is where can i find a replacement power supply?

thanks

flow sebastien - Reply

as with sebastien... I too need to replace the power supply... but the power supply page is blank. Can someone please advise?

Michael - Reply

Hi there,

if you like me want the cheapest repair for your time capsule, it is possible to repair the power supply for as less as 2$

http://raphsallyoucanknow.blogspot.ch/20...

raphael - Reply

Hello,

Nice guide!

However, where can we find a reliable power supply?

Muchas gracias!!

Valyno

valyno - Reply

The power supply has electrolytic condensers. they age: the electrolyte evaporates, or the leads corrode. you can solder them out and replace them. mine died after 6 years because the 39uF 400volt, the long ones kicked the bucket. i replaced them for 5euro each and my unit is back online

wilfried - Reply

Add Comment

View Statistics:

Past 24 Hours: 3

Past 7 Days: 23

Past 30 Days: 102

All Time: 109,304