What you need
-
-
Follow the Apple Lisa Disassembly Guide to remove the Lisa's real panel.
-
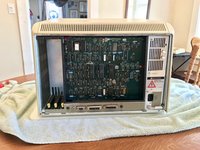
Remove the Lisa's Card Cage.
-
-
-
Remove the CPU Board. It is marked in blue.
-
Lift up on the CPU Board's clips.
-
Lift up the CPU Board to remove.
-
-
-
-
Locate the CPU at location 13A/B/C (the big one.)
-
Remove the CPU. I used a flat head screwdriver to gently pry up the chip although there are better tools such as a Chip Remover.
-
-
-
Insert the XLerator in the CPU's socket.
-
Ensure it "click" in all the way.
-
If the XLerator seems loose then use electrical tape at your discretion to secure it to the CPU Board.
-
-
-
Reinstall the CPU Board into the Lisa's Card Cage.
-
Reinstall the Lisa's Card Cage into the Lisa.
-
Reinstall the Lisa's rear panel.
-
-
-
XLerator software can be found on the MacWorks + II (MW+II) Installation floppy.
-


To reassemble your device, follow these instructions in reverse order.
