
Apex Tablet 7 Back Panel Replacement

Steven Gutzwiller and 5 other contributors
Last updated on Jan 17, 2018
Views: 1.2K
View statistics:
- Past 24 Hours:
- 1
- Past 7 Days:
- 16
- Past 30 Days:
- 99
- All Time:
- 1,220
Comments: 1
1 comment on steps.
Completed: 2 3
2 people have marked this guide "completed." Will you be next?
3 people have marked this guide "completed." Including you — great job!
Favorites: 0 1
No one has favorited (and subscribed to) this guide. Will you be the first?
1 person has favorited (and subscribed to) this guide — and that's you!
Needs Better Images
Better photos will improve this guide. Help out by taking, editing, or uploading new ones!
Introduction
Go to step 1 ↓This guide will show you how to open the back panel. This will allow the user to gain access to the device components and is necessary for most replacements and repairs for the Apex Tablet 7.
What you need
Tools


-
-
-
Unscrew the two 2.70 mm Phillips #00 screws on the side of the tablet that has the buttons and the headphone jack (bottom side when holding upright).
 Ask FixBot
-
-
-
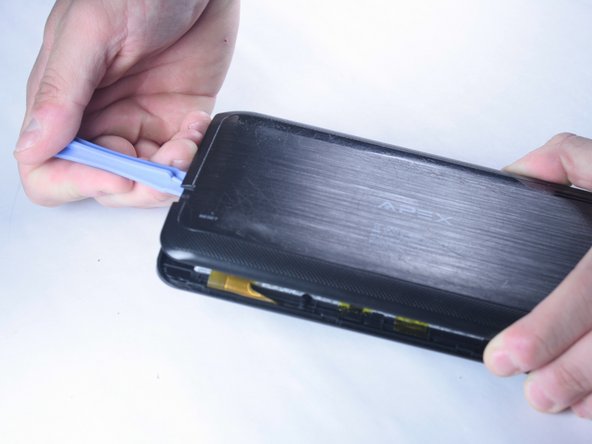
Slide a plastic opening tool in between the edge of the back panel and the the top edge of the device.
-
Run the plastic opening tool along the sides of the tablet while keeping it in the crack between the tablet and the back panel to create an opening.
-
-
-
Apply pressure using your hand to pop the back panel off slowly, taking extra care around the speaker connection.
-
-
-
-
The back panel should now be disconnected from the device. This provides access to the components of the device for repairing and replacing parts of the tablet.
-
-




To reassemble your device, follow these instructions in reverse order.
Cancel: I did not complete this guide.
2 other people completed this guide.

Team

Baylor, Team 2-2, Grigsby Spring 2015 Member of Baylor, Team 2-2, Grigsby Spring 2015
BU-GRIGSBY-S15S2G2
4 Members
60 Guides authored
