Answering Machine Speaker Replacement

What you need

  1. Answering Machine Speaker Replacement, Base: step 1, image 1 of 1
    • Turn the base over. You will see four 11mm Phillips #0 screws, one in each corner.

    • Use a screwdriver to remove all four 11mm Phillips #0 screws.

  2. Answering Machine Speaker Replacement: step 2, image 1 of 2 Answering Machine Speaker Replacement: step 2, image 2 of 2
    • Locate an easy seam for entry and insert the metal spudger to separate the plastic. Use the spudger in multiple places if necessary.

    • Opening the base may require exerting significant force as it is bound together tightly. This step can be dangerous.

    • The spudger is designed to make this step easier.

  3. Answering Machine Speaker Replacement, Answering Machine Speaker: step 3, image 1 of 2 Answering Machine Speaker Replacement, Answering Machine Speaker: step 3, image 2 of 2
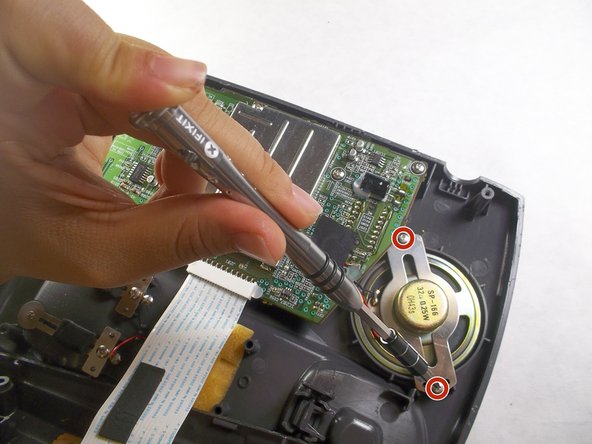
    • Locate the speaker at the top left of the base as pictured. It is the silver, conical component. Two 7mm Phillips #0 screws hold the speaker in place.

    • Use a screwdriver to remove the two 7mm Phillips #0 screws.

  4. Answering Machine Speaker Replacement: step 4, image 1 of 1
    • Finish speaker removal by cutting both the black and red wires.

  5. Answering Machine Speaker Replacement: step 5, image 1 of 1
Conclusion

To reassemble your device, follow these instructions in reverse order.

Troy Chester

Member since: 09/29/16

66 Reputation

1 Guide authored

Team

IUPUI, Team 3-3, Harley Fall 2016 Member of IUPUI, Team 3-3, Harley Fall 2016

IUPUI-HARLEY-F16S3G3

4 Members

17 Guides authored

0 Comments

Add Comment

View Statistics:

Past 24 Hours: 0

Past 7 Days: 0

Past 30 Days: 1

All Time: 628