
Amazon Echo Studio Speakers Replacement

What you need

  1. Amazon Echo Studio Speakers Replacement, Power Supply Board: step 1, image 1 of 3 Amazon Echo Studio Speakers Replacement, Power Supply Board: step 1, image 2 of 3 Amazon Echo Studio Speakers Replacement, Power Supply Board: step 1, image 3 of 3
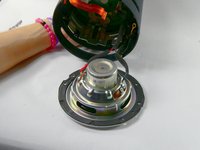
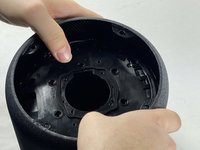
    • Flip the device upside down.

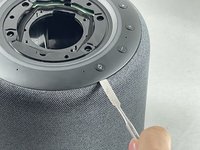
    • Pry up the edge of the rubber base panel with a spudger, then pull the rest of it off by hand.

  2. Amazon Echo Studio Speakers Replacement: step 2, image 1 of 3 Amazon Echo Studio Speakers Replacement: step 2, image 2 of 3 Amazon Echo Studio Speakers Replacement: step 2, image 3 of 3
    • Use a T15 Torx screwdriver to remove the nine 3.2 mm screws.

    • Use a Torx T10 screwdriver to remove the six 2.7 mm screws.

    • After removing the screws, gently lift the base off, with care not to damage any of the connected cables.

  3. Amazon Echo Studio Speakers Replacement: step 3, image 1 of 3 Amazon Echo Studio Speakers Replacement: step 3, image 2 of 3 Amazon Echo Studio Speakers Replacement: step 3, image 3 of 3
    • Before fully removing the base, remove the three attached connectors.

  4. Amazon Echo Studio Speakers Replacement: step 4, image 1 of 2 Amazon Echo Studio Speakers Replacement: step 4, image 2 of 2
    • Now unscrew the the single 10 mm Phillips screw.

    • Remove the power supply board.

  5. Amazon Echo Studio Speakers Replacement, Subwoofer: step 5, image 1 of 1
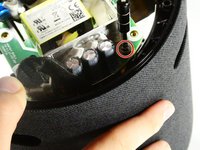
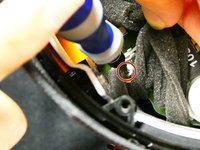
    • Remove the two screws located across from each other on the outside of the plastic ring shown.

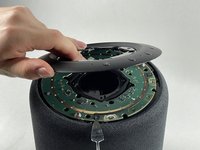
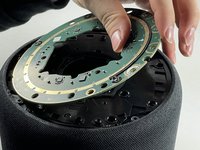
    • Remove the plastic outer ring that hugs the inside of the edges of the device.

    • This may require you to use a soft prying tool to separate it from the outer shell.

  6. Amazon Echo Studio Speakers Replacement: step 6, image 1 of 3 Amazon Echo Studio Speakers Replacement: step 6, image 2 of 3 Amazon Echo Studio Speakers Replacement: step 6, image 3 of 3
    • Remove the two 2.7 mm screws with a T10 Torx screwdriver.

    • Once the screws are removed, take the power supply's baseplate out of the unit.

    • You may need to gently pry the subwoofer's air ports from the round slots In the side of the unit.

  7. Amazon Echo Studio Speakers Replacement: step 7, image 1 of 2 Amazon Echo Studio Speakers Replacement: step 7, image 2 of 2
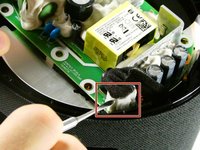
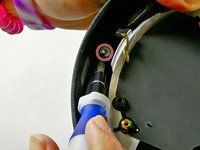
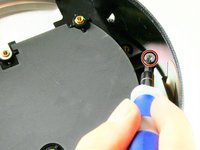
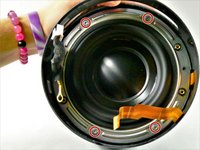
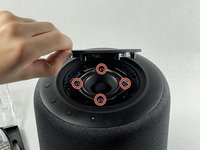
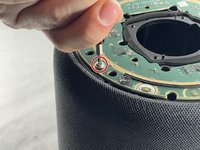
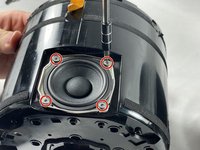
    • On the silver ring located on the outer edge of the plastic portion of the subwoofer, you will see four 2.7 mm screws. Use a Torx T10 screwdriver to remove them, in order to remove of the subwoofer.

    • Once the four screws have been removed, gently pull the subwoofer out as to not damage the wiring connecting the subwoofer to the main board inside the unit.

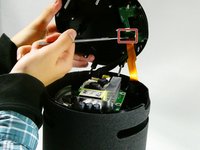
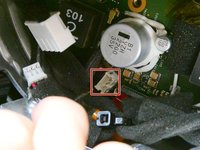
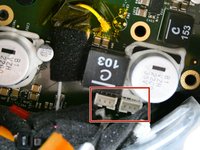
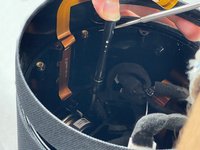
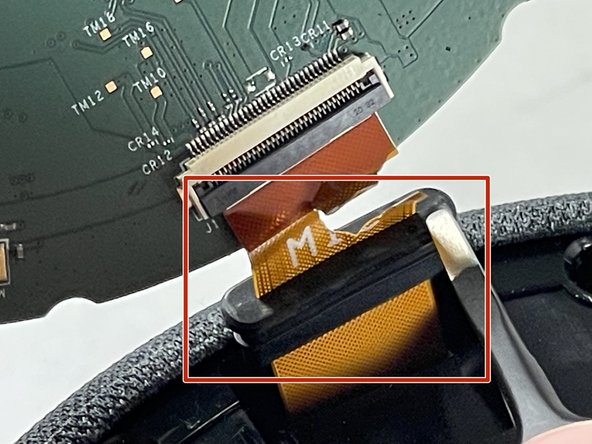
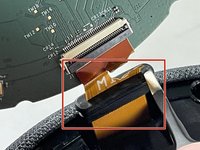
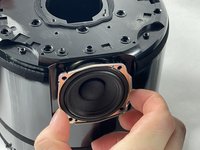
    • Follow the wires from the subwoofer to the main board and disconnect the connector attaching them.

    • Your subwoofer is now disconnected and ready to be replaced.

  8. Amazon Echo Studio Speakers Replacement, Motherboard: step 8, image 1 of 2 Amazon Echo Studio Speakers Replacement, Motherboard: step 8, image 2 of 2
    • Remove the thirteen 9 mm Phillips #00 screws.

    • Some screws may be hidden by other components; simply hold them out of your way during screw removal.

  9. Amazon Echo Studio Speakers Replacement: step 9, image 1 of 1
    • Unfasten the Phillips 9mm screws, using the Phillips #00 Screwdriver.

    • There may be obstruction against some screws, which can be avoided by using a spudger or your hand.

  10. Amazon Echo Studio Speakers Replacement: step 10, image 1 of 3 Amazon Echo Studio Speakers Replacement: step 10, image 2 of 3 Amazon Echo Studio Speakers Replacement: step 10, image 3 of 3
    • After removing the screws, locate the four power connectors on the motherboard and detach them from the motherboard.

  11. Amazon Echo Studio Speakers Replacement: step 11, image 1 of 1
    • Remove the motherboard from the device by pulling it out.

    • Be careful to not damage any of the loose wires inside the case while removing the motherboard.

  12. Amazon Echo Studio Speakers Replacement, Top and Side Speakers: step 12, image 1 of 3 Amazon Echo Studio Speakers Replacement, Top and Side Speakers: step 12, image 2 of 3 Amazon Echo Studio Speakers Replacement, Top and Side Speakers: step 12, image 3 of 3
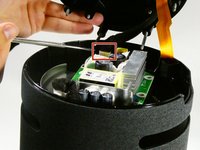
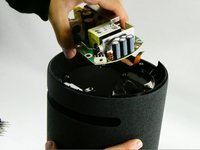
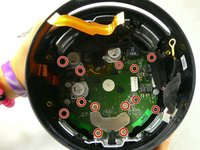
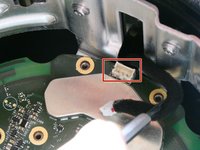
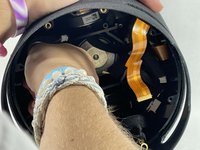
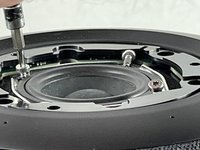
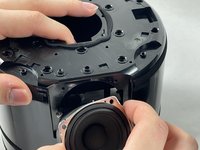
    • After removing the motherboard, you should be able to see both of the side speakers and top speaker.

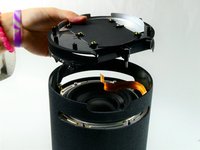
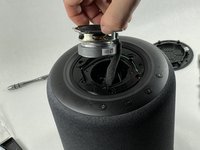
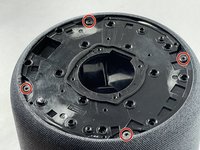
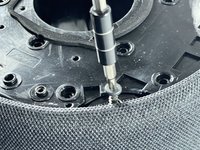
    • You will need to find and remove six 10mm screws to take off the top speaker's cover.

    • Unfortunately, it can be very risky to get these screws out without a thin, magnetic screwdriver, due to the minimal space between the frame and side speakers.

  13. Amazon Echo Studio Speakers Replacement: step 13, image 1 of 2 Amazon Echo Studio Speakers Replacement: step 13, image 2 of 2
    • After unscrewing the lid on the inside, you should be able to lift off the cover

    • Now remove four 2.7 mm screws with a Torx T10 screwdriver.

  14. Amazon Echo Studio Speakers Replacement: step 14, image 1 of 3 Amazon Echo Studio Speakers Replacement: step 14, image 2 of 3 Amazon Echo Studio Speakers Replacement: step 14, image 3 of 3
    • Before taking out the top speaker, first find and remove it's connector inside.

    • This connecter should have already been disconnected while removing the motherboard, but if it's still attached to the cable tie, you can just snip it in order to get the speaker out.

    • After snipping the tie, now pull the speaker out from the top.

  15. Amazon Echo Studio Speakers Replacement: step 15, image 1 of 2 Amazon Echo Studio Speakers Replacement: step 15, image 2 of 2
    • Lift the plastic lid with the buttons on top of the case.

    • If you feel resistance while removing the top plastic cover, make sure you removed every screw from the inside.

  16. Amazon Echo Studio Speakers Replacement: step 16, image 1 of 3 Amazon Echo Studio Speakers Replacement: step 16, image 2 of 3 Amazon Echo Studio Speakers Replacement: step 16, image 3 of 3
    • Unscrew and disconnect the lightboard.

    • Be careful not to break the connector; it is deceptively fragile.

  17. Amazon Echo Studio Speakers Replacement: step 17, image 1 of 3 Amazon Echo Studio Speakers Replacement: step 17, image 2 of 3 Amazon Echo Studio Speakers Replacement: step 17, image 3 of 3
    • Once the lightboard is out, you should be able to see the frame inside of the case. You can unscrew it from the case, and then take it out.

    • Taking the frame out may require a significant amount of force, be careful not to break anything inside.

  18. Amazon Echo Studio Speakers Replacement: step 18, image 1 of 3 Amazon Echo Studio Speakers Replacement: step 18, image 2 of 3 Amazon Echo Studio Speakers Replacement: step 18, image 3 of 3
    • With the frame outside of the case, you can now spot the 3 side speakers.

    • To take the speakers out, unscrew the four sets of four 2.74 m screws with a T10 Torx screwdriver, and they should lift right out.

Conclusion

To reassemble your device, follow these instructions in reverse order.

One other person completed this guide.

Nick Saranich

Member since: 10/24/22

292 Reputation

2 Guides authored

Team

UMass Dartmouth, Team 2-6, Petersen Fall 2022 Member of UMass Dartmouth, Team 2-6, Petersen Fall 2022

UMASSD-PETERSEN-F22S2G6

4 Members

6 Guides authored

0 Comments

Add Comment

View Statistics:

Past 24 Hours: 0

Past 7 Days: 6

Past 30 Days: 32

All Time: 742