
Alienware AW610M Battery Replacement

What you need

  1. Alienware AW610M Battery Replacement, Battery: step 1, image 1 of 3 Alienware AW610M Battery Replacement, Battery: step 1, image 2 of 3 Alienware AW610M Battery Replacement, Battery: step 1, image 3 of 3
    • Power off the mouse and disconnect any wired connections.

  2. Alienware AW610M Battery Replacement: step 2, image 1 of 2 Alienware AW610M Battery Replacement: step 2, image 2 of 2
    • Use a spudger to gently lift and remove the old mouse feet.

    • If the feet are sticky, try lifting slowly from one corner to avoid tearing them.

    • Be careful not to scratch the mouse surface or damage the plastic housing.

  3. Alienware AW610M Battery Replacement: step 3, image 1 of 3 Alienware AW610M Battery Replacement: step 3, image 2 of 3 Alienware AW610M Battery Replacement: step 3, image 3 of 3
    • Remove the four 6.5 mm screws using a Y1 Tri-Point screwdriver.

  4. Alienware AW610M Battery Replacement: step 4, image 1 of 2 Alienware AW610M Battery Replacement: step 4, image 2 of 2
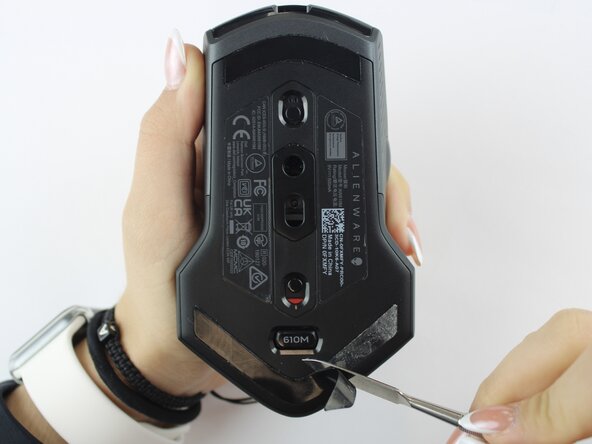
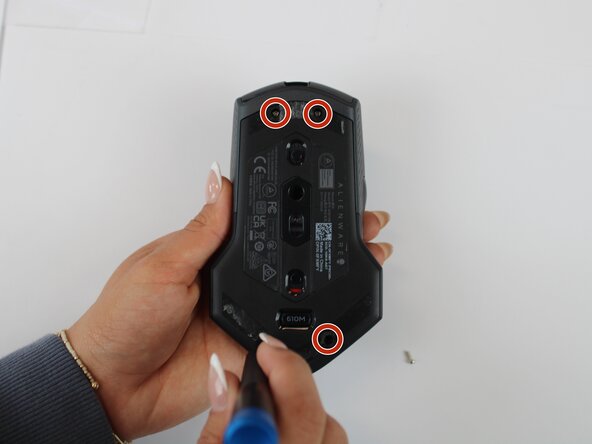
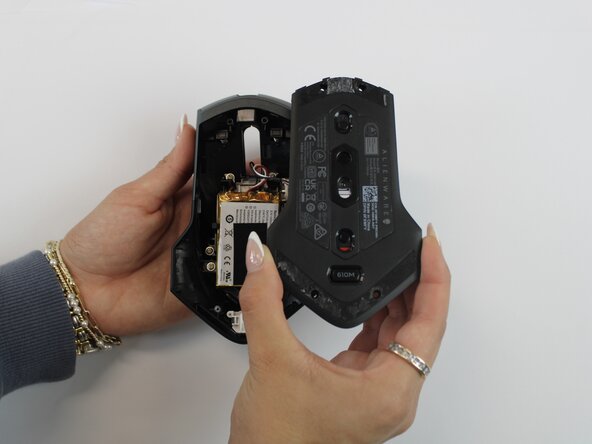
    • Using an opening tool, gently pry apart the two halves of the mouse case. Start at the seam and work your way around until the housing is separated.

    • Don't pull the halves completely apart, as internal wires still connect them.

  5. Alienware AW610M Battery Replacement: step 5, image 1 of 3 Alienware AW610M Battery Replacement: step 5, image 2 of 3 Alienware AW610M Battery Replacement: step 5, image 3 of 3
    • Remove the battery pack inside the mouse.

    • If you are having trouble, use a small flat tool to help ease it out.

    • The battery is lightly glued to the mouse, so ease it out gently to avoid breaking the battery or wiring

  6. Alienware AW610M Battery Replacement: step 6, image 1 of 2 Alienware AW610M Battery Replacement: step 6, image 2 of 2
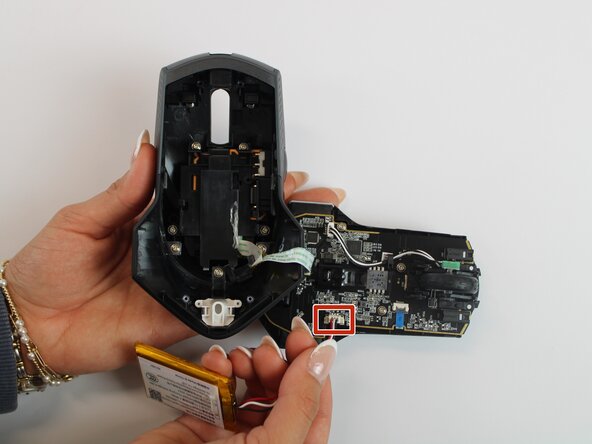
    • Remove the old battery from its spot. Lift the wire connector away from the mainboard to disconnect it.

    • Make sure all wires are inside the mouse before sealing it shut for easy reassembly.

Conclusion

To reassemble your device, follow these instructions in reverse order.

Darby Brandt

Member since: 09/24/25

391 Reputation

2 Guides authored

Team

Texas Tech, Team 46-4, Johansen Fall 2025 Member of Texas Tech, Team 46-4, Johansen Fall 2025

TTU-JOHANSEN-F25S46G4

4 Members

5 Guides authored

0 Guide Comments

Add Comment

View Statistics:

Past 24 Hours: 3

Past 7 Days: 8

Past 30 Days: 19

All Time: 58