Free Shipping on Domestic Orders $75+

Alarmo CMOS Battery Replacement

What you need

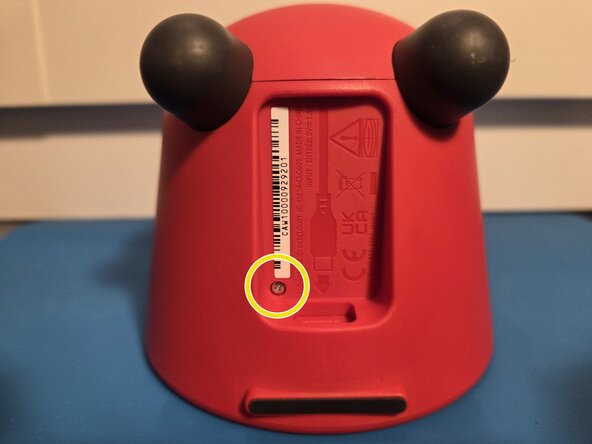
  1. Alarmo CMOS Battery Replacement, Removing the outer screw.: step 1, image 1 of 1
    • Flip your Alarmo so you can see the USB-C port.

    • Use a tri-point Y00 driver to remove the silver screw just below the S/N sticker.

    Ask FixBot
  2. Alarmo CMOS Battery Replacement, Opening the alarmo.: step 2, image 1 of 2 Alarmo CMOS Battery Replacement, Opening the alarmo.: step 2, image 2 of 2
    • Turn the Alarmo's Frontplate counter-clockwise until it pops out.

    Ask FixBot
  3. Alarmo CMOS Battery Replacement, Unscrewing CMOS battery bracket and cover.: step 3, image 1 of 2 Alarmo CMOS Battery Replacement, Unscrewing CMOS battery bracket and cover.: step 3, image 2 of 2
    • Use a Philips #00 driver to remove the silver screws in the CMOS bracket and cover.

    • The screw on the black CMOS battery cover won't come off, but it will allow the cover to be removed.

    Ask FixBot
  4. Alarmo CMOS Battery Replacement, Removing the CMOS battery.: step 4, image 1 of 2 Alarmo CMOS Battery Replacement, Removing the CMOS battery.: step 4, image 2 of 2
    • Remove the battery cover, flip the bracket upside down, and the battery will come off.

    Ask FixBot
  5. Alarmo CMOS Battery Replacement, Inserting the new CMOS battery.: step 5, image 1 of 1
    • Insert your new battery with the positive side facing up.

    Ask FixBot
  6. Alarmo CMOS Battery Replacement, Re-inserting the CMOS battery bracket.: step 6, image 1 of 1
    • Use a Philips #00 driver to rescrew the two silver screws that hold the CMOS bracket.

    Ask FixBot
  7. Alarmo CMOS Battery Replacement, Re-inserting the CMOS battery cover.: step 7, image 1 of 1
    • Use a Philips #00 driver to rescrew the silver screw that hold the CMOS cover.

    Ask FixBot
  8. Alarmo CMOS Battery Replacement, Closing the alarmo.: step 8, image 1 of 1
    • Snap the front plate with the back of the alarmo.

    • Align the charging port with the charging port hole.

    Ask FixBot
  9. Alarmo CMOS Battery Replacement, Locking the faceplate.: step 9, image 1 of 1
    • Turn the faceplate clockwise as much as you can.

    • Check the USB-C port at the back to see if you aligned it correctly.

    Ask FixBot
  10. Alarmo CMOS Battery Replacement, Screwing the outer screw.: step 10, image 1 of 1
    • Use a tri-point Y00 driver to screw the silver screw just below the S/N sticker.

    Ask FixBot
Conclusion

You swapped the battery! No more steps required.

When you power on the alarmo, the clock will be set at 1AM at 01/01. It will be adjusted automatically after a few seconds if you have an internet connection set up. If you don't have an internet connection or it doesn't adjust after a minute, you can adjust the Time and Date at settings -> Date and Time.

Please throw your old battery in a battery collection point.

One other person completed this guide.

Dante

Member since: 03/07/26

1 Reputation

1 Guide authored

0 Guide Comments

Add Comment

View Statistics:

Past 24 Hours: 1

Past 7 Days: 7

Past 30 Days: 37

All Time: 125