Introduction
The RAM chip is necessary for even basic operation of the device, providing memory for the computer's processing. If there is not enough memory on your RAM chip, the device will run very slowly and may become unresponsive. If your RAM is corrupted or improperly mounted, the computer will fail to clear POST (Power On Self-Test) and will be unusable. If you have followed the steps in the Troubleshooting Guide and found that you need a RAM upgrade, this step-by-step guide will lead you through the process of removing the battery, back-plate, and RAM chip.
What you need
-
-
Ensure the device is powered off by holding down the power button on the top left-hand side.
-
On a flat, level surface, flip the device over so that the back-plate is accessible.
-
-
-
-
Using the JIS J1 Screwdriver Bit and Driver, remove the center screw (7.0 mm) from the back-plate.
-
Using your hands, slide the back-plate away from the center of the device and remove.
-
-
-
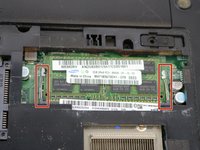
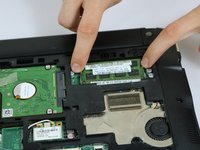
Using two fingers, push the clamps away from the RAM chip, releasing it from the motherboard.
-
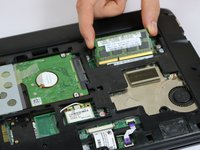
Carefully remove the RAM chip by pulling it out and away from the center of the device.
-


To reassemble your device, follow these instructions in reverse order.
Cancel: I did not complete this guide.
2 other people completed this guide.
Team

USF Tampa, Team 8-3, Eyestone Spring 2017 Member of USF Tampa, Team 8-3, Eyestone Spring 2017
USFT-EYESTONE-S17S8G3
4 Members
16 Guides authored