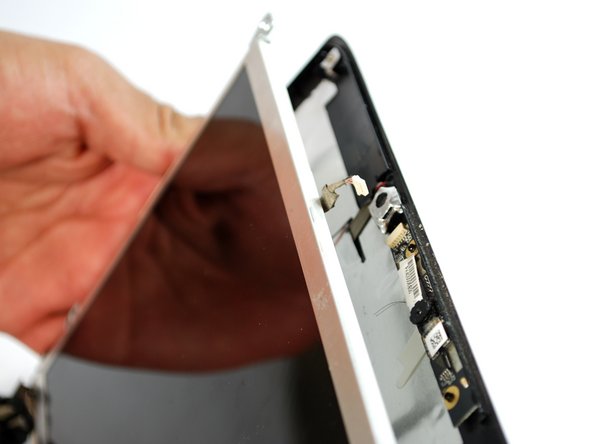
Acer Aspire One 532h-2527 Screen Replacement

What you need

  1. Acer Aspire One 532h-2527  Screen Replacement, Battery: step 1, image 1 of 1
    • Press the power button to turn off the netbook.

  2. Acer Aspire One 532h-2527  Screen Replacement: step 2, image 1 of 1
    • Place the netbook bottom-side-up on a flat surface.

    • Locate the unlock latch on the top right corner of the back.

  3. Acer Aspire One 532h-2527  Screen Replacement: step 3, image 1 of 1
    • To unlock the battery, slide the lock latch in the direction indicated by the unlocking icon. You should see the orange indicator which means that the latch is unlocked.

  4. Acer Aspire One 532h-2527  Screen Replacement: step 4, image 1 of 3 Acer Aspire One 532h-2527  Screen Replacement: step 4, image 2 of 3 Acer Aspire One 532h-2527  Screen Replacement: step 4, image 3 of 3
    • On the opposite side, slide and hold the release latch.

    • Gently slide the battery out.

  5. Acer Aspire One 532h-2527  Screen Replacement, Screen: step 5, image 1 of 1
    • Remove the two small circular stickers located on each side at the bottom of the screen.

    • Once stickers are removed, you should see a Phillips screw head underneath each sticker.

  6. Acer Aspire One 532h-2527  Screen Replacement: step 6, image 1 of 2 Acer Aspire One 532h-2527  Screen Replacement: step 6, image 2 of 2
    • Use the #0 Phillips Screw bit with the Screwdriver to remove the two 6mm Phillips screws from the bottom of the screen.

    • The screws are located where the stickers were in the previous step.

  7. Acer Aspire One 532h-2527  Screen Replacement: step 7, image 1 of 3 Acer Aspire One 532h-2527  Screen Replacement: step 7, image 2 of 3 Acer Aspire One 532h-2527  Screen Replacement: step 7, image 3 of 3
    • Using the plastic opening tool, gently separate the front plastic cover from the screen.

    • You should hear clicks as you go about removing the plastic cover.

  8. Acer Aspire One 532h-2527  Screen Replacement: step 8, image 1 of 1
    • Locate the four Phillips screws holding the screen in place.

    • Using the #0 Phillips Screw bit with the Screwdriver, remove the four 6mm Phillips screws around the screen.

  9. Acer Aspire One 532h-2527  Screen Replacement: step 9, image 1 of 2 Acer Aspire One 532h-2527  Screen Replacement: step 9, image 2 of 2
    • Using the plastic opening tool, gently lift the screen up from the back of the plastic laptop cover.

    • Use the plastic opening tool to remove the no fuss ribbon connector from the webcam component.

  10. Acer Aspire One 532h-2527  Screen Replacement: step 10, image 1 of 2 Acer Aspire One 532h-2527  Screen Replacement: step 10, image 2 of 2
    • Locate the no fuss ribbon connector wire.

    • Peel it from the backside of the screen.

  11. Acer Aspire One 532h-2527  Screen Replacement: step 11, image 1 of 2 Acer Aspire One 532h-2527  Screen Replacement: step 11, image 2 of 2
    • Locate the yellow tape on the back of the screen and peel it off partially.

    • Locate the ZIF (zero insertion force) connector cable.

    • Carefully unplug the ZIF connector.

    • No excess force is needed to remove the ZIF connector as its name implies.

    • Be sure to only pull the connector from its head and not the ribbon wire as it is very delicate.

  12. Acer Aspire One 532h-2527  Screen Replacement: step 12, image 1 of 2 Acer Aspire One 532h-2527  Screen Replacement: step 12, image 2 of 2
    • Locate the two 6mm screws on each side of the screen.

    • Use the #0 Phillips Screw bit with the Screwdriver to remove the four 6mm Phillips screws from each side of the screen.

  13. Acer Aspire One 532h-2527  Screen Replacement: step 13, image 1 of 1
    • Remove the screen.

Conclusion

To reassemble your device, follow these instructions in reverse order.

One other person completed this guide.

Adam Debes

Member since: 09/15/16

153 Reputation

1 Guide authored

Team

USF Tampa, Team 11-6, Blackwell Fall 2016 Member of USF Tampa, Team 11-6, Blackwell Fall 2016

USFT-BLACKWELL-F16S11G6

3 Members

12 Guides authored

0 Comments

Add Comment

View Statistics:

Past 24 Hours: 0

Past 7 Days: 3

Past 30 Days: 7

All Time: 657