
Acer Aspire 5734z-4836 Screen Replacement

What you need

  1. Acer Aspire 5734z-4836 Screen Replacement, Battery: step 1, image 1 of 1
    • Before removing the battery, power off your laptop and disconnect the AC adapter.

    • Flip your laptop on its back so the battery is facing up and the hinges are facing away from you.

  2. Acer Aspire 5734z-4836 Screen Replacement: step 2, image 1 of 1
    • Slide the right latch down to unlock the battery.

  3. Acer Aspire 5734z-4836 Screen Replacement: step 3, image 1 of 2 Acer Aspire 5734z-4836 Screen Replacement: step 3, image 2 of 2
    • Slide and hold the left latch below the battery.

    • While holding this latch in place, pry the battery up from its bottom edge.

    • Lift the old battery out of its compartment.

  4. Acer Aspire 5734z-4836 Screen Replacement, Screen: step 4, image 1 of 2 Acer Aspire 5734z-4836 Screen Replacement, Screen: step 4, image 2 of 2
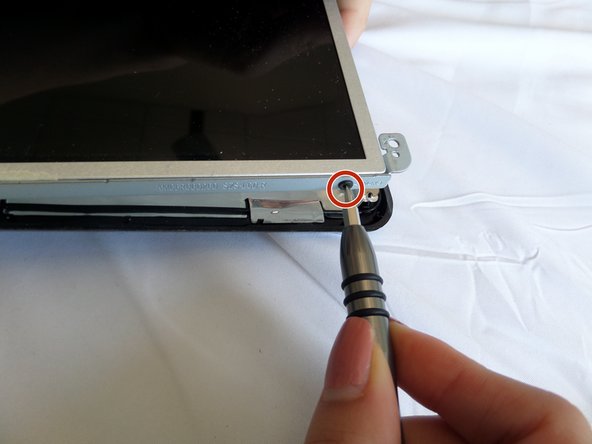
    • Remove rubber bumpers from each four corners to expose the hidden screws that hold the screen bezel in place.

  5. Acer Aspire 5734z-4836 Screen Replacement: step 5, image 1 of 1
    • Extract the hidden screws from each of the bezel's four corners, using a #00 Phillips screwdriver.

  6. Acer Aspire 5734z-4836 Screen Replacement: step 6, image 1 of 1
    • Pop the bezel loose along the edges with a plastic opening tool.

  7. Acer Aspire 5734z-4836 Screen Replacement: step 7, image 1 of 2 Acer Aspire 5734z-4836 Screen Replacement: step 7, image 2 of 2
    • Gently pry off the bezel by holding each edge of the bezel with a forefinger and applying pressure onto the screen with your thumbs.

    • Lift the bezel away completely.

  8. Acer Aspire 5734z-4836 Screen Replacement: step 8, image 1 of 1
    • Unscrew the middle screw on the green strip under the screen.

  9. Acer Aspire 5734z-4836 Screen Replacement: step 9, image 1 of 2 Acer Aspire 5734z-4836 Screen Replacement: step 9, image 2 of 2
    • Gently detach the red-and-white cable from the right end of the green strip under the screen.

  10. Acer Aspire 5734z-4836 Screen Replacement: step 10, image 1 of 2 Acer Aspire 5734z-4836 Screen Replacement: step 10, image 2 of 2
    • Locate six small screws, three on each side of the screen.

    • Remove all six screws with a #000 Phillips screwdriver.

  11. Acer Aspire 5734z-4836 Screen Replacement: step 11, image 1 of 2 Acer Aspire 5734z-4836 Screen Replacement: step 11, image 2 of 2
    • Disconnect wires from the webcam located above the screen.

  12. Acer Aspire 5734z-4836 Screen Replacement: step 12, image 1 of 3 Acer Aspire 5734z-4836 Screen Replacement: step 12, image 2 of 3 Acer Aspire 5734z-4836 Screen Replacement: step 12, image 3 of 3
    • Lift the screen up from the laptop and turn it around.

    • Gently peel back the tape located behind the screen.

  13. Acer Aspire 5734z-4836 Screen Replacement: step 13, image 1 of 2 Acer Aspire 5734z-4836 Screen Replacement: step 13, image 2 of 2
    • Pull the connector straight down to remove it.

    • You can now safely lift the screen out of the laptop.

Conclusion

To reassemble your device, follow these instructions in reverse order.

One other person completed this guide.

Susan Cao

Member since: 09/12/16

121 Reputation

1 Guide authored

Team

CSU Fullerton, Team 2-3, Bruce Fall 2016 Member of CSU Fullerton, Team 2-3, Bruce Fall 2016

CSUF-BRUCE-F16S2G3

4 Members

6 Guides authored

0 Comments

Add Comment

View Statistics:

Past 24 Hours: 0

Past 7 Days: 2

Past 30 Days: 7

All Time: 832