This translation was generated by a machine and has not been reviewed by a person yet. Speak this language? Review it.
-
-
-
The hard drive is inside that compartment.
-
To take out the hard drive, remove the screws and pull backwards to remove it.
 Ask FixBot
-
-
-
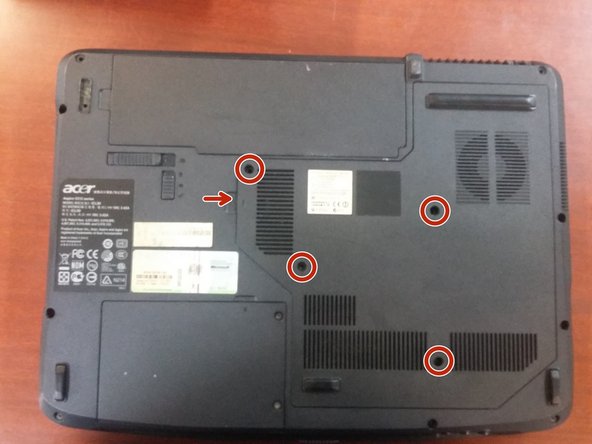
To be able to disassemble the components, we must first remove the cover.
-
To remove the cover, we will have to unscrew the following screws that are marked in the first image
-
-
-
To remove the dead battery we have to remove the safe, and pull the other lever and it will go out alone.
-
-
-
To remove the floppy drive we have to unscrew the screw is in the compartment where the motherboard.
-
In the image 1 the screw to be removed is marked.
-
-
-
-
To be able to remove the RAM stick, next to it there are two levers (Image1)
-
In order to remove it, we have to press the two levers out simultaneously (Image2)
-
To take it out you must be in a diagonal position because if not, it can break or become damaged.
-
-
-
To remove the cooling fan, we have to unscrew it and disconnect it from the board. (In image 1 it is marked where the screws and the connector are)
-
Then to open it we have to remove the screws that are behind (in Image 2 they are marked)
-
After it is open we can use a can of compressed air for its cleaning.
-
-
-
Now that we have removed the cooling fan, we must remove the heatsink.
-
To remove the heatsink we have to unscrew the screws that are marked in Image 1
-
-
-
To remove the processor we must be very careful, since if you do not remove it well, the pins can break.
-
To be able to remove the processor we will need a screwdriver, and we will have to unscrew this screw. (image 1)
-
When it is already loosened we have to remove the processor upwards so that no pin breaks
-
-
-
To remove the Wi-Fi card, the first thing we need to remove is the two cables and the two screws that are marked in Image 1
-
When we have already removed both cables and screws, the card will come out on its own; we must be careful and pull it out diagonally so it does not break.
-
-
-
To remove the keyboard, we have to press four tabs that are marked in Image 1.
-
In order to press the tabs, we will use a flat-head screwdriver or lever.
-
-




To Reassemble your device, follow these instructions in reverse order.
Cancel: I did not complete this guide.
2 other people completed this guide.
Special thanks to these translators:
100%


These translators are helping us fix the world! Want to contribute?
Start translating ›

