Introduction
This guide will document the process of replacing an old hard drive of an ASUS Q524U Notebook PC laptop computer. When ones computer begins to scramble up folder and file names, frequently crashes when booting up Windows, begins to lose files and folders, and even has a long wait time to access folders and files that means the current hard drive is about to die.
This guide will demonstrate how people can save their important files and folders by replacing the failing hard drive. Be sure to power off the laptop and unplug from any power source prior to beginning your repair, including disconnecting the battery cable once you are inside the device.
What you need
-
-
-
Turn the laptop on its back, and place it on a flat and smooth surface. Identify the location of the back panels screws.
 Ask FixBot
-
-
-
Remove all ten 1.3mm screws on the outer edge of the back panel using the T4 screwdriver.
-
-
-
-
Using the opening tool or spudger, remove the back panel by working your way around the perimeter and pry it open gently.
-
-
-
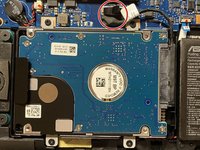
Using the T4 screwdriver, remove the four 1.3 mm screws connecting the hard drive to the motherboard.
-
-
-
Once all the screws are removed from the port, lift the hard drive out of its casing. After, disconnect the hard drive from the motherboard.
-
-


Cancel: I did not complete this guide.
3 other people completed this guide.
Team

University of Memphis, Team S3-G15, Willis Fall 2020 Member of University of Memphis, Team S3-G15, Willis Fall 2020
UM-WILLIS-F20S3G15
1 Member
3 Guides authored