Free Shipping on Domestic Orders $75+

2006 Xserve Teardown

What you need

    1. 2006 Xserve Teardown, Unplug: step 1, image 1 of 1
      • Unplug power and connections and hold power for 15s to make sure the residual power is gone

      • Careful with the fibre lines if you have a raid attached

      • Graphic card if installed

      Ask FixBot

      Add Comment

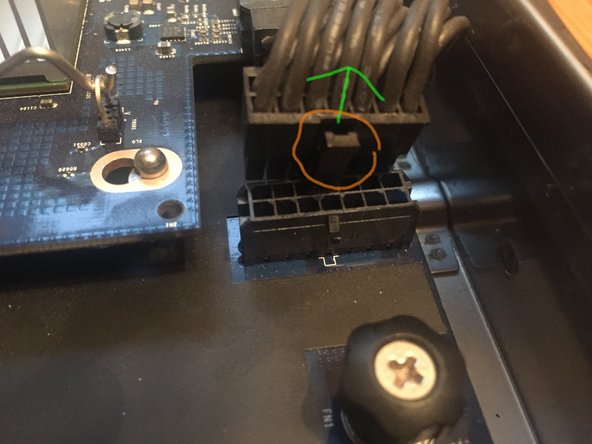
    2. 2006 Xserve Teardown, Remove Cover: step 2, image 1 of 3 2006 Xserve Teardown, Remove Cover: step 2, image 2 of 3 2006 Xserve Teardown, Remove Cover: step 2, image 3 of 3
      • Unscrew the two thumb screws at the back.

      • Pull back on the top, then remove the top cover.

      Ask FixBot

      Add Comment

    3. 2006 Xserve Teardown, Remove Power Modules: step 3, image 1 of 3 2006 Xserve Teardown, Remove Power Modules: step 3, image 2 of 3 2006 Xserve Teardown, Remove Power Modules: step 3, image 3 of 3
      • pull out and to the right with the black locking lever

      • Pull out module

      Ask FixBot

      Add Comment

    4. 2006 Xserve Teardown, Remove HardDrives: step 4, image 1 of 3 2006 Xserve Teardown, Remove HardDrives: step 4, image 2 of 3 2006 Xserve Teardown, Remove HardDrives: step 4, image 3 of 3
      • Push on the caddy handles to release the handle's then pull each one out.

      Ask FixBot

      Add Comment

    5. 2006 Xserve Teardown, Remove Airduct: step 5, image 1 of 3 2006 Xserve Teardown, Remove Airduct: step 5, image 2 of 3 2006 Xserve Teardown, Remove Airduct: step 5, image 3 of 3
      • use a #1 phillips on the 5 screws holding the Airduct in place.

      • slide up and out easily.

      • carefull with the backplane-to-logic board I/O cable

      Ask FixBot

      Add Comment

    6. 2006 Xserve Teardown, Fan Array: step 6, image 1 of 3 2006 Xserve Teardown, Fan Array: step 6, image 2 of 3 2006 Xserve Teardown, Fan Array: step 6, image 3 of 3
      • please note these are captive thumb screws and will not come all the way out

      • To remove the fan array you need to loosen two phillips on the right and left of the array as noted in the pic's.

      • Carefull around the fan plug requires you to pull straight up after screws are lose

      Ask FixBot

      Add Comment

    7. 2006 Xserve Teardown, Remove PCI Cards: step 7, image 1 of 3 2006 Xserve Teardown, Remove PCI Cards: step 7, image 2 of 3 2006 Xserve Teardown, Remove PCI Cards: step 7, image 3 of 3
      • Loosen the two captive screws that secure the riser bracket to the back panel.

      • pull up a little to clear the captive screws then lean back should come out easy

      • the Screws in the case act like alinement pins careful when pulling up

      • Also a good time to check the ROM battery! Replace battery only with type CR2032.

      Ask FixBot

      Add Comment

    8. 2006 Xserve Teardown, Front Panel Board Cable: step 8, image 1 of 3 2006 Xserve Teardown, Front Panel Board Cable: step 8, image 2 of 3 2006 Xserve Teardown, Front Panel Board Cable: step 8, image 3 of 3
      • This is a delicate cable push the 2 sides together to release

      • This cable is molded to go back in only one way do not try any other orientation

      • Pop one side out then rock the connector wile pressing on the other tab for easier removal

      • The connecter is keyed for one way only

      Ask FixBot

      Add Comment

    9. 2006 Xserve Teardown, Backplane-to-Logic Board I/O Cable: step 9, image 1 of 3 2006 Xserve Teardown, Backplane-to-Logic Board I/O Cable: step 9, image 2 of 3 2006 Xserve Teardown, Backplane-to-Logic Board I/O Cable: step 9, image 3 of 3
      • they are only press in connectors use a Spudger to pry one side, should come free after a little force

      • Carefull with the connecters as they can be damaged!

      • Note! there is adhesive on the side of the cable along the power module's side

      Ask FixBot

      Add Comment

    10. 2006 Xserve Teardown, CD Drive Cable: step 10, image 1 of 3 2006 Xserve Teardown, CD Drive Cable: step 10, image 2 of 3 2006 Xserve Teardown, CD Drive Cable: step 10, image 3 of 3
      • lift one side of the connector gently it should pop out

      • !Note! more adhesive out lined in red!

      • Don't Use a screw driver like i did use a plastic Heavy-Duty Spudger

      Ask FixBot

      Add Comment

    11. 2006 Xserve Teardown, Removing CD Drive: step 11, image 1 of 3 2006 Xserve Teardown, Removing CD Drive: step 11, image 2 of 3 2006 Xserve Teardown, Removing CD Drive: step 11, image 3 of 3
      • Unlock the CD locking leaver by sliding the arm to the left.

      • Push back away from bezel then lift up and out the drive.

      Ask FixBot

      Add Comment

      • Unscrew 4 #0 Phillips screws and remove carriage

      Ask FixBot

      Add Comment

    12. 2006 Xserve Teardown, Ram Removal: step 13, image 1 of 3 2006 Xserve Teardown, Ram Removal: step 13, image 2 of 3 2006 Xserve Teardown, Ram Removal: step 13, image 3 of 3
      • To remove open the tabs on either side of the Ram slot to remove~ repeat for all ram.

      • !note! Max Ram on a 2006 =32GB

      Ask FixBot

      Add Comment

    13. 2006 Xserve Teardown, Raid card/ Drive Array: step 14, image 1 of 2 2006 Xserve Teardown, Raid card/ Drive Array: step 14, image 2 of 2
      • Unscrew the one thumb screw on the main part of the board

      Ask FixBot

      Add Comment

Finish Line

Cancel: I did not complete this guide.

6 other people completed this guide.

Attached Documents

mitch

Member since: 07/09/16

298 Reputation

1 Guide authored

0 Guide Comments

Add Comment

View Statistics:

Past 24 Hours: 3

Past 7 Days: 13

Past 30 Days: 48

All Time: 2,186