Introduction
I originally posted this writeup on Honda-Tech forums but have migrated it here since I could better explain the procedure.
(Higher-resolution images help as well.)
A couple of years ago my 1998 Honda Accord Dx started shutting itself off at random times -- on freeway onramps, while parked and idling, etc. -- so I did some research and found that the electrical portion of the ignition switch had been recalled. I called up Honda of America and found that my car had already been serviced for this recall, meaning I was on my own to fix this problem.
So I did some more research on the internet to verify that the ignition switch was indeed the problem. At that point I had two choices: I could pay the dealer $100 for them to figure out the problem, and *possibly* honor the recall a second time(provided they found the problem in the first place). Or I could buy the part for $61 and do the repair myself. I chose the latter since I really want to learn about cars as much as possible, and I will be assured that the job was done properly (or at least learn from my mistakes ).
DISCLAIMER: This posting is for educational purposes only, and I take no responsibility for your actions. You can't blame me if your car blows up or if your airbag deploys, or for any other reason whatsoever. Perform this repair at your own risk.
What you need
-
-
The tools and materials you will need:
-
10 mm Wrench
-
Phillips Screwdriver
-
Flathead Screwdriver
-
Electrical Tape
-
Multimeter (not shown)
-
Electrical portion of the Honda Accord ignition switch
-
-
-
Disconnect the battery. This is especially important because you're going to be working near the airbag.
-
-
-
Remove the two Phillips retaining screws that hold the driver's side lower panel to the dash.
-
-
-
Use a flathead screwdriver to pry off the left side of the panel immediately below the radio surround.
-
-
-
-
Now the driver's side lower panel can be removed. Begin on the left side and gently pull it off, so that all of the retaining clips are released.
-
-
-
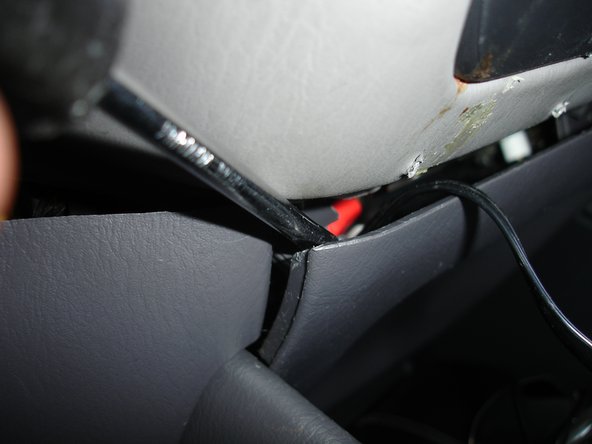
The ignition switch can now be unplugged for testing. The switch connects to the rear of the driver's side fuse panel. Shine a flashlight and find the connector highlighted in red.
-
-
-
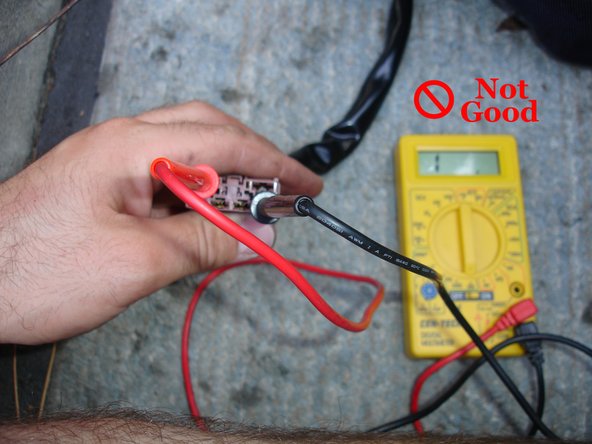
Now it's testing time. The key should be placed into the ignition switch and turned to the appropriate position; you should test for continuity between each of the points as outlined in the guide.
-
-
-
Remove the three Phillips screws on the lower steering column cover.
-
Pop the lower steering column cover off the top cover, giving you access to the electrical portion of the ignition switch.
-
-
-
Unscrew the two Phillips screws that hold the ignition switch cover (and switch itself) in place.
-
-
-
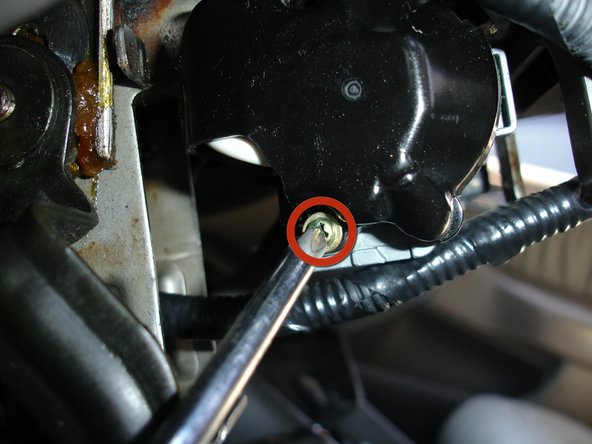
The cover should be loose on the switch, however there is another screw holding it in place behind the steering wheel.
-
-
-
Once you remove the old switch from its cover, plug in the new switch connector into the rear of the fuse panel and connect the other side to the steering column.
-
-
-
Route the wiring in the same manner the old switch wiring was routed, insert the switch into the steering column, and put back the ignition switch cover and screws.
-
Use the electrical tape to corral any of the loose wiring. Put all paneling back the way it was by following the above directions in reverse. Make sure that the rubber O-ring around the ignition switch is properly seated against the switch when putting back the lower steering wheel cover.
-