
1988-1991 Honda Civic Oil Change

What you need

  1. 1988-1991 Honda Civic Oil Change, Lifting the Car: step 1, image 1 of 3 1988-1991 Honda Civic Oil Change, Lifting the Car: step 1, image 2 of 3 1988-1991 Honda Civic Oil Change, Lifting the Car: step 1, image 3 of 3
    • Begin by placing a jack under the lifting point. It is on the driver's side of the car, below the rocker panel and just behind the front wheel.

    • Lift the car with the jack until you can work underneath it.

    • Slide a jack stand under the car, just behind the jack.

    • Slowly lower the jack until the jack stand is supporting the car. Remove the jack.

    • Many hydraulic jacks are lowered by placing the open end of the handle over a knob and turning it counter-clockwise. Consult your owners manual for your jack if you don't know how to lower it.

    • Never work underneath a car that is only supported by a jack. The jack may slip or fail, resulting in serious injury or death.

  2. 1988-1991 Honda Civic Oil Change, Draining the Oil: step 2, image 1 of 3 1988-1991 Honda Civic Oil Change, Draining the Oil: step 2, image 2 of 3 1988-1991 Honda Civic Oil Change, Draining the Oil: step 2, image 3 of 3
    • Always wear protective gloves and eyewear when working with motor oil. Be careful if your car has been running recently as the engine, transmission and exhaust may be very hot. Keep rags or towels nearby to wipe up any spills.

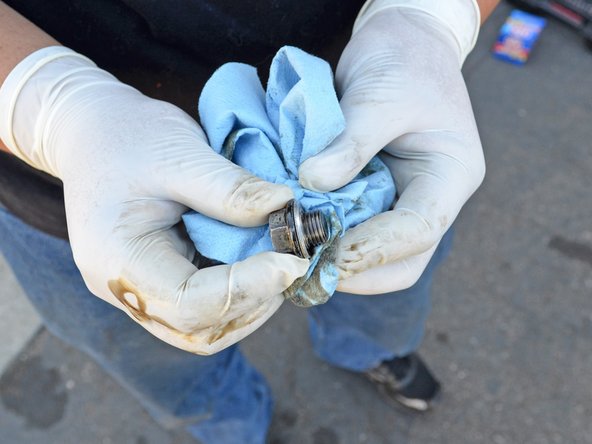
    • Locate the 17mm hex oil drain plug. It is on the driver's side of the car and facing backwards.

    • Use a 17 mm socket wrench or box end wrench to turn the oil drain plug counter-clockwise until it is loose enough to turn by hand.

    • Place the oil drain pan underneath the oil drain plug.

    • Be sure that the drain pan is positioned so that it will catch the oil when it is streaming out of the pan.

  3. 1988-1991 Honda Civic Oil Change: step 3, image 1 of 3 1988-1991 Honda Civic Oil Change: step 3, image 2 of 3 1988-1991 Honda Civic Oil Change: step 3, image 3 of 3
    • Finish removing the oil drain plug by hand and allow the oil to drain.

    • Watch the draining oil for shiny specks. These shiny specks may be metal flakes and could mean that there is a serious problem with your engine internals.

    • Clean the oil drain plug with a clean rag or towel. If the oil drain plug gasket is damaged, replace it.

  4. 1988-1991 Honda Civic Oil Change: step 4, image 1 of 3 1988-1991 Honda Civic Oil Change: step 4, image 2 of 3 1988-1991 Honda Civic Oil Change: step 4, image 3 of 3
    • Once the draining oil has slowed to a drip, wipe off the area around the oil drain plug hole with a clean rag or towel.

    • Reinstall the drain plug. Turn it clockwise as far as possible by hand, then use the 17 mm socket or box end wrench to finish tightening it.

    • Only tighten the drain plug until it is snug. Over-tightening the oil drain plug can strip the threads or crack the oil pan.

  5. 1988-1991 Honda Civic Oil Change, Replacing the Oil Filter: step 5, image 1 of 3 1988-1991 Honda Civic Oil Change, Replacing the Oil Filter: step 5, image 2 of 3 1988-1991 Honda Civic Oil Change, Replacing the Oil Filter: step 5, image 3 of 3
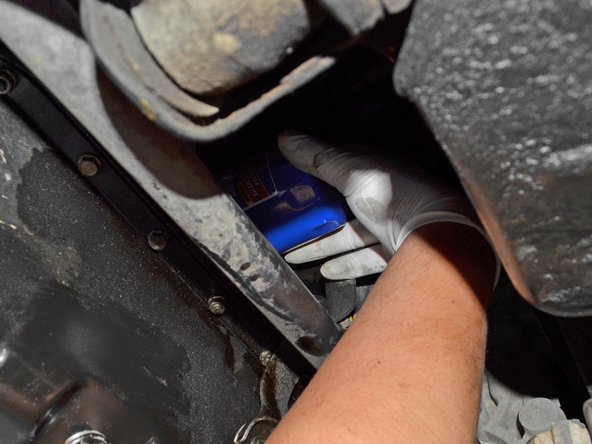
    • Locate the oil filter. It is on the driver's side of the car, on the back side of the engine and above the oil drain plug.

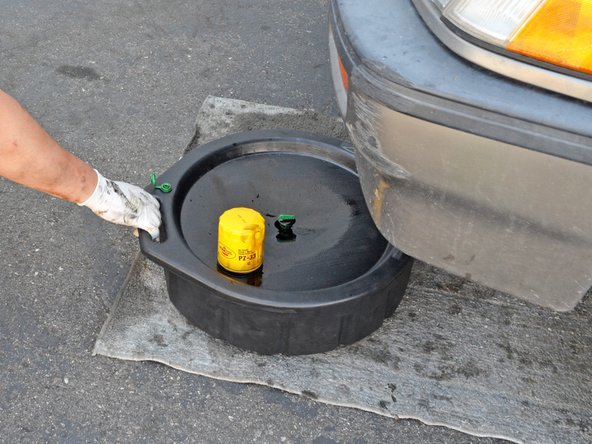
    • Reposition the oil drain pan so that it catches the oil that will spill when you remove the oil filter.

    • Turn the oil filter counter-clockwise by hand until it comes off the engine's oil filter threads.

    • If the filter is too tight to loosen by hand, use an oil filter wrench. A wrench that fits over the top of the oil filter is ideal, as there is very little space on the sides of the oil filter.

    • Lower the oil filter with its threaded end up to reduce spills, then place it with the threaded end facing down in the oil drain pan.

  6. 1988-1991 Honda Civic Oil Change: step 6, image 1 of 3 1988-1991 Honda Civic Oil Change: step 6, image 2 of 3 1988-1991 Honda Civic Oil Change: step 6, image 3 of 3
    • Dip a clean gloved finger into a bottle of new oil and spread the oil onto the gasket of the new oil filter.

    • Wipe off any excess oil from your hands/fingers when you are done as the oil may make handling the filter or tools difficult.

    • Guide the oil filter back over the engine's oil filter threads and turn the filter clockwise until it is snug.

    • If the filter is difficult to turn at the beginning of its threads, stop! You may be cross threading the oil filter. Re-align the oil filter and try again.

    • Do not over-tighten your oil filter. Doing so may cause the oil filter seal to leak and will make removing the oil filter very difficult in the future.

    • Remove the oil drain pan from under the car.

  7. 1988-1991 Honda Civic Oil Change, Lowering the Car: step 7, image 1 of 3 1988-1991 Honda Civic Oil Change, Lowering the Car: step 7, image 2 of 3 1988-1991 Honda Civic Oil Change, Lowering the Car: step 7, image 3 of 3
    • Use the jack to lift the car off of the jack stand.

    • Remove the jack stand from under the car.

    • Slowly lower the jack until it is no longer supporting the car and remove it from under the car.

  8. 1988-1991 Honda Civic Oil Change, Replacing the Oil: step 8, image 1 of 3 1988-1991 Honda Civic Oil Change, Replacing the Oil: step 8, image 2 of 3 1988-1991 Honda Civic Oil Change, Replacing the Oil: step 8, image 3 of 3
    • Locate the hood release lever. It is below the left side of the driver's console, by the door frame.

    • Pull the hood release lever until you hear the hood click.

    • Go to the front of the car and locate the hood release latch. It is under the hood and along the center line of the car.

    • Lift up on the hood release latch and lift the hood open.

    • Place the end of the hood prop rod into the hole on the driver's side of the hood marked by an arrow.

  9. 1988-1991 Honda Civic Oil Change: step 9, image 1 of 3 1988-1991 Honda Civic Oil Change: step 9, image 2 of 3 1988-1991 Honda Civic Oil Change: step 9, image 3 of 3
    • Locate the oil filler cap. It is on the front passenger side of the valve cover.

    • Turn the oil filler cap counter-clockwise and remove it.

    • Place a funnel into the oil filler hole.

  10. 1988-1991 Honda Civic Oil Change: step 10, image 1 of 2 1988-1991 Honda Civic Oil Change: step 10, image 2 of 2
    • Pour 4 quarts of 10W-30 oil* into the engine. Use one hand to stabilize the funnel to help prevent spills.

    • * (Check your owner's manual for correct amount and grade of oil. My 1991 Honda Civic takes 3.2 Qt of 5W-30.)

    • Consult your owner's manual if you think your operating conditions call for a different oil viscosity.

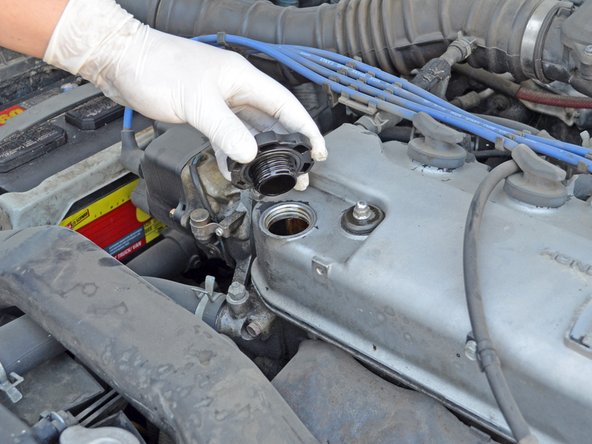
    • Remove the funnel and place the oil filler cap over the oil filler hole.

    • Turn the oil filler cap clockwise until it is snug.

  11. 1988-1991 Honda Civic Oil Change: step 11, image 1 of 3 1988-1991 Honda Civic Oil Change: step 11, image 2 of 3 1988-1991 Honda Civic Oil Change: step 11, image 3 of 3
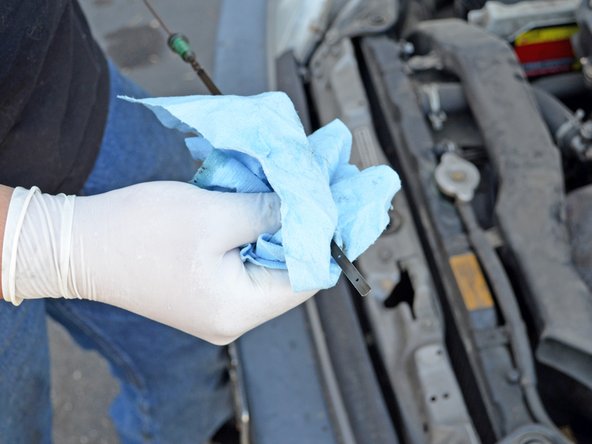
    • Locate and remove the oil dipstick. It is in front of the valve cover, sticking out of the exhaust manifold's heat shield.

    • Wipe off the oil dipstick, reinsert it into its hole and remove it again.

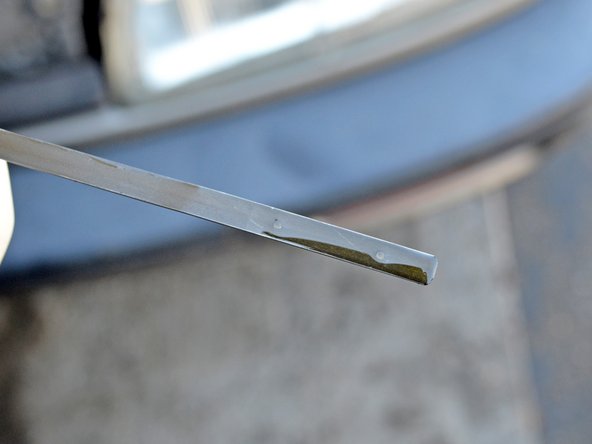
    • Check the oil level on the end of the dipstick. It should be between the two holes or slightly above the top one.

    • This is not your actual oil level, but a pre-check to make sure the engine will not run dry when you first start it. The oil level will drop slightly after the first run when oil fills the new oil filter.

    • Add oil if the oil level is below the bottom hole of the dipstick. Place the oil dipstick all the way back in its hole.

  12. 1988-1991 Honda Civic Oil Change, Wrapping Up: step 12, image 1 of 3 1988-1991 Honda Civic Oil Change, Wrapping Up: step 12, image 2 of 3 1988-1991 Honda Civic Oil Change, Wrapping Up: step 12, image 3 of 3
    • Support the hood with one hand and use your other hand to place the hood prop rod back into its holder.

    • Make sure the hood prop rod is secured in its holder to prevent damage.

    • Gently lower the hood until it clicks into the secondary latch.

    • Press firmly on the edge of the hood until you hear the primary latch engage.

  13. 1988-1991 Honda Civic Oil Change: step 13, image 1 of 2 1988-1991 Honda Civic Oil Change: step 13, image 2 of 2
    • Start the car and look for leaks under the car. If there are leaks, shut the car off and determine if the drain plug or filter need to be tightened, or if a part has been damaged.

    • After running the engine for a few minutes, let it cool down for at least an hour and re-check the oil level. If the oil level is more than a 1/2" above the top hole of the dipstick you will need to drain oil. If the oil level is below the bottom hole of the dipstick you will need to add oil.

    • Allow 12-24 hours for all the oil to drain out of your old oil filter.

    • Take your old oil and filter to a recycling facility. Most auto parts stores and repair shops accept these at no charge. In addition, some cities and/or counties have a service where they will collect used oil and filters from your home. For more information, see the American Petroleum Institute's web page on used motor oil collection and recycling.

Finish Line

19 other people completed this guide.

Phillip Takahashi

Member since: 08/22/11

86,617 Reputation

87 Guides authored

5 Comments

Don't forget to push in the anti drainback valve from the holes on the outer perimeter because there will still be oil trapped in there. Use a toothpick or something to open up each hole while holding the filter upside down to get more oil out of the filter.

danwat1234 - Reply

Sometimes the oil drain plug is 19mm like mine so be sure to check that because you don't want to not have the right size wrench or ratchet socket

martyrcorpus - Reply

That was a pretty darn specific description of how to change oil but if you need a diagram like that to change your oil get the !&&* out from under the hood you shouldn't be there LOL

Supertropper - Reply

That was a very step by step presentation on how to change your oil but if you need a presentation like that to change your oil get it the !&&* out from underneath the hood you shouldn't be there

Supertropper - Reply

Nothing wrong with extra description ; you never know, someone might know the process generally but the specific detail in a certain step might teach them something they didn’t know before.

Aaron Wallentine - Reply

Add Comment

View Statistics:

Past 24 Hours: 1

Past 7 Days: 18

Past 30 Days: 91

All Time: 78,162