
Free Shipping on Domestic Orders $75+

PlayStation 4 Slim Bottom Cover Replacement

What you need

  1. PlayStation 4 Slim Bottom Cover Replacement, Bottom Cover: step 1, image 1 of 3 PlayStation 4 Slim Bottom Cover Replacement, Bottom Cover: step 1, image 2 of 3 PlayStation 4 Slim Bottom Cover Replacement, Bottom Cover: step 1, image 3 of 3
    • Locate the plastic warranty sticker next to the three ports on the side of the console.

    • Remove the warranty sticker by peeling it off with any kind of spudger.

    • Removing the warranty sticker will NOT cause your warranty to be null and void.

    Ask FixBot

    Add Comment

  2. PlayStation 4 Slim Bottom Cover Replacement: step 2, image 1 of 2 PlayStation 4 Slim Bottom Cover Replacement: step 2, image 2 of 2
    • Unscrew and remove the now exposed 5.0mm screw using a TR8 security Torx screwdriver with a counter-clockwise motion.

    Ask FixBot

    Add Comment

  3. PlayStation 4 Slim Bottom Cover Replacement: step 3, image 1 of 3 PlayStation 4 Slim Bottom Cover Replacement: step 3, image 2 of 3 PlayStation 4 Slim Bottom Cover Replacement: step 3, image 3 of 3
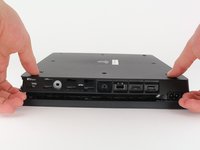
    • Place the Playstation 4 Slim upside down with the side of the screw you just removed facing you.

    • Pry up on the two corners that are facing you with your fingers.

    • This may take a bit of force to open up and you will hear a fairly loud click when the bottom cover detaches.

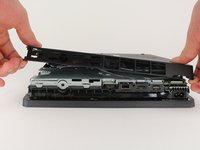
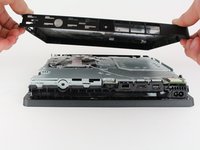
    • Remove the bottom cover by sliding it towards the back corners and lifting up.

    Ask FixBot

    Add Comment

Conclusion

To reassemble your device, follow these instructions in reverse order.

Cancel: I did not complete this guide.

63 other people completed this guide.

Hernan Rodriguez

Member since: 01/24/18

4,870 Reputation

3 Guides authored

2 Guide Comments

Wo kann man die Bodenplatte kaufen?

Emre Kaman - Reply Share

Hi hello it's Good

محب علي شاكر - Reply Share

Add Comment

View Statistics:

Past 24 Hours: 33

Past 7 Days: 197

Past 30 Days: 936

All Time: 72,136