Introduction
This teardown comes with a bit of a history lesson :)
Here's a Sony TR-63 transistor radio - I forgot I had one until reminded of it by the ifixit Sony teardown promotion. If we're going to tear down Sony consumer gadgets, why not start with one of the earliest?
The TR-63 was introduced in 1957 - it was the first "pocket-sized" transistor radio ever made and the first Sony-branded product exported to North America, by the then-named Tokyo Tsushin Kogyo company (Tokyo Telecommuncations Engineering Corporation). It became a huge commercial success, over 100,000 units were sold.
It seems "pocket-sized" was a bit of a marketing gimmick at the time - although smaller than any competing product, the TR-63 was a bit too big to fit into a standard shirt pocket. So story has it that company salesmen wore custom-made shirts with slightly bigger pockets to show off the TR-63's small size. But unlike desktop radios of the day which were promoted under the idea of "a radio in every home", the TR-63 was uniquely marketed as something each person could own and carry with them. A foreshadowing of the Walkman and iPod, perhaps?
The TR-63 contains a whopping 6 transistors. By comparison, the Cell processor chip in the PS3 contains two to three hundred million transistors. That's an indication of the progress made in the electronics industry in the past 50 years.
In Japan the TR-63 sold for 13,800 yen, and the original export price was U$39.95. It was available in 4 colours (yellow, red, green and black).
Follow along with this teardown to get a look into an important piece of consumer electronics history.
What you need
-
-
A bit more trivia...
-
At the time, the company's co-founders felt the Japanese name was too hard to pronounce and remember by foreigners. They decided the name change would help them expand and become well known worldwide. And as they say, the rest is history.
-
-
-
Carefully pry open the case from the bottom edge.
-
Boy, this is a lot easier to open than an iPod! (Spudger not required.)
-
On the inside of the back cover, you'll find the product label. Notice the official company name, Tokyo Tsushin Kyogo Ltd. I've seen photos of later versions of the TR-63 which say "Sony Corporation" there instead.
-
I'm not sure what happened to the corner of the label - perhaps after all these years in the back of my closet it was likely eaten by a grue?
-
-
-
-
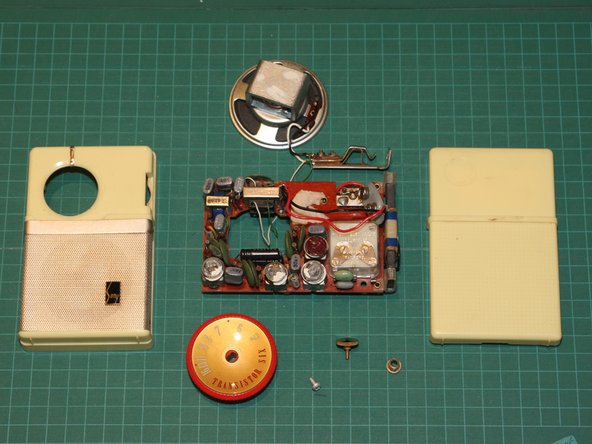
Here's the circuit board, earphone jack and speaker after they've been removed from the case.
-
Notice that there are components mounted on both sides of the circuit board. Perhaps the resistors and capacitors on the solder-side were a last minute design change?
-
On the other hand, the circuit board is so tightly crammed on the component side there probably wasn't enough room for everything on one side.
-
-
-
Here's the component side of the circuit board.
-
You can see the various components in these views of the circuit board. Remember, these are all discrete components here -- no integrated circuits! But state of the art at the time, a lot of circuitry crammed into a small space.
-
Six of the gray components with an oval cross-section (marked or stamped with "Sony") are transistors.
-
The 7th similar looking gray component is a varistor. It's the one at the front left of the circuit board in the 3rd photo in this series.
-
Say, do they still teach the resistor colour code in schools these days? :)
-


8 Comments
This was really cool, thanks!
The first transistor radio hit the consumer market on October 18, 1954. The Regency TR-1 featured four germanium transistors operating on a 22.5-volt battery that provided over twenty hours of life.