
What you need

This teardown is not a repair guide. To repair your Magic Trackpad, use our service manual.

  1. Magic Trackpad Teardown, Magic Trackpad Teardown: step 1, image 1 of 3 Magic Trackpad Teardown, Magic Trackpad Teardown: step 1, image 2 of 3 Magic Trackpad Teardown, Magic Trackpad Teardown: step 1, image 3 of 3
    • The Magic Trackpad is the first full desktop trackpad that supports a full set of gestures, including click, scroll, swipe, and rotate, all available at the tip of your fingers.

    • Requirements:

    • Mac desktop or laptop.

    • Bluetooth connectivity.

    • Mac OS X 10.6.4 or later.

    • And of course, batteries! (Apple Battery Charger not included).

    • As the rumors confirmed, the Magic Trackpad is designated Model A1339.

  2. Magic Trackpad Teardown: step 2, image 1 of 3 Magic Trackpad Teardown: step 2, image 2 of 3 Magic Trackpad Teardown: step 2, image 3 of 3
    • The Magic Trackpad is 80% larger than the trackpad included in current MacBook Pro models.

    • It features the same aluminum design as its wireless keyboard counterpart, allowing for the perfect union of typing and gestures.

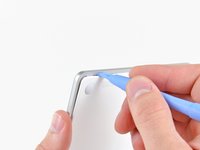
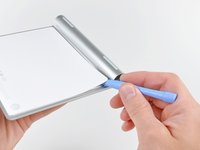
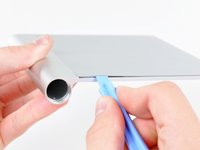
    • Let us not forget the main attraction, which is the 0.5 mm thick, capacitive touch, wear-resistant glass surface.

    • That's all good, but what lies inside?

  3. Magic Trackpad Teardown: step 3, image 1 of 3 Magic Trackpad Teardown: step 3, image 2 of 3 Magic Trackpad Teardown: step 3, image 3 of 3
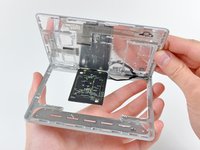
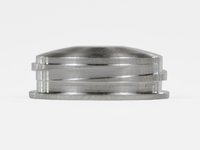
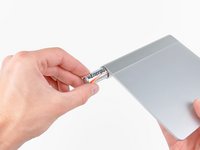
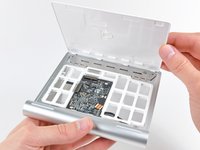
    • Removing the batteries is about as straightforward as it can get. Give a twist to the battery door and the two AA batteries slide right out.

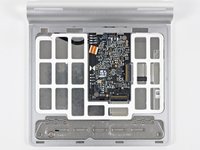
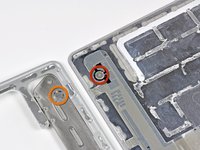
    • Check out those square threads! While square threads have the highest mechanical efficiency of all lead screws, their difficulty of manufacturing makes them prohibitive for most applications.

    • Kudos, Apple, for sweating the details.

  4. Magic Trackpad Teardown: step 4, image 1 of 3 Magic Trackpad Teardown: step 4, image 2 of 3 Magic Trackpad Teardown: step 4, image 3 of 3
    • Time to get our hands dirty!

    • Use a plastic opening tool to pry the lower panel away from the adhesive securing around its left, right, and top edges.

    • Don't pry up along the bottom. There are a bunch of retaining clips.

    • After slicing through most of the adhesive, the lower panel lifts right off.

  5. Magic Trackpad Teardown: step 5, image 1 of 3 Magic Trackpad Teardown: step 5, image 2 of 3 Magic Trackpad Teardown: step 5, image 3 of 3
    • And there's......not really that much to this thing.

    • After a good amount of quasi-non-destructive prying, the inner spacer can be removed from the trackpad.

    • This spacer prevents the highly unlikely event of squeezing the lower panel against the logic board hard enough to damage it.

  6. Magic Trackpad Teardown: step 6, image 1 of 3 Magic Trackpad Teardown: step 6, image 2 of 3 Magic Trackpad Teardown: step 6, image 3 of 3
    • Next, disconnect the two ribbon cables connecting the capacitive touch pad to the logic board.

    • These things are ridiculously thin and are stuck to the underside of the touch pad. If you plan to remove them, proceed with caution.

  7. Magic Trackpad Teardown: step 7, image 1 of 2 Magic Trackpad Teardown: step 7, image 2 of 2
    • We've noticed a trend about Apple's newer products: thin and pretty = not user serviceable. The Magic Trackpad is no exception.

    • After using a heat gun to warm up the adhesive, the touch pad can be carefully pried off the aluminum chassis.

    • This is not for the faint of heart. A copious amount of heat, guitar picks, and plastic opening tools were required to make this thing budge.

  8. Magic Trackpad Teardown: step 8, image 1 of 2 Magic Trackpad Teardown: step 8, image 2 of 2
    • After being freed from the adhesive securing it to the chassis, the touch pad can be easily removed.

    • The Magic Trackpad has a unique way of triggering the mouse button. As you press down on the top surface of the Trackpad, the two rubber feet near its front edge push up on the hinged plate and set screw (shown in orange) attached to the chassis. This squeezes the electronic mouse button switch (shown in red), producing the characteristic "click".

  9. Magic Trackpad Teardown: step 9, image 1 of 2 Magic Trackpad Teardown: step 9, image 2 of 2
    • To completely remove the logic board, you must first de-solder the four wires leading to the battery connector/status LED.

    • After removing two Phillips screws, the logic board can be separated from the chassis.

  10. Magic Trackpad Teardown: step 10, image 1 of 2 Magic Trackpad Teardown: step 10, image 2 of 2
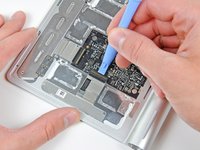
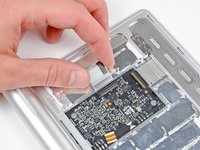
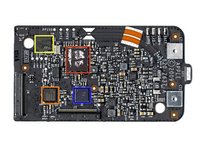
    • At the heart of the Magic Trackpad's logic board lies a Broadcom BCM2042 for Bluetooth connectivity.

    • This is the same chip used by the Magic Mouse for data transmission.

    • We found a Broadcom BCM5974 touch screen controller chip that provides Multi-touch functionality.

    • This is the same chip you'll find in the iPhone, iPod Touch, and MacBook Air.

    • Also, an SST 25WF020 provides 2 Mbit of serial flash memory.

    • This appears to be a TI CD3238, which has been identified by Hearst as a RS232 line driver/receiver. It was also in the original iPhone with a BCM5973A.

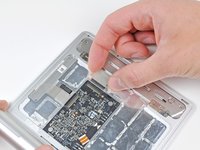
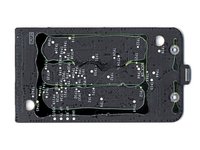
    • The back of the logic board features nothing but blackness and glue.

  11. Magic Trackpad Teardown: step 11, image 1 of 1
    • And there it lies: the Magic Trackpad in nine difficult-to-disassemble pieces.

    • Keep an eye on our teardown page for an inside look at the latest gadgets!

22 Comments

A great tear down. One question: Where is the bluetooth antenna? Is it just etched into the circuit board?

Doug - Reply

Good question. It looks like the curved traces along the top of the board seen on step 10 could be the antenna, and they lead to a small metal pressure contact that mates into the aluminum chassis. My guess is that the chassis of the trackpad and/or those curved traces serve as the antenna.

Andrew Bookholt -

Step 3c, I was expecting to see an Apple-branded battery instead of a bunny-battery. When you get the Apple batteries, is there any reason to tear one of those apart to see if Apple is merely re-labeling someone else's battery or if they actually are building AA batteries?

plink53 - Reply

Apple does not produce batteries, as much as they don’t produce LCD panels or SoC chips - at best, they design them or define specs, but mostly just source it from suppliers, such as Samsung (and SDI), LG and Desay. It makes no financial sense to be a one stop shop - and that’s why Trump’s Nevo-mercantilism is a sure fail. Sorry about the politics - it’s a *charged* topic lolz ;)

Idan -

Step 10, "2Mbit of serial flash memory" This means this device might be capable of storing/receiving data from the attached computer. It will be something we get to investigate to see what type of data it holds to see how it has to be treated in a government setting.

plink53 - Reply

Add Comment

View Statistics:

Past 24 Hours: 11

Past 7 Days: 62

Past 30 Days: 275

All Time: 256,858