What you need

This teardown is not a repair guide. To repair your MacBook Unibody Model A1342, use our service manual.

  1. MacBook Unibody Model A1342 Mid 2010 Teardown, MacBook Unibody Model A1342 Mid 2010 Teardown: step 1, image 1 of 1
    • The new revision of the MacBook Unibody Model A1342 has been kind enough to grace us with its presence.

    • Tech Specs:

    • 2.4 GHz Intel Core 2 Duo processor with 3 MB on-chip L2 shared cache.

    • NVIDIA GeForce 320M graphics processor with 256 MB of shared DDR3 SDRAM.

    • 10 hour 63.5 Wh lithium-polymer battery.

    • Mini Display port with audio out support. *GASP*

  2. MacBook Unibody Model A1342 Mid 2010 Teardown: step 2, image 1 of 2 MacBook Unibody Model A1342 Mid 2010 Teardown: step 2, image 2 of 2
    • Much like its predecessor, the lower case is held by eight Phillips #00 screws.

  3. MacBook Unibody Model A1342 Mid 2010 Teardown: step 3, image 1 of 3 MacBook Unibody Model A1342 Mid 2010 Teardown: step 3, image 2 of 3 MacBook Unibody Model A1342 Mid 2010 Teardown: step 3, image 3 of 3
    • The battery looks very similar to the previous one. So similar, in fact, that it's identical in size and shape, and has the same model number (A1331).

    • Even so, it still makes continued use of Tri-Wing screws to secure the battery in place. Why Apple? Why? Why can't you free us from the oppression and tyranny that is Tri-Wing screws?

    • Be wary though...appearances can be deceiving, and that is certainly the case here.

    • The battery in the A1342 Mid 2010 is 63.5 watt-hours and weighs 355 grams.

    • In contrast, the earlier A1342 has a battery of 60 watt-hours and weighs 347.5 grams.

  4. MacBook Unibody Model A1342 Mid 2010 Teardown: step 4, image 1 of 2 MacBook Unibody Model A1342 Mid 2010 Teardown: step 4, image 2 of 2
    • Lo and behold, the new battery works in the A1342!

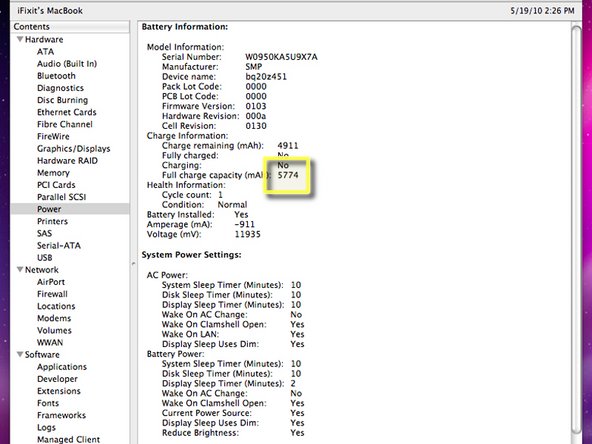
    • Both of these screenshots were taken from the previous iteration, the MacBook Unibody A1342.

    • You can get an extra 350 mAh of juice if you're willing to add 7.5 grams to your "older" MacBook.

  5. MacBook Unibody Model A1342 Mid 2010 Teardown: step 5, image 1 of 2 MacBook Unibody Model A1342 Mid 2010 Teardown: step 5, image 2 of 2
    Tool used on this step:
    T6 Torx Screwdriver
    $9.99
    Buy
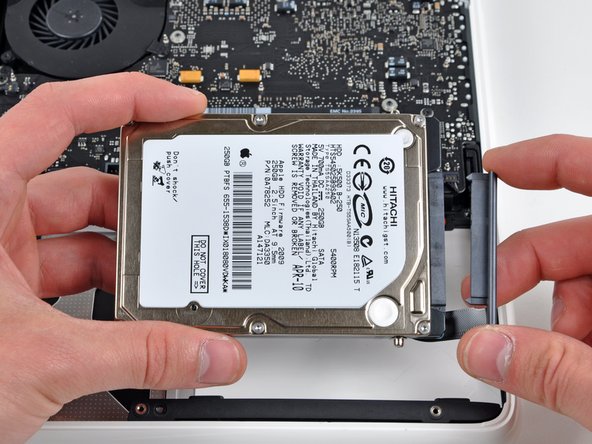
    • After removing two Phillips screws and the hard drive bracket, lift the drive out of the MacBook by its pull tab and disconnect the SATA connector.

    • If you're installing a new hard drive, you'll need a T6 Torx screwdriver to transfer the mounting screws to your new hard drive.

  6. MacBook Unibody Model A1342 Mid 2010 Teardown: step 6, image 1 of 2 MacBook Unibody Model A1342 Mid 2010 Teardown: step 6, image 2 of 2
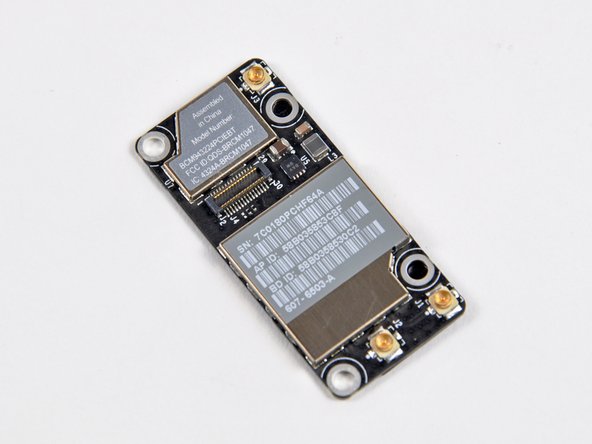
    • Removing the speaker assembly and AirPort/Bluetooth board requires a bit of work, but nothing we at iFixit can't handle.

    • Bluetooth model number is BCM943224PCIEBT.

    • This is the same card used in the previous model, the A1342.

  7. MacBook Unibody Model A1342 Mid 2010 Teardown: step 7, image 1 of 1
    • After removing the final few screws, lift the optical drive out of its comfy abode.

    • You'll be glad to know that MacBook Unibody Model A1342 Mid 2010 continues to use the 8x SATA superdrive manufactured by Panasonic, model UJ898.

  8. MacBook Unibody Model A1342 Mid 2010 Teardown: step 8, image 1 of 2 MacBook Unibody Model A1342 Mid 2010 Teardown: step 8, image 2 of 2
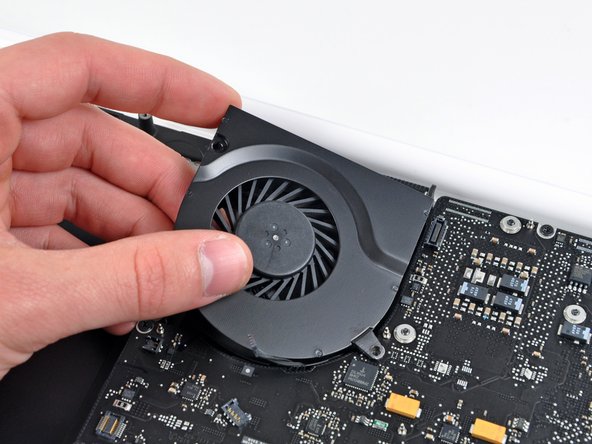
    • Removal of the fan was no biggie. It simply required a Phillips screwdriver and a spudger.

  9. MacBook Unibody Model A1342 Mid 2010 Teardown: step 9, image 1 of 3 MacBook Unibody Model A1342 Mid 2010 Teardown: step 9, image 2 of 3 MacBook Unibody Model A1342 Mid 2010 Teardown: step 9, image 3 of 3
    • Obviously the logic board needs to come out, or else this isn't a teardown.

    • With the flick of our trusty spudger, we continue to disconnect several connectors around the perimeter of the logic board, as well as removing the RAM.

    • Carefully maneuver the logic board assembly out of the upper case.

  10. MacBook Unibody Model A1342 Mid 2010 Teardown: step 10, image 1 of 1
    • The heat sink must be removed prior to revealing the newly optimized processor and graphics chips.

  11. MacBook Unibody Model A1342 Mid 2010 Teardown: step 11, image 1 of 2 MacBook Unibody Model A1342 Mid 2010 Teardown: step 11, image 2 of 2
    • Parts numbers found thus far:

    • Intel Core 2 Duo Mobile Processor E006B705 SLDGZ AV80577P8600 2.40/3M/1066

    • NVIDIA GeForce 320M integrated chipset graphics card: The successor to the GeForce 9400M.

    • Realtek RTL8251CA GigE Ethernet

    • CYPRESS CY8C24 16 KB Flash PSoC

    • TDK 6T213HF

    • Cirrus Logic 4206ACNZ

  12. MacBook Unibody Model A1342 Mid 2010 Teardown: step 12, image 1 of 1
    • The display assembly is secured by two large T8 screws, one on each side.

    • Shameless plug: We sell a screwdriver kit that will enable you to remove these screws.

  13. MacBook Unibody Model A1342 Mid 2010 Teardown: step 13, image 1 of 1
    • In Apple's everlasting effort to aid in the reduction of environmental impacts, the LED-backlit display in the MacBook A1342 and Mid 2010 A1342 are Mercury-free.

    • Wondering how to replace the display assembly? Well look no further, simply follow these steps and you'll be up and running in no time.

    • Spoiler alert: Coming soon to a browser near you, replacing the LED-backlit display...stay tuned!

  14. MacBook Unibody Model A1342 Mid 2010 Teardown: step 14, image 1 of 1
    • Disclaimer: No MacBooks were hurt, in any way, shape, or form, during the process of this teardown.

    • Now that we've taken care of that legal mumbo jumbo that some people care about (most people don't), here is the final layout of what used to be a MacBook Unibody Model A1342 Mid 2010.

12 Comments

Step 3

New battery is 63.5 watts not 65

mkaz13 - Reply

Just wanted to let people know, the A1278 13" macbook pro 'black' keyboard is interchangeable with the 'white' 2009/2010 macbook A1342 .. It looks pretty cool to! :) . Just remove the metal bracket and use epoxy to stick the keyboard and metal bracket back on :). Cheers.

techetc - Reply

Including the Backlight? That'd be crazy awesome!

Maximilian Willert -

I don’t think the backlight would work because there is no hardware to power it present on the logic board of the MacBook

Isaiah Hollingworth -

Many thanks for this awesome teardown!

Maximilian Willert - Reply

Add Comment

View Statistics:

Past 24 Hours: 3

Past 7 Days: 24

Past 30 Days: 151

All Time: 189,765