Introduction
Replacing the battery on the iPhone 4S requires minimal disassembly. If your battery is swollen, take appropriate precautions.
For optimal performance, after completing this guide, calibrate your newly installed battery: Charge it to 100% and keep charging it for at least two more hours. Then use your iPhone until it shuts off due to low battery. Finally, charge it uninterrupted to 100%.
What you need
Video Overview
-
-
Power off your iPhone before beginning disassembly.
-
Remove the two 3.6 mm Pentalobe P2 screws next to the dock connector.
-
-
-
-
Remove the following screws securing the battery connector to the logic board:
-
One 1.7 mm Phillips screw
-
One 1.5 mm Phillips screw
-
-
-
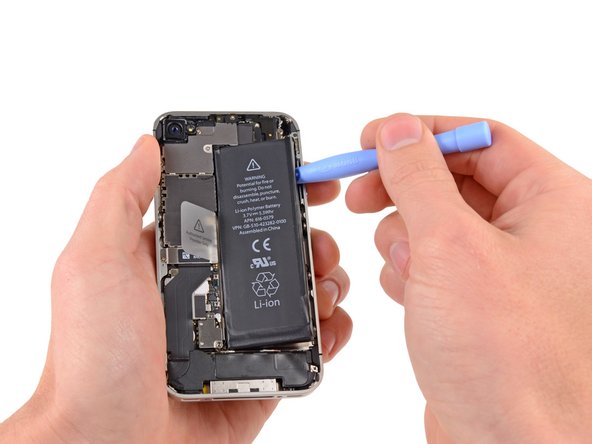
Insert the edge of a plastic opening tool between the battery and the outer case near the bottom of the iPhone.
-
Run the plastic opening tool along the right edge of the battery and pry up at several points to completely separate it from the adhesive securing it to the outer case.
-
Wait about one minute for the alcohol solution to weaken the adhesive.
-
Use the flat end of a plastic opening tool to gently lift the battery.
-
To reassemble your device, follow these instructions in reverse order.
If your iPhone reboots constantly after the replacement, you need to do a "Hard Reset" by holding down the Home- and Sleep-Button for about 10 seconds (until the device restarts).
If you have WiFi and/or Cellular connection problems with the new battery, try restoring the device using iTunes.
Repair didn’t go as planned? Check out our Answers community for troubleshooting help.
Cancel: I did not complete this guide.
4061 other people completed this guide.
254 Comments
When I removed the battery the glue was holding it in. I used the screw driver to pry it out. It sparked and I'm sure shorted the logic board. VERY IMPORTANT ONLY USE PLASTIC TOOL WHEN REMOVING BATTERY! Now I have no service. I swapped a different logic board into same phone and works fine. Any suggestions on how to fix the old logic board are appreciated.
Used a screw driver once to lift up battery, shorted the board. No display. Had to give another iPhone 4 to customer.
I now on always use my nail to lift up the battery. Never had issues since doing that.
Ben -
Well, the phillips screwdriver was a bit awkward. Had to hold screwdriver top down with one hand and turn driver with other hand. All else was as stated. Never had to touch any internal parts with my bare hands just used tools. That saves the worries about static or corrosion. One part that I failed to see in write up is the small case ground. Don't loose it it will come loose once screw is out.
A couple of suggestions.
1). If you are over about 40, some sort of hands free magnifier helps a lot - I used a headband mounted jewelers magifier called an Optivisor.
2). A pair of fine tipped tweezers and a gentle touch will let you grab the pressure contact in step 5 without getting skin oil on it.
3). Work over some sort of tray to stop small parts from rolling away.
4). If you don't have a spudger or a set of plastic case opening tools (or you know you have them, but can't recall their exact location at this moment...*cough*), the corner of an an expired credit card, or a stiff guitar pick will work to pry the battery loose. It will likely bend the card though, so do use an expired one. I used an empty Starbucks gift card I found in a junk drawer...
I'm over 40, I wish I read your tips first! both a magnifier and tweezers would have helped, and possiby prevented the spark... It's charging, fingers crossed that the tiny spark wasn't enough to fry anything!


