Introduction
Use this guide to replace the hard drive in your Apple Time Capsule Model A1302.
What you need
-
-
Open the Time Capsule by exposing the screws that hold the device together. The screws are concealed by the rubber base, which is the bottom surface of the device.
-
Use a heat gun or hair dryer to heat the rubber base, which softens the adhesive holding it on.
-
Starting in a corner, carefully lift the rubber base to prevent tearing. You can use a guitar pick or a small, plastic ruler to help separate the rubber from the metal.
-
-
-
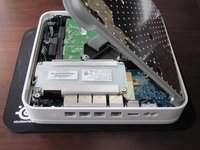
Once the rubber base is separated from the device, remove the 8 Phillips PH00 screws that attach the metal bottom of the case to the plastic top of the case.
-
-
-
Tool used on this step:Tweezers$4.99
-
Lift up the left side of the metal plate and slowly flip it over the right edge of the device.
-
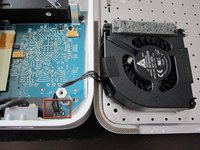
Since many people have had serious problems with the fan power connnector breaking, it is advisable to NOT try to disconnect the fan power connector. Be VERY careful with this connector. It is extremely fragile. If you absolutely have to disconnect the fan from the logic board, VERY carefully use a spudger or tweezers to do so.
-
-
-
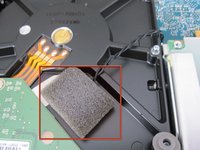
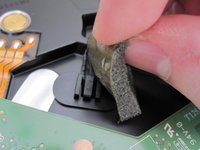
Peel off the foam and set the sensor aside. Be gentle with the foam because you will reuse it to connect the sensor to the new HDD.
-
Lift the HDD out of the device and disconnect the two SATA cables from the HDD.
-
-
-
Using a Phillips #00 screwdriver, remove the four metal spacers (pegs) from the old HDD and install them in the same locations on the new HDD.
-
Place the temperature sensor in approximately the same position on the new HDD as on the old HDD. Cover the sensor with the foam, using adhesive tape if necessary.
-


To reassemble your device, follow these instructions in reverse order.
Cancel: I did not complete this guide.
290 other people completed this guide.

68 Guide Comments
I dislodged the fan connector from the logic board. How can I go about fixing this? Can I just solder the connector back onto the board? Thanks
Yes. It says to follow the article bakcward so yes connecting correctly sshould work…
I successfully took mine apart in order to harvest the hard drive (Apple told me that the unit as a whole wasn't fixable, but that the drive should be good).
However, I got to the point of trying to remove the 4 metal spacers in Step 5 and I can't get them to budge one bit. I need them out in order to fit the drive in the enclosure I got for it, and they just won't move. I've tried a couple different Phillips #00 screwdrivers on them, and no joy.
Any suggestions? Alternatively, anyone know of an enclosure that would work for the drive that doesn't require me getting these spacers out? I hate trashing a perfectly good drive if I don't have to.