Installing iPod Nano 6th Generation Outer Case

Replace the aluminum outer casing on your 6th generation iPod Nano.

  • Add Note x

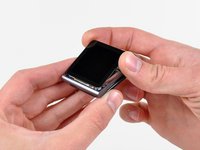
Use this guide to replace your iPod Nano's outer casing.

first image

Add Note Edit Step 1 — Front Panel Assembly  ¶ 

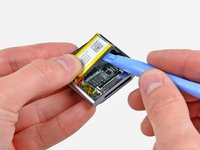
  • Use a heat gun or hair dryer to soften the adhesive securing the perimeter of the front panel assembly to the outer case.

  • Be careful not to overheat the front panel assembly, as it may result in damage to the LCD.

first image

Add Note Edit Step 2  ¶ 

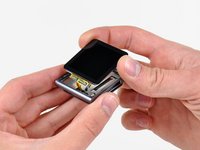
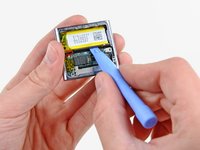
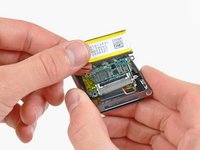
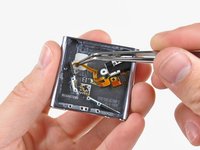
  • While the front panel is still warm, use the edge of an iPod opening tool to pry it from the headphone jack side of the front panel assembly out of the Nano.

  • Do not attempt to pry out the front panel assembly from the left side of the device, as the display data cable may be damaged in the process.

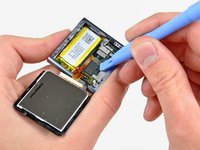
  • Continue prying the perimeter of the front panel assembly out of the outer casing, being careful not to damage the display data cable held under its left edge.

  • If the front panel is excessively difficult to lift out of the outer case, reheat the area and try again.

first image
thumb image 1
thumb image 2

Add Note Edit Step 3  ¶ 

  • Lift the front panel assembly from the headphone jack side of the Nano.

  • Pull the front panel assembly slightly away from the left side of the Nano to clear the display data cable.

  • The front panel assembly is still attached to the Nano by two cables.

first image

Add Note Edit Step 4  ¶ 

  • Lay the front panel assembly next to the Nano.

  • Remove the following two screws:

    • One 2.3 mm Phillips screw

    • One 2.6 mm shouldered Phillips screw

first image
thumb image 1
thumb image 2

Add Note Edit Step 5  ¶ 

  • Use an iPod opening tool to pry the steel shield out of the Nano by its upper right corner.

  • Remove the steel shield from the Nano.

first image
thumb image 1
thumb image 2

Add Note Edit Step 6  ¶ 

  • Use an iPod opening tool to disconnect the display data and digitizer cable connectors up from their sockets on the logic board.

first image

Add Note Edit Step 7  ¶ 

  • Remove the front panel assembly, minding its two cables that may get caught.

first image

Add Note Edit Step 8 — Logic Board Assembly  ¶ 

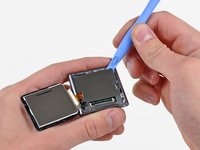
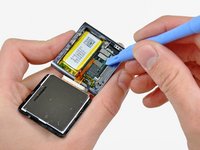
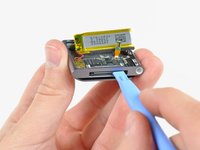
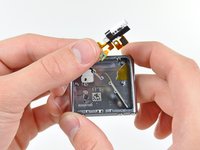
  • Use an iPod opening tool to lift the headphone jack assembly connector up and out of its socket on the logic board.

first image

Add Note Edit Step 9  ¶ 

  • Remove the single 1.9 mm Phillips screw securing the logic board to the outer case.

first image
thumb image 1
thumb image 2

Add Note Edit Step 10  ¶ 

  • Use an iPod opening tool to gently pry the battery up from the adhesive securing it to the outer case.

  • Use your thumb to pull the battery toward the left side of the Nano as you pry the battery's other edge out of the outer case.

first image

Add Note Edit Step 11  ¶ 

  • Use an iPod opening tool to gently pry the logic board off the adhesive holding it against the outer case.

  • Do not excessively pry the logic board upward.

first image
thumb image 1
thumb image 2

Add Note Edit Step 12  ¶ 

  • Use your iPod opening tool to gently push the dock connector toward the center of the Nano.

  • Remove the logic board assembly from the Nano, being careful not to damage the headphone jack assembly cable.

first image

Add Note Edit Step 13 — Headphone Jack Assembly  ¶ 

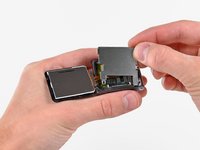
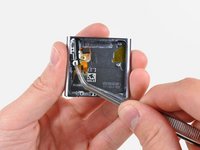
  • Remove the following five screws:

    • One 1.7 mm Phillips screw

    • Four 3.9 mm Phillips screws.

first image
thumb image 1
thumb image 2

Add Note Edit Step 14  ¶ 

  • Use a pair of tweezers to carefully pull the headphone jack toward the center of the Nano.

  • Avoid pulling on the cable, as it is very thin and delicate. The plastic mounting ear is a safer area to pull on.

first image
thumb image 1
thumb image 2

Add Note Edit Step 15  ¶ 

  • Very carefully pull the headphone jack assembly ribbon cable toward the dock connector to separate the sleep and volume buttons from the outer case.

  • Remove the headphone jack assembly.

first image

Add Note Edit Step 16 — Outer Case  ¶ 

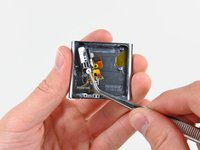
  • Remove the following three screws:

    • One black 1.8 mm Phillips screw

    • Two 1.7 mm Phillips screws

first image

Add Note Edit Step 17  ¶ 

  • Remove the clip from the outer case.

  • Outer case remains.

  • When reinstalling the clip, it is necessary to squeeze the base of the clip very tightly against the outer case as you insert the first screw.

To reassemble your device, follow these instructions in reverse order.

For more information, check out the iPod Nano 6th Generation device page.

Did you successfully follow this guide?

This guide has been completed 0 times.

Comments Add Note Comments are offturn on