
iPad Wi-Fi Battery Replacement

What you need

  1. iPad Wi-Fi Battery Replacement, Display Assembly: step 1, image 1 of 3 iPad Wi-Fi Battery Replacement, Display Assembly: step 1, image 2 of 3 iPad Wi-Fi Battery Replacement, Display Assembly: step 1, image 3 of 3
    • If your display glass is cracked, keep further breakage contained and prevent bodily harm during your repair by taping the glass.

    • Lay overlapping strips of clear packing tape over the iPad's display until the whole face is covered.

    • This will keep glass shards contained and provide structural integrity when prying and lifting the display.

    • Do your best to follow the rest of the guide as described. However, once the glass is broken, it will likely continue to crack as you work, and you may need to use a metal prying tool to scoop the glass out.

    • Wear safety glasses to protect your eyes, and be careful not to damage the LCD screen.

  2. iPad Wi-Fi Battery Replacement: step 2, image 1 of 2 iPad Wi-Fi Battery Replacement: step 2, image 2 of 2
    • In this guide you will be prying the iPad's display assembly away from the aluminum body. Read ahead and follow the directions closely to avoid damaging the display assembly or the fragile clips holding it in place.

    • There are 14 metal clips holding the display assembly in place, shown at left. As you pry in the following steps, do your best to pry around these clips and not slice through them with your opening tool.

    • If you do happen to break some clips, you can buy replacements here.

  3. iPad Wi-Fi Battery Replacement: step 3, image 1 of 2 iPad Wi-Fi Battery Replacement: step 3, image 2 of 2
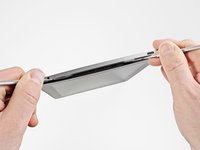
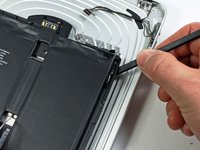
    • Insert a metal spudger between the top edge of the display assembly and the rear panel assembly.

    • Rotate the spudger away from you to release the tabs along the top edge of the display.

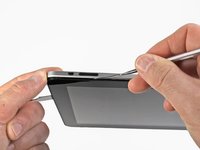
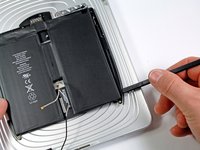
    • Insert a second metal spudger between the top edge of the display assembly and the rear panel assembly to keep the tabs from snapping back into place.

  4. iPad Wi-Fi Battery Replacement: step 4, image 1 of 2 iPad Wi-Fi Battery Replacement: step 4, image 2 of 2
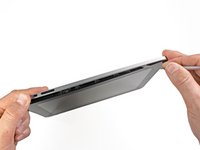
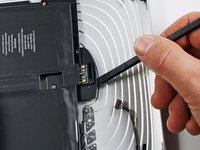
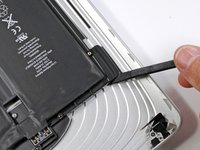
    • With one spudger, work your way along the right edge of the iPad.

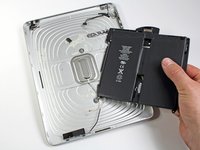
    • The front panel is held to the aluminum back by metal clips on the top, bottom, and left sides. The right side has plastic tabs which slide into recesses in the backplate.

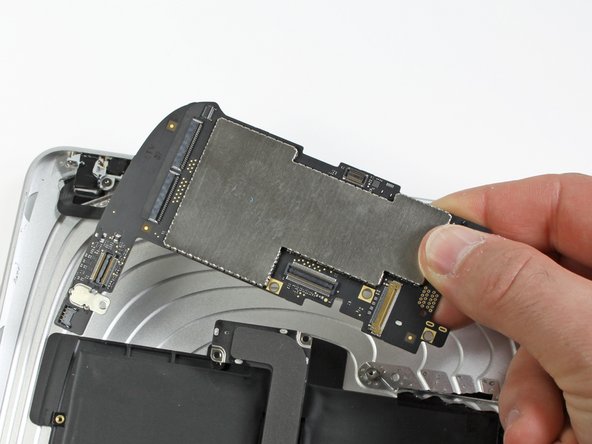
    • Once the clips are released, lift the left side of the front panel up and slide it to the left to clear the tabs from the aluminum backplate.

    • Pry carefully and gently—if you feel resistance, stop and pry at another spot.

  5. iPad Wi-Fi Battery Replacement: step 5, image 1 of 1
    • Lift the display assembly away from the rear panel assembly by its bottom edge.

    • Do not attempt to remove the display at this time, as it is attached to the rear panel assembly.

  6. iPad Wi-Fi Battery Replacement: step 6, image 1 of 1
    • In the following steps, you will disconnect the three cables attaching the display assembly to the logic board. The cables are for the following components:

    • Digitizer

    • Ambient Light Sensor

    • Display Data Cable

  7. iPad Wi-Fi Battery Replacement: step 7, image 1 of 3 iPad Wi-Fi Battery Replacement: step 7, image 2 of 3 iPad Wi-Fi Battery Replacement: step 7, image 3 of 3
    • Use the edge of a plastic opening tool to flip up the retaining flaps holding the digitizer ribbon cables in their sockets on the logic board.

    • Be sure you are flipping up the retaining flap, not the socket itself.

    • Pull the digitizer ribbon cables straight out of their sockets.

  8. iPad Wi-Fi Battery Replacement: step 8, image 1 of 1
    • Use a plastic opening tool to remove the ambient light sensor connector from its socket by gently prying upward.

  9. iPad Wi-Fi Battery Replacement: step 9, image 1 of 2 iPad Wi-Fi Battery Replacement: step 9, image 2 of 2
    • Disconnect the display data cable from the main board by flipping up the metal retainer by its black plastic pull tab.

    • Pull the cable connector away from its socket.

    • Pull the connector parallel to the face of the logic board.

  10. iPad Wi-Fi Battery Replacement: step 10, image 1 of 1
    • Remove the display assembly from the rear panel assembly.

  11. iPad Wi-Fi Battery Replacement, Logic Board: step 11, image 1 of 3 iPad Wi-Fi Battery Replacement, Logic Board: step 11, image 2 of 3 iPad Wi-Fi Battery Replacement, Logic Board: step 11, image 3 of 3
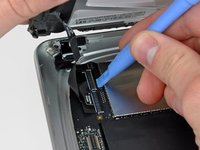
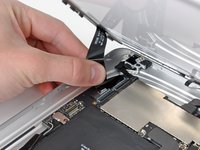
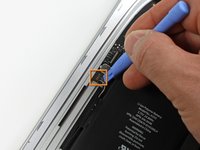
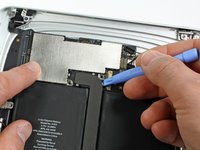
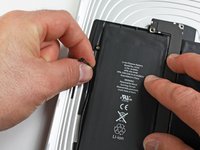
    • Use the edge of a plastic opening tool to:

    • Pry the side button connector up off the logic board from underneath the wires.

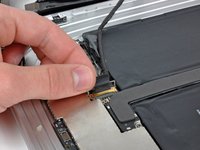
    • Pry the speaker connector up off its socket on the logic board from beneath the speaker wires.

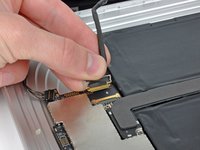
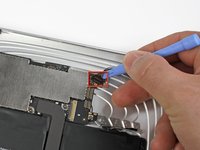
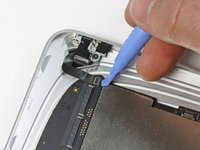
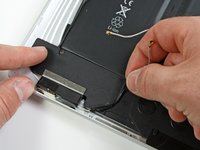
    • Carefully flip up the ZIF ribbon cable retaining flap on the socket near the headphone jack.

    • Be sure you are prying up on the retaining flap, not the socket itself.

    • Pull the headphone jack ribbon cable toward the left side of the iPad to disconnect it from its socket.

  12. iPad Wi-Fi Battery Replacement: step 12, image 1 of 1
    • Remove the following screws securing the logic board to the rear panel assembly.

    • Two 4.56 mm T5 Torx screws.

    • Two 3.76 mm T5 Torx screws.

  13. iPad Wi-Fi Battery Replacement: step 13, image 1 of 2 iPad Wi-Fi Battery Replacement: step 13, image 2 of 2
    • Use the edge of a plastic opening tool to carefully pry the dock cable connector straight up off the logic board.

    • Lift the logic board out of the rear panel assembly.

  14. iPad Wi-Fi Battery Replacement, Battery: step 14, image 1 of 1
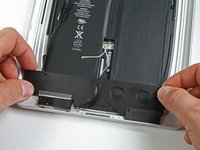
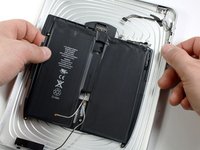
    • Remove the two 2.84 mm T5 Torx screws securing the speaker assembly to the rear panel assembly.

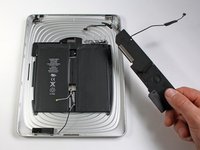
    • Remove the single T5 Torx screw securing the middle of the dock cable to the rear panel assembly.

  15. iPad Wi-Fi Battery Replacement: step 15, image 1 of 1
    • Remove the two 2.84 mm T5 Torx screws securing the dock connector cable to the rear case.

  16. iPad Wi-Fi Battery Replacement: step 16, image 1 of 1
    • Using a plastic opening tool, carefully remove the plastic cover shielding the WiFi/Bluetooth board and dock connector cable.

  17. iPad Wi-Fi Battery Replacement: step 17, image 1 of 1
    • Carefully pry the Wi-Fi and Bluetooth antennas up from their respective sockets on the Wi-Fi/Bluetooth board.

  18. iPad Wi-Fi Battery Replacement: step 18, image 1 of 1
    • Lift the dock connector cable out of the rear panel assembly.

  19. iPad Wi-Fi Battery Replacement: step 19, image 1 of 2 iPad Wi-Fi Battery Replacement: step 19, image 2 of 2
    • De-route the speaker cable from the left side of the battery case.

    • De-route the Wi-Fi antenna through its channel in the speaker assembly.

  20. iPad Wi-Fi Battery Replacement: step 20, image 1 of 2 iPad Wi-Fi Battery Replacement: step 20, image 2 of 2
    • Lift the speaker assembly and push it forward until the ports clear the bottom side of the lower case.

    • Remove the speaker assembly from the rear panel assembly.

  21. iPad Wi-Fi Battery Replacement: step 21, image 1 of 2 iPad Wi-Fi Battery Replacement: step 21, image 2 of 2
    • The battery is held to the rear panel by an excessive amount of adhesive. Proceed with patience and caution.

    • Use the flat end of a spudger to gently pry the battery up from the the lower case.

    • Gently continue to enlarge the gap by wiggling the spudger and running it along the right side of the battery.

    • Continue to pry until the right side of the battery is free from the rear panel.

  22. iPad Wi-Fi Battery Replacement: step 22, image 1 of 2 iPad Wi-Fi Battery Replacement: step 22, image 2 of 2
    • Insert the flat end of a spudger under the top edge of the battery and continue to separate the adhesive.

    • Continue doing so until the top of the battery is free from the rear panel.

  23. iPad Wi-Fi Battery Replacement: step 23, image 1 of 2 iPad Wi-Fi Battery Replacement: step 23, image 2 of 2
    • When there is enough clearance, use your hands to peel the battery off any adhesive still securing it to the rear panel.

    • Remove the battery from the rear panel.

Conclusion

To reassemble your device, follow these instructions in reverse order.

113 other people completed this guide.

14 Comments

make sure when putting back together to push down the digitizer clasps

zach - Reply

Tried this with 2 ebay "OEM" cheapo batteries. Both failed- wouldn't charge, reboot every few minutes.

Solution: Dissected both new and original batteries. Snipped out old LI-ION cells from original Apple battery pack frame. Soldered new LI-ON cells into original battery frame.

Success!

The battery pack includes both LI-ION cells and an small circuit board. The cheapo replacement battery packs don't work (with newer IOS versions? are they actively blocking 3rd party battery replacements?)

Using the circuit board from the original battery pack with new LI-ION cells seems to fix everything.

Be ready to peel off a lot of adhesive label stickers and maybe use a bit of electrical tape to produce a renovated battery pack that works- original Apple battery frame + new LI-ION cells..

Jason Sodergren - Reply

Thanks for letting us know that battery PCB takes LiIon cells replacement. I have the same problem with reboot using cheap ebay replacement battery. Going to test new LiIon cells for capacity and if OK - will resolder them.

Paul G -

PS: just replaced two cells, it works. Just in case, to prevent the charging PCB to loose the power (some LiIon controllers can lock because of power loss) I did it one by one. First I removed one cell, soldered replacement, then second one. I estimated capacity of new cells using Imax B6 charger - both of them were around 3100mah, not bad for noname $12 battery from ebay.

Paul G -

I am new to this. Does the iPad need to be kept powered up by an external battery while changing out the battery pack to prevent loss of apps and data? I don't mind so much losing data, it is backed to cloud. But apps are a problem as many of mine are no longer available.

Mike Nixon - Reply

Add Comment

View Statistics:

Past 24 Hours: 20

Past 7 Days: 138

Past 30 Days: 741

All Time: 462,664