Introduction
Your iPhone 4 won't hold a charge? Replace the battery! Luckily, replacing the battery on the iPhone 4 requires minimal disassembly. If your battery is swollen, take appropriate precautions.
For optimal performance, after completing this guide, calibrate your newly installed battery: Charge it to 100% and keep charging it for at least two more hours. Then use your iPhone until it shuts off due to low battery. Finally, charge it uninterrupted to 100%.
What you need
Video Overview
-
-
Power off your iPhone before beginning disassembly.
-
Your iPhone 4 rear cover may have either two #000 Phillips screws or Apple's 5-Point "Pentalobe" screws (second image). Check which screws you have, and ensure you also have the correct screwdriver in order to remove them.
-
Remove the two 3.6 mm Pentalobe or Phillips #000 screws next to the dock connector.
-
-
-
-
Remove the single 2.5 mm Phillips screw securing the battery connector to the logic board.
-
-
-
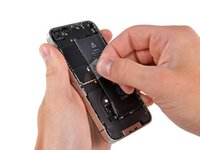
Use the clear plastic pull tab to gently lift the battery out of the iPhone.
-
If there's any alcohol solution remaining in the phone, carefully wipe it off or allow it to air dry before installing your new battery.
-
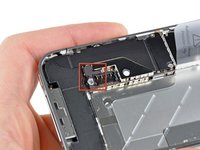
Before reconnecting the battery connector, be sure the contact clip (shown in red) is properly positioned next to the battery connector.
-


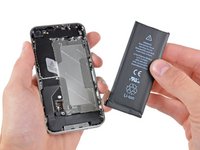
Compare your new replacement part to the original part—you may need to transfer remaining components or remove adhesive backings from the new part before installing.
To reassemble your device, follow the above steps in reverse order.
Take your e-waste to an R2 or e-Stewards certified recycler.
Repair didn’t go as planned? Check out our Answers community for troubleshooting help.
Cancel: I did not complete this guide.
2261 other people completed this guide.
Attached Documents

133 Guide Comments
When I put the battery in, the lead going from the battery to the plug was fully extended. You need to fold it back on itself - look at the shape of the battery you just removed.
Unfortunately, I didn't realize this until AFTER I clipped the new battery in. I tried to align the battery to where it should go while it was still connected, in the process I broke one of the soldered connections on the battery connector. Wouldn't boot up and did the continuous battery recycling.
Luckily, I was able to put the old battery back in and all was working again. I don't think I'll attempt a new battery at this point...
yes they need to add that
Tim -
Now that I put my old battery back in, my phone turns on but won't charge. Great. I have 68% until I have a dead phone, no battery. The battery I got from ifixit was a dud. This is a complex process--I've changed out displays on a laptop, hard drives, cpus. This is NOT a "moderate" job and needs major rework on their tips.