Introduction
Chances are if you have access to news media, you’ve heard of this phenomenon—Switch joysticks are drifting. Even though it sounds like it, it's not the latest trend amongst young people. It's a term for joysticks acting as though they are being moved, even when they are not, and the bane of gamers everywhere. So stop getting skeptical glares when you blame your lackluster gaming skills on your controller and get to fixing it!
The Basics
Before undertaking any of the more time-consuming solutions below, there are a few fundamentals to give a go.
- Update your Pro Controller. The Switch will typically prompt you to update when one is available, but to check manually, navigate to System Settings > Controllers and Sensors > Update Controllers.
- Update your Switch. Update settings can be found in System Settings > System > System Update.
- Clean the outside of the controller using a damp cloth and some compressed air. Your latest snack crumbs may be stuck, not allowing the joystick to return to the center.
Causes
In order for a joystick to work properly, it needs to have an idea of what the “neutral” position is, and what other values mean in relation to that. Calibration is the process the Switch uses to determine that. Based on the widespread nature of this issue, this is unlikely to resolve the problem but is easy enough that it warrants a try.
- Select the System Settings Application on the Home Screen.
- Navigate to Controllers and Sensors > Calibrate Control Sticks.
- Tilt the joystick that needs calibration.
- Follow the directions to evaluate the joystick’s current response.
- Press the X button to initiate calibration
- Follow the guide to calibrate the joystick, then retest.
Any gamer knows that your controller is going to get downright disgusting. No matter what you do. Even though the internals are shielded from most debris, there’s no keeping it out altogether. Giving the joystick mechanism a good clean can get you back on track.
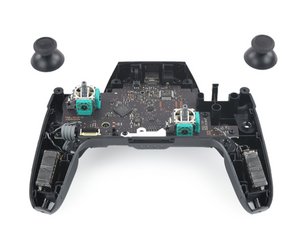
- Open up your controller and use compressed air to blow any debris out of the joysticks themselves.
- Pop off the joystick cap and spray some electronics cleaner into the mechanism. Ideally you’ll want a cleaner that doesn’t leave a residue (like BW-100).
- Move the thumb stick in all directions to spread the contact cleaner around. This will move the internal parts of the joystick and clean off any corrosion or debris in the process.
- If you don’t want to open up your controller, you can give the no disassembly method a go, but this sort of cleaning is best done directly.
- Verify no corrosion or any visible damage to the circuits is present on the joystick board. Clean anything up with isopropyl alcohol and a cotton swab.


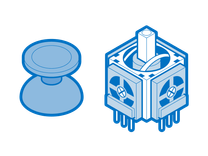
Ultimately, even cleaning may be a temporary fix. To understand why, you'll need to know a bit about joystick operation. Analog joysticks have an inherently limited lifespan. As you tilt the stick, small metal wipers move over an electrically resistive material. The position of these wipers creates a difference in voltage output. Your Pro Controller translates that voltage reading into directional information.
Over time, this resistive material wears away. This changes the way the sticks behave. Voltages will no longer read as expected and your character might end up slowly walking to their doom rather than sitting put. Erosion could become so severe, parts of the resistive track might wear through altogether.


- If cleaning hasn’t addressed drift adequately or the issue returns, replace the affected joystick. This will require some soldering, so it is not a repair for everyone. But even a soldering novice should be able to complete it.
- For added longevity replace your stock analog sticks with ones that use Hall-Effect sensors. These use magnets to generate the same voltage differences as an analog stick.
- Due to the lack of physical contact needed to generate voltage changes, they generally last far longer and can be more accurate. Third party companies make replacement sticks you can solder in just like the stock sticks.

- 35 - 40 minutesDifficult
Find compatible replacement parts for your Switch Pro Controller. All parts and fix kits are backed by the iFixit Quality Guarantee.
If you're still getting drift even after joystick cleaning and replacement, this issue can extend to the board level. It is usually related to liquid spill, but can arise in some cases even without.
- Inspect the motherboard thoroughly. Check for bend, burnt components, or any nefarious green fuzz.
- If damage is found, clean up any corrosion or burn with isopropyl alcohol and a cotton swab and reassess. You can retest after cleaning, but the damage may have already occurred. It might be time to replace the motherboard itself.
- You can also replace the necessary chip, or components if you are skilled in soldering small surface mount parts.This is more advanced than the average fixer can undertake, so proceed with caution, or seek professional assistance. It may also be more reasonable to replace the whole controller in this case, unless you're especially dedicated.

- 1 hourDifficult
1 common problem
View all