
This teardown is in progress – Reload periodically to see the latest changes!

What you need

  1. Western Digital My Book Live Teardown, Introduction: step 1, image 1 of 1
    • The 2TB MyBook Live is an interesting desktop NAS, as it packs not only a 2TB HDD but also Debian Lenny on some peculiar hardware:

    • A WD Caviar Green 2TB desktop hard drive with 64MB cache, using "IntelliPower" technology

    • 256MB RAM

    • A PowerPC-based APM82181 CPU running at 800Mhz, single core, with built-in RAID acceleration

    • One multi-color LED in the front

    • Gigabit Ethernet

    • Debian Lenny for PowerPC

  2. Western Digital My Book Live Teardown, Removing the Cover: step 2, image 1 of 1
    • While the MyBook Live's book-shaped chassis is nice, the clips preventing it from opening are not.

    • There are four inner clips in the back, 2 on each side of the chassis.

    • Slowly work around the clips, while opening the back, otherwise you risk breaking these. If you do, it's not too much of an issue.

    • Luckily, a Plastic Opening Tool can be used to separate the clips from the outer cover.

    • Simply insert the tool into the seams near the clip areas, and slowly pry the cover apart.

    • You may need to use multiple spudgers or screwdrivers to help separate the cover from the inner chassis.

    • Be careful and don't let any of the tools slide inside the chassis.

  3. Western Digital My Book Live Teardown, Sliding the Cover: step 3, image 1 of 2 Western Digital My Book Live Teardown, Sliding the Cover: step 3, image 2 of 2
    • The cover slides off once the back clips are pried apart, which makes it easier to grab a hold of the cover.

    • The top and bottom rails of the cover snap off from the inner chassis as you push forward.

  4. Western Digital My Book Live Teardown, Front LED.: step 4, image 1 of 2 Western Digital My Book Live Teardown, Front LED.: step 4, image 2 of 2
    • We remove the small plastic LED extension from the front of the unit.

    • It seems that the actual LED is on the CPU board, and WD used a small piece of plastic to bring the light over to the front of the unit.

  5. Western Digital My Book Live Teardown, Main Chassis: step 5, image 1 of 2 Western Digital My Book Live Teardown, Main Chassis: step 5, image 2 of 2
    • Some rubber padding keeps the hard disk in place, but a little push allows us to separate the hardware from the inner chassis.

    • When reassembling, do not force the rubber padding back in if it does not fit, most often that means that you did not align the assembly properly.

  6. Western Digital My Book Live Teardown, Continued Removal: step 6, image 1 of 2 Western Digital My Book Live Teardown, Continued Removal: step 6, image 2 of 2
    • Don't pull too fast! Some clips get in the way of the board, and you have to clear them by bending the outer frame slightly outwards.

    • We make sure that the board doesn't snag against the chassis.

  7. Western Digital My Book Live Teardown, Removing the Padding: step 7, image 1 of 2 Western Digital My Book Live Teardown, Removing the Padding: step 7, image 2 of 2
    • There is a large padding block on the corner of the chassis.

    • We simply pull on it to remove it, the adhesive is non-residual.

    Is there a point in this block being present? It doesn’t seem to do anything at all useful.

    Frank Hovis - Reply

  8. Western Digital My Book Live Teardown, Continued Removal: step 8, image 1 of 1
    • As you push the chassis away from the board, you may also have to push on the corner area to push the metal tab away from its rubber socket.

  9. Western Digital My Book Live Teardown, Extracting the Board: step 9, image 1 of 2 Western Digital My Book Live Teardown, Extracting the Board: step 9, image 2 of 2
    • Pushing upwards slightly eventually gets the board to release itself from the rubber pads.

    • We now have access to the board, completely freed from the main chassis.

  10. Western Digital My Book Live Teardown, Pulling the Rubber Feet: step 10, image 1 of 2 Western Digital My Book Live Teardown, Pulling the Rubber Feet: step 10, image 2 of 2
    • Some rubber feet cover the other two metal tabs, we remove it by pulling on them.

  11. Western Digital My Book Live Teardown, Removing the Metal Tabs: step 11, image 1 of 2 Western Digital My Book Live Teardown, Removing the Metal Tabs: step 11, image 2 of 2
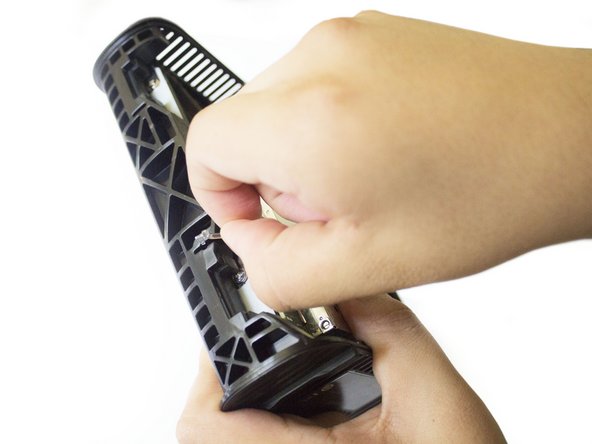
    • Next we remove the 4 metal tabs (and their bars) by unscrewing the fasteners that hold them.

    • There are 4 screws, two on each side of the hard disk area.

  12. Western Digital My Book Live Teardown, Removing the Hard Drive shield: step 12, image 1 of 2 Western Digital My Book Live Teardown, Removing the Hard Drive shield: step 12, image 2 of 2
    • After removing the metal clips and bars, we can now remove the shield covering the Hard Disk.

Foxlet

Member since: 05/17/10

601 Reputation

3 Guides authored

10 Comments

You do not break the rear 4 clips, simply insert an opening tool into the front (top side and bottom side) and slowly "walk it" open as you see being done in step #3.

Repeat, you do NOT need to break anything when you open up any device, if you think something is snapping, bending, or breaking, Stop and look for what you are missing with said repair.

as in this tear down, it should be completely silent, no popping of clips or rails.

Nick - Reply

Thanks for that advise and it's been very simple with the 4 clips.

patrickkluge -

I find it unfortunate you didn't showed what kind of harddrive the WDMybookLive contains.

Sander Schaeffer - Reply

Maybe it’s a little bit too late now, but it is a WD Red NAS drive

Andres Rendon -

Totally brilliant. Much easier to follow than the videos i watched on UnoWhat!

Christopher Lambert - Reply

I just cracked mine and the 3TB drive inside is the WD Caviar Green SATA (MDL: WD30EZRS-11J99B1). No jumpers present.

Swigs - Reply

Anybody know how to format the drive and use with SATA cable? I connect to my Mac and Windows machine and it cannot detect a hard drive.

mcarr67 - Reply

Has anyone made a repair video of this device. Have one of them and it has stopped working so all of my files are untrivieable for now. Any suggestions? I am a novice in this issue but am willing to learn any shortcuts to getting to my files. Thanks in advance. Kevin. Cowboy0001@aol.com

Kevin Desmond - Reply

worked great (did break one clip tho)

super clear step by step, thank you

Running EasUS Data Recovery 9.0 Pro, on my wiped WD MyBook Live 3TB drive

will keep you posted on how it turns out

Kevin Gore - Reply

I just found support for installing OpenWRT onto this device. Yes, it is primarily a networking distro, but if people use it on their router to share the USB port as NAS, why not on a dedicated NAS appliance.

Bob Zeilstra - Reply

Add Comment

View Statistics:

Past 24 Hours: 7

Past 7 Days: 35

Past 30 Days: 151

All Time: 33,185