Introduction
Samsung is back, baby! The world's biggest smartphone maker kicks off 2017 by launching what is very nearly the world's biggest smartphone—with its monster 6.2-inch display, the Galaxy S8+ packs a visual wallop. But how will it fare on the teardown table? Let's get the exploded view.
Oh, were you looking for our standard Galaxy S8 teardown? Well, look no further.
Want to get the edge on future teardowns? Follow along on Twitter, make friends with us on Facebook, and check out our Instagram for all the latest!
What you need
Video Overview
-
-
You've seen the slick exterior of the S8+ in Samsung's promotional imagery, but we're going deeper. A few of this teardown's expected waypoints include:
-
6.2-inch, dual-edge, Super AMOLED display with 2960 × 1440 resolution (529 ppi)
-
Qualcomm Snapdragon 835 (or Samsung Exynos 8895) processor, with 4 GB RAM
-
12-megapixel rear camera with dual pixel autofocus and 4K video capture; 8-megapixel selfie camera
-
64 GB internal storage, expandable via MicroSD card (up to 256 GB additional)
-
IP68 water resistance rating
-
Android 7.0 Nougat
-
-
-
Ports on the bottom include a headphone jack, USB-C connector, microphone port, and speaker grille.
-
The front face is smooth and very nearly featureless—the physical home button has been replaced by a pressure sensor that lives under the display, making this a truly monolithic device.
-
Lastly, frequent SIM-swappers take note: there are two nigh-identical openings in the top of the S8+. One is for your SIM eject tool, and the other houses a microphone. Don't mix those up.
Samsung went with easier solution in regard of fingerprint reader because synaptic did not finish developing the on screen sensor; while they are under pressure to release a new flagship in a rather empty market for them after the Note 7 fiasco.
I would love to understand the damage (especially to the IP rating) that may have been caused by pushing the sim ejector through the top mic hole.
-
-
-
Time for a few quick comparisons before we get down to brass tacks.
-
In the three-fer, we've got the S7 Edge on the left, S8+ in the center, and S8 on the right.
-
Thanks to its thinner bezels and unusual 18.5:9 aspect ratio, the S8+ manages to pack a 6.2" display in about the same form factor as the 5.5" S7 Edge.
-
Stacked against last year's offerings, the only noteworthy difference is the migrating flash assembly and relocated fingerprint reader.
-
-
-
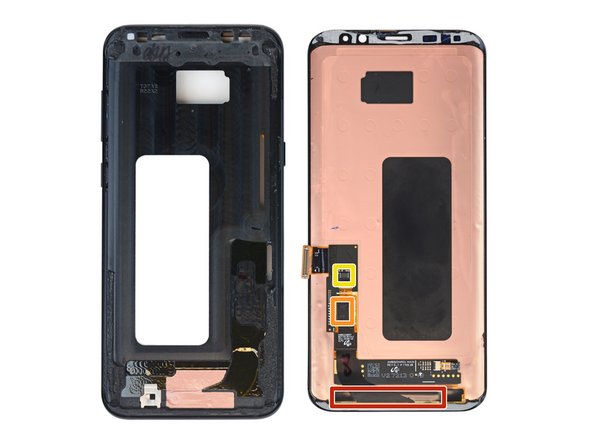
...But for all our talk, this rear panel does present something new. The fingerprint reader lives in the rear panel, with a very short cable tying it to the motherboard.
-
It looks like Samsung designed this cable to safely pull free with the rear panel. With almost no slack in the cable, the gentlest lift of the panel yanks the cable right out from its tiny pop connector. This makes it decidedly less damage-prone than certain fingerprint sensor cables we've seen before.
-
Cable dispatched, and we've got the glass out of the way. The S8+ and S8 follow the S6's move to a glass rear panel. This design has saved Samsung the engineering effort that goes into integrating antennas into a metal-backed phone, at the cost of durability and repairability.
-
Twice the crackability and a heck of an opening procedure won't help when it's time to score the repairability.
What is the fingerprint reader made from this year? The S7 fingerprint reader in the home button was prone to scratching and peeling last year. Is the fingerprint reader covered by glass this year in the S8 and S8+? Very curious to know as I like things to last and wear well.
-
-
-
With the midframe coming out in pieces, things are looking very similar to the S7 and S7 Edge.
-
This time the upper antenna assembly is combined with the NFC/wireless charging panel, like on the Note7.
-
The coil should also perform Samsung Pay functions, duplicating MST—presumably using the coil as an electromagnet to act as a credit card strip would on a card reader.
-
-
-
-
Let's hope that Samsung's improved testing procedures are what the Note7 was missing, because this design looks about the same to us.
-
And it's still a bear to pry it off that adhesive. Even with the battery fully removed, the glue won't let go.
-
The S8+ features a 13.48 Wh (3500 mAh at 3.85 V) battery—the exact same capacity as the Note7, and a little less than the S7 Edge's 13.86 Wh.
-
Samsung continues to beat Apple in the battery capacity wars, with the iPhone 7+ weighing in at 11.1 Wh (2900 mAh at 3.82 V).
-
-
-
We pop out the action-packed motherboard and start plucking off cameras.
-
The "Hero" Sony of old has been traded in for the "Dream1" Sony in the rear-facing/main camera. Labeling variations aside though, this purports to be the same camera hardware as in the S7/S7 Edge—Samsung has refined the software, nothing more.
-
Next we have the front-facing camera and another iris scanning camera, previously seen in the Note7.
The image sensor is also different. Being an IMX333. On top of that the ISP has been upgraded. Far from just "sofware improvements, nothing more" I could tell the moment I took a RAW photo on both using 500 iso. Despite using RAW, bypassing the jpeg processing, the S8 image was noticeably less noisy with much less color blotching
-
-
-
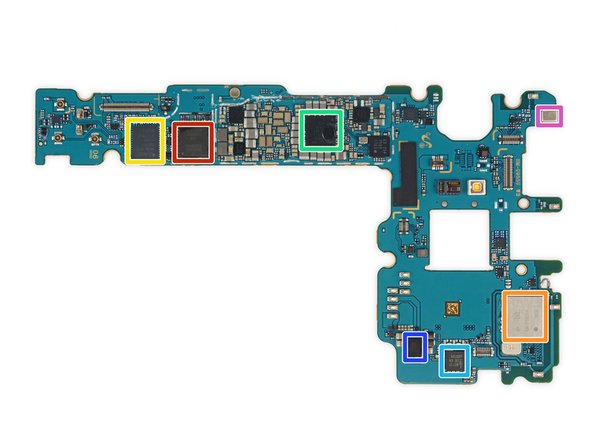
We push the cameras off to the side in order to pore over this motherboard's silicon. Our findings include:
-
Samsung K3UH5H50MM-NGCJ 4 GB LPDDR4 RAM layered over the MSM8998 Snapdragon 835
-
Toshiba THGAF4G9N4LBAIR 64 GB UFS (NAND flash + controller)
-
Qualcomm Aqstic WCD9341 audio codec
-
Skyworks SKY78160-11 front-end module w/ LNA
-
Avago AFEM-9066 front-end module
-
Qualcomm QET4100 envelope tracker
-
Silicon Mitus SM5720 Interface PMIC
-
-
-
And on the reverse side:
-
Qualcomm WTR5975 RF transceiver
-
Murata KM7118064 Wi-Fi module
-
Avago AFEM-9053 front-end module
-
Qualcomm PM8998 (similar to PMM8920) power management
-
NXP PN80T NFC controller w/ secure element
-
Renesas (formerly IDT) P9320S wireless charging receiver
-
Likely Knowles MEMS microphone
-
-
-
IC Identifications, pt. 2:
-
Qualcomm ? D5320 high-band diversity IC (likely)
-
Maxim Integrated MAX98506 audio amplifier
-
Qualcomm PM8005 ? power management
-
Maxim Integrated MAX77838 power management
-
Samsung S2MPB02 camera power management
-
Samsung S2MM005X02 USB power delivery controller (likely)
-
Samsung S5475S2 ? camera processor (likely)
-
-
-
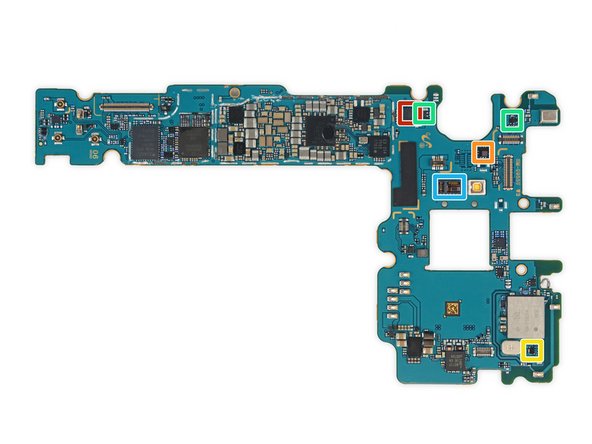
IC Identifications, pt. 3:
-
NXP Semiconductor PCAL6524 24-bit I/O expander
-
ON Semiconductor FPF3688UCX load switch (likely)
-
ON Semiconductor FAN48630UC35X 1.5 A synchronous regulator
-
Vishay DG2730 2 port, 480 Mbps DPDT USB 2.0 analog switch
-
NXP Semiconductor NCX2200 comparator
-
ON Semiconductor FXLA0104QFX 4-bit voltage translator
-
Probably some low/mid-band front-end modules
-
-
-
IC Identifications, pt. 4 (sensors):
-
STMicroelectronics LSM6DSL 3-axis accelerometer/gyroscope (assumption)
-
STMicroelectronics LPS22HB Pressure Sensor
-
AKM Semiconductor AK09916C 3-axis electronic compass
-
Ablic (formerly Seiko Instruments) S-5712CCDL1-I4T1U Hall Effect Sensor (assumption)
-
Analog Devices ? Heart Rate Sensor
-
-
-
We extract the I/O daughterboard. There's lots of ingress proofing in evidence here, including the speaker grille surround and the tiny seals on the USB Type-C connector and headphone jack—all part of that IP68 rating.
-
The headphone jack itself remains a modular affair—good news for repairability, as this is a high-wear component.
-
This daughterboard also houses some antenna tuners and likely a Semtech SX9320 proximity sensor.
Is the voltage regulator on the daughter board?
My S8+ indicated moisture when I plugged in the charging cable, the next day it did not but It will not take a charge. Even wirelessly. So I think it is the voltage regulator that is fried. If it is on the daughter board I can pillage one from another Google Locked phone and fix mine.
You think this will work?
-
-
-
After a peek at the heat pipe and contact pad button cables, we extract a few more bits from the chassis.
-
Out comes ye olde vibrator motor.
-
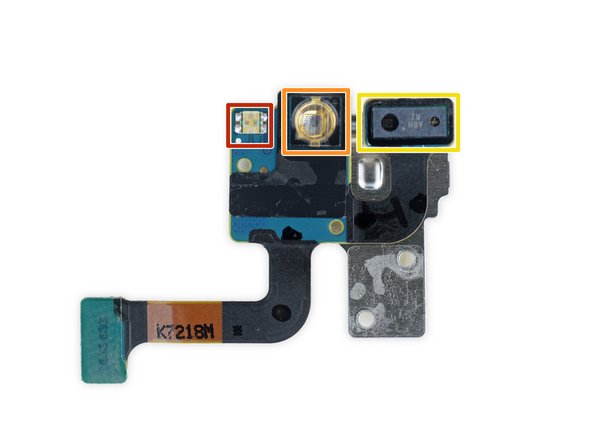
Also the nifty sensor array (with moisture indicator):
-
RGB LED (probably)
-
IR emitter (for the iris scanning camera, maybe)
-
Likely AMS TMD4906 rangefinder/color sensor module (probably) for dimming the screen during calls.
I thought the IR camera/emitter on the front should be part of the iris scanning system and not pulse reading
Exactly. Yellow is the proximity sensor, orange an IR LED for the iris scanner and red the notification LED, as stated.
Not as stated, the description says it's for illuminating fingers for pulse reading,,,
djlobb01 -
-
-
-
On a hunt for the mysterious home not-button, we dig into the display despite previous... difficulties.
-
Luckily this fused display/digitizer peels up from its frame with a decent struggle, but no damage.
-
Hoping to find some hidden detail under the display cabling, we peel it up and find—zilch. No model info and no visible pressure sensor. Better luck next time.
-
Samsung S6E3HA6 display driver
-
STMicroelectronics fingertip touchscreen controller
-
Winbond W25Q80EWUXIE 8 Mb serial NOR flash memory
There is a force sensor..hope everybody can see it which connects to the display/timing/touch controller board
This interests me most.... So there is no pressure sensor at all?? How does the S8 register a home button "press" without any kind of pressure pad/sensor?
A pressure sensor isn't needed, it just needs to see how big an imprint your finger is making as the harder you press, the bigger the contact area is on the screen
that seems like a conductive layer beneath with a sponge covering. this could be a force sensor.
-
-
-
That's it for the S8+. If you're still hungry for more teardown, warp on over to our analysis of the standard Galaxy S8.
-
Meanwhile, it's time to give this phone a score.
Hiya!
I was wondering if you guys could maybe do a comparison?
1) like the SD835 vs the A10 size.
2) volume of battery on S8 vs iphone7
3) size, efficency and density of the two motherboards (i think iphones is much smaller)
4) size and effectiveness of the two vibration motors (since S8 seems 1/3 the size)
4) also could you compare the two speakers (S8 and iphone7) against the and dual front speaker moto phone?
I ask because once again I am under the impression that the moto speakers are 1/3 the size of the main speakers in the two leaders and the same size as the ear speaker on the two.
5) and also maybe the effectiveness of the hydrophobic coating on the moto phones vs the two leaders?
6) and finally compare their internals density and effeicency to the Xiaomi Redmi 3s (because as far as I know, that is the smallest 5inch phone with a 4000mA battery)
I think that would be a really cool and enlightning.
love your work guys.
cheers.
-
- Many components are modular and can be replaced independently.
- The battery can be replaced, but tough adhesive and a glued-on rear panel make it unnecessarily difficult.
- Front and back glass make for double the crackability, and strong adhesive on both makes it tough to access the internals for any repair.
- Because of the curved screen, replacing the front glass without destroying the display is extremely difficult.


Final Thoughts
Repairability Score


(10 is easiest to repair)
32 Comments
Hi: the breakdown exercise did you get a positive id on who is providing the USB-C controller chip? Thx!
I don't like glue on the battery and its not just that its the same capacity as we already see on the Samsung Galaxy S7 its kinda sad.
Man i now i will probably wait for one plus 5 or next google device because these two have big support on XDA community and they have regulari updates.
OnePlus are great with updates. My friend had Nougat on his OnePlus 3 before any of the leading phone makers (excluding Google Pixel obviously).
djlobb01 -
The S8/S8+ use a Sony IMX333 or Samsung S5K2L2 up from the IMX266 S5K2L1 found in last year's S7/S7E.
Thanks as always, guys. I seem to miss the speaker, though. Is it under the light gray grille?
Ah, ok. I see. It is the component in the lower midframe (https://d3nevzfk7ii3be.cloudfront.net/ig...).
Do you know how the home button works since there's no pressure sensor?
Does it have a separate "taptic engine" or uses the same vibration motor?
Thanks.
It likely works by measuring the surface area of the finger placed on the screen. When you press harder to activate the virtual button your finger will create a larger surface area on the screen which can be measured as more force being applied.
Leo Best -
Because samsung opted for Toshiba UFS storage if they also manufacture UFS storage
Why would you expect to find a pressure sensor behind the displyay? The screen does not deform, the digitiser just has to look for the contact patch of your finger getting bigger as you press harder on that area.
Open the Samsung Dex Dock as well!
Are the s8 and s8+ motherboards the same?
Photos [|3]
Hi, could you see a photo in high resolution, how is the earphone hooked? The frontal bone, I get curious about how it is maintained and how it is, and if it could sink without meaning to. Thank you
Do you mean the earpiece speaker? It can be seen in this photo, the last photo in step 6, at the top of the phone. It is adhered to the case and connected via spring contacts to the back of the motherboard. The speaker grille can be seen in this photo, the second image on step 13 at the top of the phone.
Can someone tell me what type the 14 Phillips screws used to hold down the NFC antenna, charging coil, and loud speaker? In addition, what are the 5 Phillips screws used to hold down the charging port PCB?
accidently I entered the ejection pin in the bottom mic.hole in S8 please advise if I already damaged the mic and/or the water resistant sealed?
I want to share my experience with you all.
We at HiGenius.nl fix smartphones all the time like Samsung S8 Plus too. unfortunately i did not see in this video that the sim tray is different than ever before. This because the tray is attached at the back of the board. So dont be surprised while you see this for the first time. Just be very cautious while removing the board. it wil follow so don’t worry.
I recently disassembled my Samsung galaxy s8 Plus the other day to replace the usb-c port as it would no longer lock in the charging cable.
However upon putting it back together and re-inserting the SIM card, it can no longer connect to my network provider. I get no mobile data or cell reception at all. However Wifi connections still work.
I was wondering if you may have an idea at what piece, board ect may play a role in connecting to the network.
The SIM works fine in another samsung phone that I previously used, so it is definitely hardware.
I’ve done network setting resets, WiFi calling is not on, and ive factory reset.
Sort of wishing I just bought a wireless charger at this point…
Thanks,
ZL
Something like that happened to me with an ASUS phone, the cause of the problem was that I did not properly connected the antenna (it was a little loose).
Hops this helps!
My galaxy s8 replaced screen isn't black what other part do i need to buy
The pictures don’t match what is received for the Galaxy S8+. It’s also not clear where to attach the perimeter adhesive. On the lip of the back cover or just inside the well area. In addition, after exposing the adhesive (after removing the clear side), no matter how weel you pre-align the position, you can’t count on the adhesive to stick to whichever method questioned above, without some of it not releasing cleanly from the colored backing. Yes. firm pressure was applied before moving a little further down. At times the adhesive stuck so strongly to the colored backing, it stretched the adhesive out of shape.
I have repaired hundreds of laptops and all in ones, so I understand there are subtleties in a repair, and I found it quite confusing replacing the battery and fingerprint sensor and other necessary parts related to doing that repair with the either inaccurate, outdated, or lack of detail provided (but much needed) in this guide.
can i buy motherboard for samsung galaxy 8plus scv35
hhera,n - Reply