Introduction
The Note7 came in hot but went out in a show of flames and combustion. Rising out of its ashes is Fawkes the Note8! Samsung has pulled out all the stops on the specs of this phone, and added a few stops where the battery’s concerned. Join us—and hopefully not the local fire department—as we open up the Samsung Galaxy Note8!
Looking for more fiery teardown updates? Follow us on Facebook, Instagram, or Twitter for the latest teardown news.
What you need
Video Overview
-
-
The Note8 is a tall phone. Let's see what occupies all that space:
-
Edge-to-edge, 6.3" Super AMOLED display, 18.5:9 aspect ratio with 2960 × 1440 resolution (521 ppi) and Gorilla Glass 5
-
Qualcomm Snapdragon 835 processor with 6 GB RAM
-
3300 mAh battery
-
Dual-lens, dual OIS main camera system with one 12 MP wide-angle lens with ƒ/1.7 aperture and one 12 MP telephoto lens with ƒ/2.4 aperture
-
64/128/256 GB of internal storage with 256 GB available via microSD expansion
-
S Pen slot, USB-C port, and headphone jack
-
IP68 dust and water resistance rating
-
-
-
You can see right through this phone if you squint hard and have the ability to fire high-energy photons.
-
The X-ray intel suggests a somewhat familiar layout, but a little physical poking and prodding is definitely in order. Ready the tools!
-
But first, a quick exterior comparison of the Note8 and Note7 Fan Edition reveals a bigger display, slimmer bezels, and a fingerprint sensor that has migrated to the back of the phone—where it's now joined by not one, but two cameras.
-
-
-
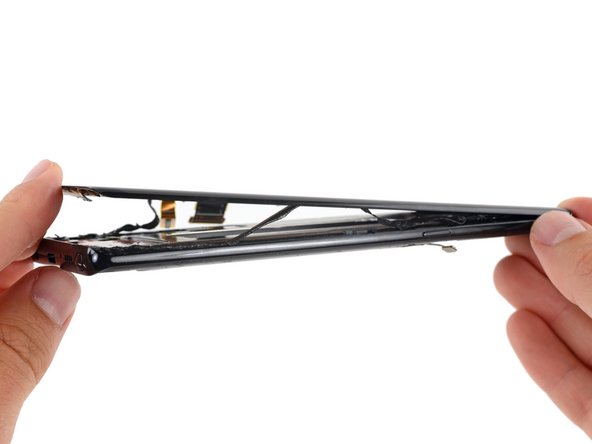
This glue-ridden heat-pry-and-slice opening procedure is certainly not our favorite, but at least by now it's getting familiar. As usual, it all starts with our trusty iOpener.
-
Cracking open the phone, we spy a delicate fingerprint sensor cable. This makes carving through all that glue a bit treacherous as the cable might be easy to slice right through if you aren't expecting it.
-
-
-
We are pleased that we get to use a Phillips driver to remove the midframe/NFC antenna/PMA and Qi wireless charging coil combo.
-
After removing that maxed-out midframe, we remove the bottom speaker assembly to get our first peek at the internals.
-
Is this a subtle response to past battery woes, or just Samsung working to tidy up? Time to take a look at that power plant.
-
-
-
In line with other recent Samsung phones, the battery squats in a little pit of glue-lined sadness, but we quickly set to work digging it free.
-
A little heat can help soften the glue here, but heat and lithium-ion batteries form a combustible mix—so we opt for a different solution.
-
This Samsung SDI-made battery plonks down 12.71 Wh (3300 mAh at 3.85 V) of capacity.
-
That's 6% less than the Note7's 13.48 Wh—but keep in mind that battery burned in more ways than one. The safely revamped battery in the Fan Edition clocked in at only 12.32 Wh, so this actually represents an improvement (assuming of course no fire).
-
-
-
-
Next we get our hands on the motherboard, along with the Note8’s many cameras.
-
If we were impressed with the number of cameras last time, the new Note ups the ante with four cameras:
-
Facing the front of the phone we have an iris scanner and an 8 MP, ƒ/1.7 camera.
-
Facing the rear we have Samsung's new dual camera module: one wide-angle and one telephoto camera, both with OIS. This system allows for some pretty cool new features.
-
OIS confirmed. This magic bonus image reveals a squad of dense, dark shapes—those'd be the magnets—surrounding both camera lenses. Neat!
-
-
-
Let's notate what powers all of this screen:
-
Samsung K3UH6H60AM-NGCJ 6 GB LPDDR4X SDRAM layered over a Qualcomm Snapdragon 835
-
Samsung KLUCG4J1ED-B0C1 64 GB UFS flash storage
-
Qualcomm WCD9341 Aqstic audio codec
-
Skyworks 78160-11 power amplification module
-
Avago AFEM-9066 power amplification module
-
Wacom W9018 touch control IC
-
-
-
We reserve the right to continue bellyaching about the opening procedure on these phones, but once inside it's not all bad news.
-
The USB-C port, a component that will experience wear, can be removed with the daughterboard.
-
Meanwhile, the 3.5 mm headphone jack is present (huzzah!) and completely modular. We find this essential on premium handsets.
-
All that, plus an IP68 water/dust ingress protection rating that bests Apple's efforts. Not too shabby.
-
The front-facing sensor assembly is also present on its own little board—another easily replaceable module!
-
Next we open up the S Pen compartment … to find the S Pen. Kind of obvious I guess, but we couldn’t help ourselves.
-
-
-
The Note8's OLED panel has been much ballyhooed, with many superlatives, but we're mostly just interested in how it comes off.
-
Answer: bring heat and alllllll your opening picks.
-
Along for the ride: Samsung S6SY661X (likely touch controller)
-
-
-
With both the Note7 and Note8 styluses on hand, we couldn't help but do our own comparison—Star Wars style.
-
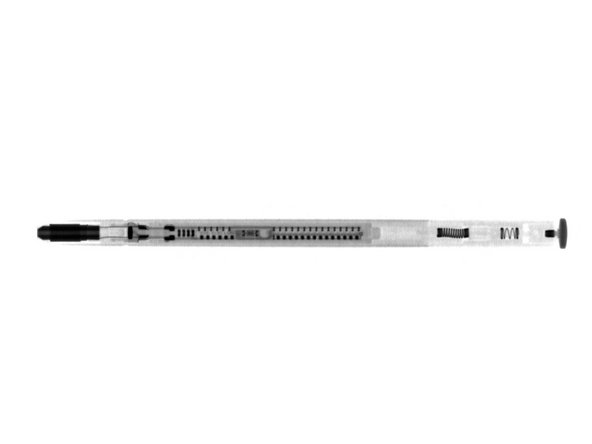
After glorious combat we asked our friends at Creative Electron to show us the inner-workings of the S Pen.
-
-
-
We hope you took notes along the way, because this Note is kaput!
-
Big thanks to Creative Electron for once again bringing our teardown into a new dimension!
-
Feast your eyes on all the bits and stay tuned for a score.
-
- Many components, including all of those that experience wear, are modular and can be replaced independently.
- The only screws in this phone are standard Phillips screws.
- The battery can be replaced, but tough adhesive and a glued-on rear panel make it unnecessarily difficult.
- All repairs require removing the glass rear panel, which is challenging due to the large amount of adhesive.
- Replacing the display requires removing the glass rear panel and the display, both of which are fragile and secured with strong adhesive.


Final Thoughts
Repairability Score


(10 is easiest to repair)
