
What you need

This teardown is not a repair guide. To repair your Adapter, use our service manual.

  1. Nokia AC-16U USB Power Adapter Teardown, Crack Open The Case: step 1, image 1 of 3 Nokia AC-16U USB Power Adapter Teardown, Crack Open The Case: step 1, image 2 of 3 Nokia AC-16U USB Power Adapter Teardown, Crack Open The Case: step 1, image 3 of 3
    • This power supply is slim and unusually attractive.

    • That white case is 39mm in diameter, and 15mm thick: pretty small for this power level (see heat sinks later).

    • The case is glued together, so you're not going to get into this one cleanly. I sawed a slot in the side, and used a screwdriver to crack the glue.

  2. Nokia AC-16U USB Power Adapter Teardown, What's Inside?: step 2, image 1 of 3 Nokia AC-16U USB Power Adapter Teardown, What's Inside?: step 2, image 2 of 3 Nokia AC-16U USB Power Adapter Teardown, What's Inside?: step 2, image 3 of 3
    • The wall power pins lead to two spring contacts.

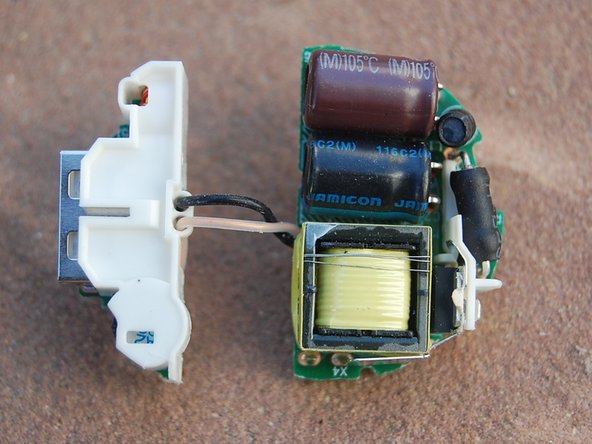
    • There's a plastic barrier between the low voltage and high voltage sides (you can't get much better than that!).

  3. Nokia AC-16U USB Power Adapter Teardown, How about some detailed PCB Photos?: step 3, image 1 of 2 Nokia AC-16U USB Power Adapter Teardown, How about some detailed PCB Photos?: step 3, image 2 of 2
    • Pretty tight layout.

    • Note the heat sink with thermal interface material, and the landing pads for the line voltage springs.

Bryce Nesbitt

Member since: 11/30/14

1,023 Reputation

9 Guides authored

One Comment

Nice teardown

Omeke - Reply

Add Comment

View Statistics:

Past 24 Hours: 0

Past 7 Days: 3

Past 30 Days: 10

All Time: 2,526