Introduction
The Nintendo GameCube launching 2001 was the second most powerful gaming console of its time, though it didn't feature any other multimedia capabilities.
It was my first stationary gaming device and I still appreciate it, because a lot of good games like Zelda: The WindWaker and the best version of Resident Evil 4 have their homes on this platform.
The unit disassembled in this teardown is a PAL one.
That's it. Enjoy the teardown!
What you need
-
-
Before you can even think of disassembling any Nintendo device you have to face the same problem with every console except NES and Wii: the screws of the enclosure. And the most tricky fact of these screws is their type because this is not a reasonable standard screw.
-
-
-
The four screws I'm talking about are a compound of a flat plate with a thicker convex layer with six notches in the brass.
-
This bit is a Nintendo Reduced E Series bit size 8. Found at http://eazypower.com/shop/nintendor-tee-...
-
-
-
I couldn't find anything suitable in the internet, so I built one on my own in this way:
-
Using a steel rod of about 8 mm diameter.
-
I tried to mill three teeth with equivalent distance around the boundary of one end of the rod with an angle grinder. After that I drilled a hole perpendicularly in the center of the rod. Taddaah... a working screwdriver!
-
Now let's begin the Teardown.
-
-
-
Make sure to have a game disc inserted to avoid damaging the lens. Flip the unit upside down and remove the screws sitting in the four holes with your possibly self-made screwdriver. Don't remove the enclosure yet!
-
Turn the device on its stands again, now lift the top case off. It'll come up easily.
-
-
-
-
Unsnap the controller port cover and the rearmost I/O-cover by unsnapping the two snaps on the sides of each cover. Don't remove the controller panel yet.
-
Then remove the heatsinks of the memory card slots (necessary step).
-
-
-
Now start removing the 'normal' Phillips #0 screws.
-
Start by removing the fan assembly.
-
then unscrew the 12 visible screws on the edging of the now not so cube-shaped GameCube.
-
-
-
Now you can lift the drive assembly up. You maybe have to loosen it a bit with a screwdriver or a heavy duty spudger.
-
The mainboard is now visible.
-
-
-
Now remove the heatsink. Unscrew the six screws holding it.
-
Now use anything flat and durable to carefully lift up the heatsink by putting it under the aluminium and using it gently as a lever.
-
-
-
If there are thermal pads remainig on the processors and/or ram chips, remove them with a plastic spudger.
-
Now disconnect the controller port panel connector by lifting and jiggling it carefully. It should come off easily.
-
-
-
24 MB MoSys 1T-SRAM
-
ATI 'Flipper' GPU, 162 MHz with 3 MB 1T-SRAM embedded within the die
-
IBM 'Gekko' CPU, 486 MHz (PowerPC 750CXe-based core)
-
Connectors (2nd pic):
-
'Hi Speed Port'
-
'Serial Port 1'
-
'Serial Port 2'
-
-
-
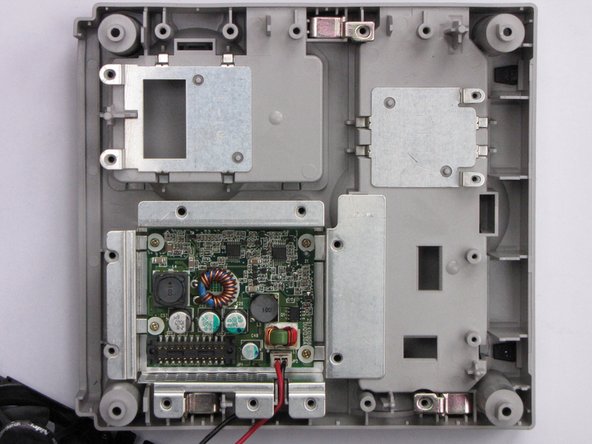
If you lift the mainboard up, you'll see a metal plate, probably for EMI-protection. Remove the two screws holding it and you have access to the internal power supply.
-