Introduction
Oh Happy Joy! It's here! The Nintendo DSi XL for all to see! Whoopee! Join us for an exciting teardown into the innards of this behemoth of a DSi.
Also check out the video slideshow of the teardown!
What you need
-
-
The Nintendo DSi XL is the latest iteration of Nintendo's ever-popular handheld gaming console, the Nintendo DS.
-
Along with fancy new packaging, the new features include:
-
Two screens that are 93% proportionally bigger than those found in the DS Lite.
-
A new full size stylus for added precision on larger screens.
-
-
-
Contents of box:
-
Nintendo DSi XL
-
Operation Manual
-
Quick Start Guides
-
AC Adapter
-
Full Size Stylus
-
Mario, Mario, Mario...when will you understand...no matter how many invitations you send for Club Nintendo, our answer is still no...
-
-
-
The DSi XL measures in at 161 x 91.4 x 21.2 mm and weighs in at a whopping 314 g. That's 45% heavier than the 217 g DSi.
-
Side by side comparison of the DSi (left) and DSi XL (right).
-
The featured specs of the DSi XL are the twin 4.2" LCD panels.
-
The back side of the DSi XL. What a surprise! It's made in China.
-
-
-
The full-sized stylus, measuring 10 x 130 mm, takes a little getting used to but fits more comfortably in the hand than its 5 x 90 mm smaller twin.
-
-
-
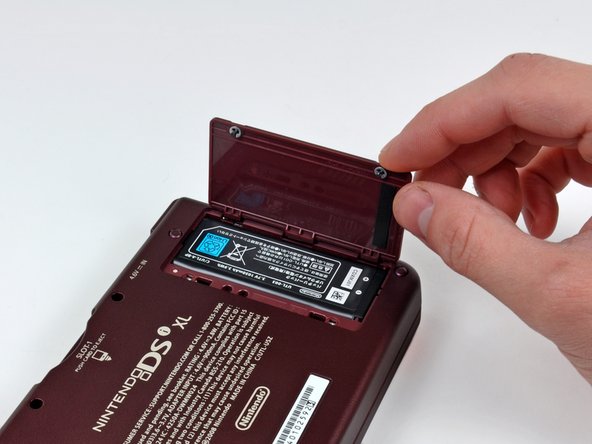
Remove the two Phillips screws securing the battery door to the outer case of the DSi XL.
-
Lift battery door off the bottom outer case and remove the battery from its housing.
-
-
-
Nintendo provided quite a hefty upgrade in battery size from 840 mAh in the DSi (Right) to 1050 mAh in the DSi XL (Left).
-
For all you math haters out there, that's 25% more capacity!
-
Larger capacity comes with the cost of more weight. The XL's battery weighs 23 g compared to the 19 g DSi battery.
-
-
-
A total of seven Phillips screws are all that stand in the way between us and the innards of the DSi XL.
-
-
-
-
Pry the following connectors straight up using the flat end of a spudger:
-
SD board cable connector
-
Volume control cable connector
-
Thankfully, Nintendo designed the DSi XL to eliminate a long ribbon cable spanning the width of the old DSi.
-
-
-
Lift the Wi-Fi board from its edge nearest the center of the DSi, and it comes right off the logic board.
-
Use the flat end of a spudger to pry both antenna cable connectors from their respective sockets on the Wi-Fi board and logic board.
-
-
-
Removing the main board is a piece of cake:
-
Remove the five Phillips screws.
-
Disconnect the six connectors on the front side, flip the board over and remove the one last connector hiding on the back.
-
-
-
The lower display is held in place by the pressure of the board secured over it. No screws!
-
After freeing it from the light adhesive around its perimeter, lift the lower display out of the DSi XL.
-
-
-
Four red plastic covers need to be removed to reveal the Phillips screws underneath.
-
Removing the four Phillips screws allows access to the top display.
-
Push the top outer case toward the top edge of the DSi XL, then use a spudger to pry it off the clips holding it to the inner case.
-
-
-
Use a spudger to pry the outward facing camera from its resting place on the top outer case.
-
Remove the single Phillips screw securing the inward facing camera's bracket to the top inner case.
-
Carefully pull the camera ribbon cable through the hollow right hinge, being careful not to rip it or the display ribbon cable.
-
The DSi XL has two digital cameras; one on the internal hinge pointed toward the user and the other pointed away from the top outer case.
-
-
-
The antenna board for the Wireless LAN rests in the upper right corner of the top outer case.
-
Removing it is as simple as lifting it up.
-
-
-
After prying up the speakers, carefully de-route the display ribbon cable through the hollow right hinge.
-
Remove the upper LCD assembly from the inner case.
-
-
-
The DSi XL's twin supersized screens.
-
Touchscreen controller: NB-F7B AB1 018
-
Each screen measures 4.2 inches diagonally.
-
Although the screen size has been enlarged, the resolution still remains the same at 256 x 192 pixels per screen.
-
-
-
Remove the seven Phillips screws securing the left trigger, right trigger, and the stylus holder to the bottom outer case.
-
Lift the SD board and the stylus holder out of the case.
-
Reassembling the triggers is quite difficult. Take them apart if you dare.
-
-
-
Samsung and Fujitsu chips are identical to the DSi:
-
Samsung 1st generation MoviNAND KMAPF0000M: 256 MB NAND Flash and MMC controller. The integrated MMC controller allows the CPU to offload the complex work of directly talking to the flash memory.
-
82DBS08164D-70L: Fujitsu Ltd 128-bit FCRAM (fast-cycle RAM) chip.
-
TI (TXN) 72071B0 power managing and charging circuit. This used to be a Mitsumi chip in the smaller DSi.
-
PAIC3005B: We assume it stands for Primary Antenna Interface Controller, given that it's located right by the antenna.
-
Primary Nintendo ARM CPU, manufactured the last week of 2009. This chip's markings are identical to the DSi. It's definitely not the Tegra chip that had been rumored.
-
Here's a couple of large photos of the front and back of the logic board. Warning for 56K users: we mean large.
-
-
-
Slide by slide comparisons of the DSi XL layout and the DSi layout.
-
DSi XL, hear us now! You've been slain by iFixit!
-