Introduction
Nearly one year after the release of the Nexus One, Google, in partnership with Samsung, has released its second official phone the Nexus S. It has some fancy gimmicks features that separate it from other Android phones on the market, such as a curved display and the newest 2.3 Gingerbread update.
That's great and everything, but we wanted to see what makes this baby tick. So stay tuned as we dig deep into the Nexus S!
Like the teardown? You can now embed it in your site! Just hit the embed link below for the HTML code.
What you need
-
-
The Nexus S is a variation of the Samsung Galaxy S, sporting more or less the same hardware specifications as its brethren.
-
Notable changes to the Nexus S include NFC (Near Field Communication) support and a Super AMOLED Contour Display.
-
Tech Specs:
-
1 GHz ARM Cortex-A8 Hummingbird Multimedia Applications Processor based on the ARMv7 architecture.
-
16 GB internal storage capacity
-
512 MB total RAM
-
5 MP rear-facing camera and a VGA (640x480) front-facing camera.
-
Android 2.3 (Gingerbread)
-
-
-
A side-by-side comparison of the Samsung-made Nexus S and its HTC-manufactured older sibling, the Nexus One.
-
It's not just an optical illusion, the Nexus S is smiling at you! This is the first smartphone to feature a Contour Display, meaning the display glass is slightly curved to be more comfortable for users.
-
-
-
Without any further ado, let's start tearing this phone apart!
-
The entire back cover comes right off without a fuss, giving us a first glimpse of the battery.
-
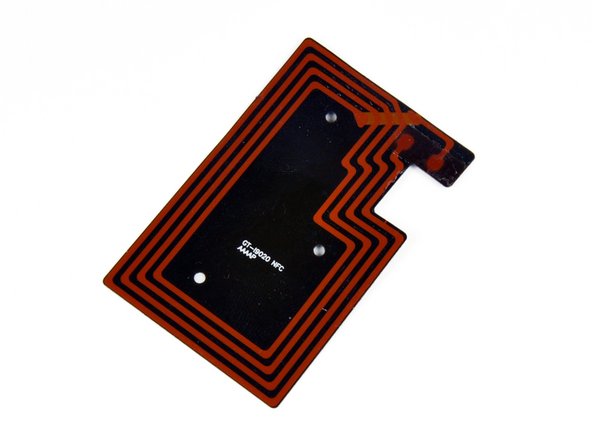
We used a plastic opening tool to peel the NFC antenna module off the back cover. According to Google: "Nexus S can read information from 'smart' tags, or everyday objects that have NFC chips in them. These can be anything from stickers and movie posters to t-shirts."
-
Looks like something straight out of Tron: Legacy.
-
-
-
The battery is extremely easy to remove and comes out next.
-
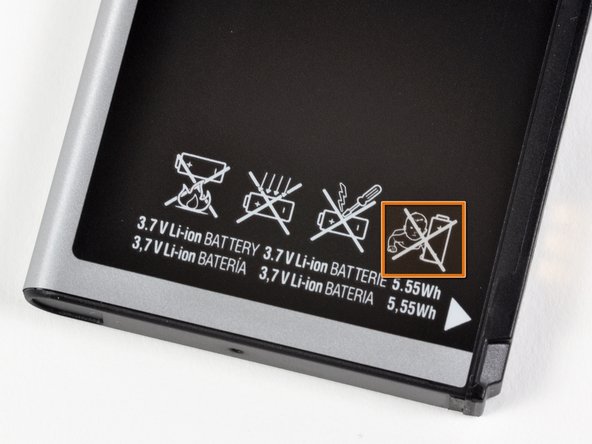
The 3.7 V, 5.55 Watt-hours Lithium ion cell provides up to 6.7 hours of talk time on a 3G network, and up to 14 hours on a 2G network.
-
The battery inside the Nexus S is rated at 1500 mAh. That's slightly higher than the 1400 mAh rating of the Nexus One's battery.
-
Don't feed this battery to a baby.
-
-
-
After removing six screws with our trusty Phillips #00 screwdriver, a little prying with a plastic opening tool lets us remove the inner case.
-
-
-
-
Taking out the motherboard requires removing three Phillips screws and disconnecting a few cables here and there.
-
-
-
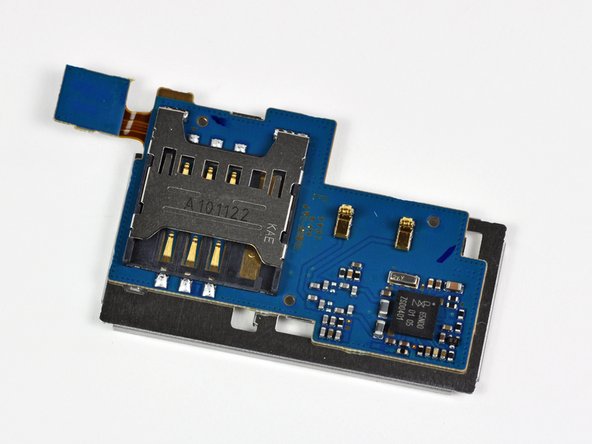
A handy plastic opening tool helps separate the SIM card reader from the rest of the motherboard.
-
The Nexus S is unlocked right out of the box and can be used with a Quad-band (850, 900, 1800, 1900) GSM carrier and is Tri-band HSPA (900, 2100, 1700) compatible.
-
-
-
Much like the Samsung Galaxy S, the Nexus S features both a rear and front-facing camera.
-
Interestingly, the two cameras share the same connector on the motherboard and can be removed as a singular unit.
-
The front-facing VGA camera provides a resolution of 640 x 480 pixels.
-
-
-
The EM-Tech EME1511AFRC integrates the earpiece speaker, loudspeaker for speakerphone and media use, and a sensor bank all into one unit with a singular shared data connector.
-
This is definitely a win for integration, but at the same time forces users to replace the entire unit if only one component malfunctions.
-
-
-
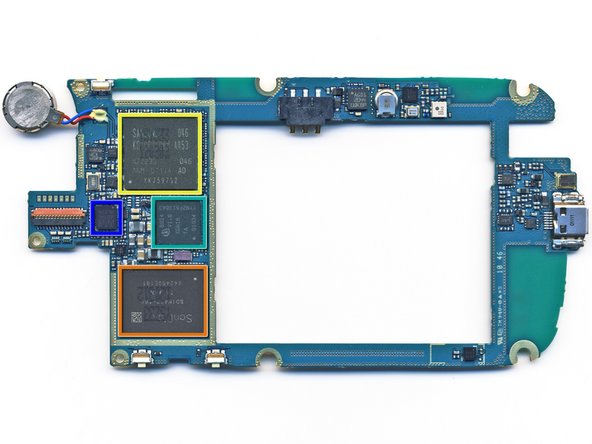
Big players on the motherboard include:
-
Skyworks SKY77529 Tx Front-End Module for Dual-Band GSM / GPRS / EDGE
-
SanDisk SDIN4C2 16GB MLC NAND flash.
-
Samsung KB100D00WM-A453 memory package and S5PC110A01 1GHz Cortex A8 Hummingbird Processor.
-
Infineon 8824 XG616 X-Gold baseband processor
-
Wolfson Microelectronics WM8994 ultra-low power audio codec.
-
-
-
Hidden underneath an EMI cover is the Broadcom Wi-Fi chip.
-
The chip reads: BCM4329GKUBG TE1043 P21
-
According to UBM Techinsights, the chip is a low-power package with 802.11n, Bluetooth 2.1, and FM capability.
-
Variants of this chip have been around for over a year. We first saw it used in the 3rd generation iPod Touch.
-
-
-
Removing the display presented us with the first stumbling block in our disassembly. A heat gun made quick work of the front case assembly, though.
-
-
-
Here you can see a side view of the Super AMOLED display and front glass panel.
-
You can definitely see that only the front glass panel is curved. The rest of the components are flat as a board, just as any other phone on the market.
-
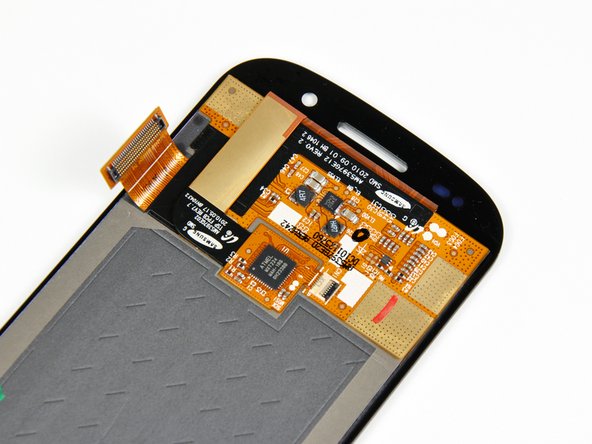
There's also a small PCB on the back of the display with an Atmel MXT224 touchscreen controller on it.
-
-
-
Nexus S Repairability Score: 7 out of 10 (10 is easiest to repair)
-
Battery is very easily replaceable -- just remove the back cover to swap it out.
-
The motherboard comes out easily once you're inside, as it's held in place by regular screws and connectors.
-
A lot of the phone's components are modular, meaning that they're simpler to replace, but will cost more as replacement parts.
-
Front panel is attached with adhesive instead of screws, so it's harder to take off than on the iPhone.
-
If you shatter the front panel glass, the SAMOLED has to be replaced as well -- they're fused together.
-