
Jolla C or Intex Aqua Fish Teardown

What you need

  1. Jolla C or Intex Aqua Fish Teardown, Phone & Back Cover: step 1, image 1 of 2 Jolla C or Intex Aqua Fish Teardown, Phone & Back Cover: step 1, image 2 of 2
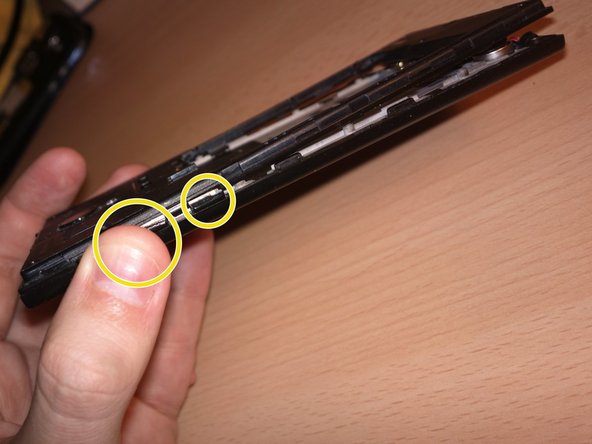
    • Remove the back cover, starting at the bottom right corner with your nail or a prying tool

  2. Jolla C or Intex Aqua Fish Teardown, Battery, Sims & SD: step 2, image 1 of 2 Jolla C or Intex Aqua Fish Teardown, Battery, Sims & SD: step 2, image 2 of 2
    • Remove the battery

    • Remove all sim-cards

    • Remove the microSD-card

  3. Jolla C or Intex Aqua Fish Teardown, Middle Cover: step 3, image 1 of 3 Jolla C or Intex Aqua Fish Teardown, Middle Cover: step 3, image 2 of 3 Jolla C or Intex Aqua Fish Teardown, Middle Cover: step 3, image 3 of 3
    • Remove all 14 cross-head screws

    • Use a prying tool to separate the middle cover from the phone, working from the bottom slowly up to the top

    • Watch out for the power and volume buttons, which probably fall out of the device.

  4. Jolla C or Intex Aqua Fish Teardown, Top Circuit Board: step 4, image 1 of 3 Jolla C or Intex Aqua Fish Teardown, Top Circuit Board: step 4, image 2 of 3 Jolla C or Intex Aqua Fish Teardown, Top Circuit Board: step 4, image 3 of 3
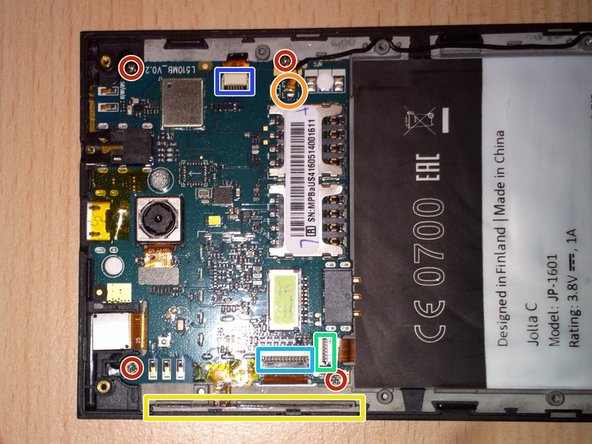
    • Remove all cross-head screws

    • Remove the antenna wire from the circuit board

    • Pry loose the power & volume button part at the side (it is stuck to the phone with sticky tape) and pull it out

    • Pull out the connector for the bottom cuircuit board

    • Pull out the screen connector

    • Pry loose the connector for the proximity sensor etc

    • Now you can remove the top circuit board

    • Remove the main and front camera connectors

  5. Jolla C or Intex Aqua Fish Teardown, Bottom Cuircuit Board: step 5, image 1 of 2 Jolla C or Intex Aqua Fish Teardown, Bottom Cuircuit Board: step 5, image 2 of 2
    • Remove the antenna cable

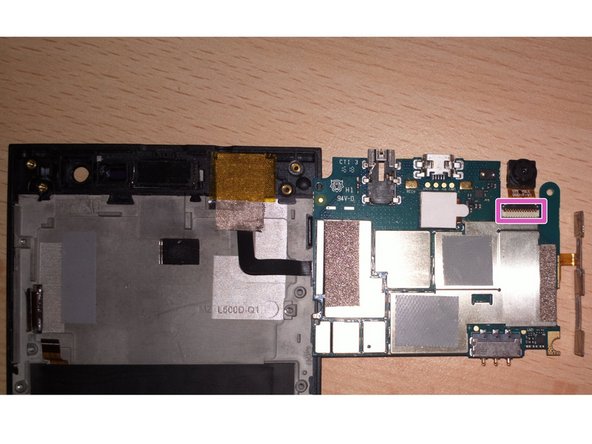
    • Remove the speaker and vibration motor from the phone

    • Both items are stuck to the phone and the cables are very fragile. I broke one of the connections when removing the speaker for a second time, as seen in the second picture. It is possible to solder it back on

Conclusion

To reassemble your device, follow these instructions in reverse order.

One other person completed this guide.

Jos Wagenmakers

Member since: 03/20/17

131 Reputation

1 Guide authored

0 Comments

Add Comment

View Statistics:

Past 24 Hours: 0

Past 7 Days: 0

Past 30 Days: 2

All Time: 1,299