
What you need

This teardown is not a repair guide. To repair your Home Essentials Sandwich Press, use our service manual.

  1. Home Essentials Sandwich Press Teardown, Home Essentials Sandwich Press Teardown: step 1, image 1 of 2 Home Essentials Sandwich Press Teardown, Home Essentials Sandwich Press Teardown: step 1, image 2 of 2
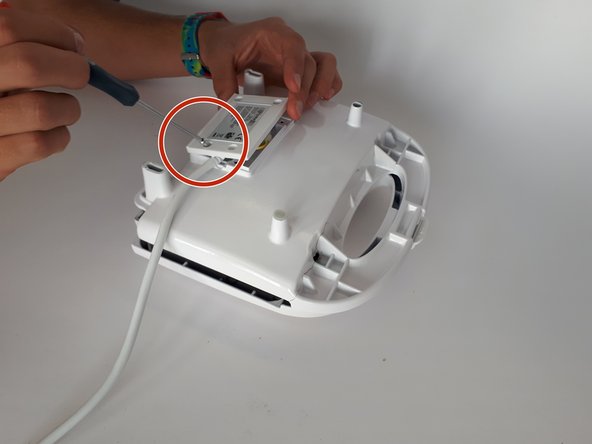
    • Unscrew the 10mm screws securing the plastic handle cover using a size PH1 screwdriver.

    • These screws are very loose and easy to remove.

  2. Home Essentials Sandwich Press Teardown: step 2, image 1 of 3 Home Essentials Sandwich Press Teardown: step 2, image 2 of 3 Home Essentials Sandwich Press Teardown: step 2, image 3 of 3
    • Unscrew the metal hot plates from the plastic covering using a size PH1 screwdriver.

    • The screws are 12 mm long.

  3. Home Essentials Sandwich Press Teardown: step 3, image 1 of 3 Home Essentials Sandwich Press Teardown: step 3, image 2 of 3 Home Essentials Sandwich Press Teardown: step 3, image 3 of 3
    • Unscrew the plastic handle cover using a Special Key Tri-wing.

    • One screw was very hard to unscrew, so grip paste had to be used.

    • The screws are 9 mm long.

  4. Home Essentials Sandwich Press Teardown: step 4, image 1 of 1
    • Remove the plug-in cord caps using a pair of pliers.

    • The metal caps have to be bent a bit to remove the plug-in cord caps, which means the metal caps will not work anymore.

  5. Home Essentials Sandwich Press Teardown: step 5, image 1 of 3 Home Essentials Sandwich Press Teardown: step 5, image 2 of 3 Home Essentials Sandwich Press Teardown: step 5, image 3 of 3
    • Now the metal plates are loose from the plastic cover. The plates need to be moved until the end of their hinge slots to slide them apart.

    • The hinges are very easy to take apart, once it is loose from the plastic cover.

  6. Home Essentials Sandwich Press Teardown: step 6, image 1 of 3 Home Essentials Sandwich Press Teardown: step 6, image 2 of 3 Home Essentials Sandwich Press Teardown: step 6, image 3 of 3
    • Separate the snap fit and remove the light covers.

    • Remove the cords of the lights by pulling them out of their snap fit.

    • Remove the light covers by pushing them out of the plastic cover.

    • The lights are being taken out very easily with not much pressure.

  7. Home Essentials Sandwich Press Teardown: step 7, image 1 of 2 Home Essentials Sandwich Press Teardown: step 7, image 2 of 2
    • Remove the press latch by using a screwdriver; add some pressure to it to get the latch loose.

    • Removing the press latch is hard and requires extra effort.

  8. Home Essentials Sandwich Press Teardown: step 8, image 1 of 3 Home Essentials Sandwich Press Teardown: step 8, image 2 of 3 Home Essentials Sandwich Press Teardown: step 8, image 3 of 3
    • Unscrew the heating element covers using a size PH1 screwdriver.

    • Remove the heating element covers from the plates.

    • These screws are very loose and easy to remove

    • The screws are 5 mm long.

  9. Home Essentials Sandwich Press Teardown: step 9, image 1 of 3 Home Essentials Sandwich Press Teardown: step 9, image 2 of 3 Home Essentials Sandwich Press Teardown: step 9, image 3 of 3
    • Unscrew the heating element wires from the hot plates using a PH1 screwdriver. The screws are 5 mm long.

    • Remove the heating elements using a Phillips head screwdriver, and put this screwdriver under the heating elements.

    • Removing the heating elements requires some more pressure because they are put in with a tight snap fit. The heating element will also deform when removed.

Anna Stapor

Member since: 03/07/18

169 Reputation

1 Guide authored

0 Comments

Add Comment

View Statistics:

Past 24 Hours: 1

Past 7 Days: 5

Past 30 Days: 11

All Time: 682