Introduction
This guide will show you how to open the Google Home Mini and disassemble the individual components.
What you need
-
-
The Google Home Mini opens from the bottom There is an orange plastic disc with a piece of orange rubber attached to it. The piece of orange plastic is glued to the device.
-
-
-
Use the metal spudger and place it between the housing and the rubberized plastic disc.
Recommended to use a heat gun to soften the adhesive a bit. Using the spudger alone didn't work for me. Heat gun on lower power was good enough to get spudger underneath the plastic/rubber disk.
-
-
-
-
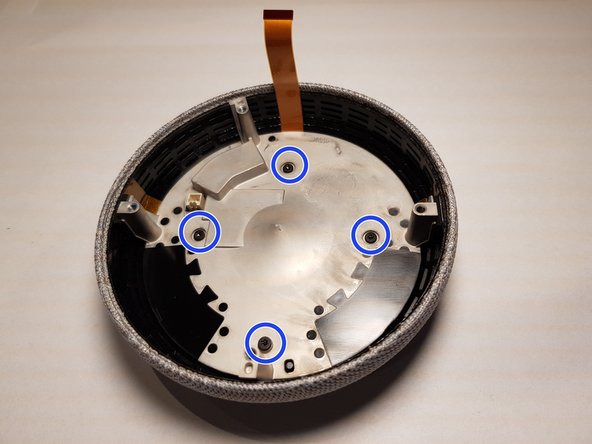
Now remove the 4 screws.
-
4 x 6mm T6 screws
Can I cut around the screw holes in the base with an xacto knife/dremel/drill so I don’t have to peel off the plasticized rubber base? Does anyone have the dimensions and locations of the screw holes relative to the other base features so I can locate the screw holes and try cutting holes in the base in just those spots?
Hmmmmm.....
Bet that turned out a holy mess lol (Inside The Mind of a glue sniffer) let's drill electronics after size mic testing.. and ps the screw head is recessed if u were missing you'd be threw to the main board before u knew it. e fact that it's designed to sound best with all equipment intact.. why don't you spin some more majic Chrystal and grab a bunch of paint markers and put gang symbols of gangs you were or never be in and snap some selfys with you graffiti speaker with holes in it sitting off set cuz the rubber foots all tore up and ya you'll be a gangster as much as you think you are some kinda tech engineer on the cutting edge of electronics and your IQ test said it you don't need to try to be special princess you already are, cuz the tear down is shown like this because some special outside of the box forward thinker like YOU already Tried, Failed and became a FB Gangster and it was decided that this teardown is one of or the best method. So spooge it on the MINI bottom G.. DanKelly
-
-
-
After turning the device over, you can gently lift the fabric-covered top.
Suggested revision: “While keeping the top close to the base as in the picture, disconnect the ribbon cable from the connector with a spudger.”
Ware to buy it
My USB connector broke. Can I buy another one ?
I’m looking for a USB connection replacement.
the ribbon cable pulls straight back from the socket. I tried to pry up the cover/lock but this was not necessary (or apparently possible)
-


Special thanks to these translators:
100%


These translators are helping us fix the world! Want to contribute?
Start translating ›
21 Comments
Do you know the resistance (ohm) of the speaker?
Did you ever find this out? I know the home is 4ohm, presuming this is the same?
For anyone coming to this late, it is a 4ohm speaker.
Is it a 4 Ohm 3 Watt driver?
Uses a Texas Instruments TAS5720LRSMT amplifier IC which is rated at 20W @ 4 Ohm
any known chips?
Thanks a lot !
Do you know if the mic on/off button cut directly the microphones or is it just an input for the chip ? (In that second case any software hack will be sufficient to listen the microphones even with the button on the off position… )
Excellent first teardown guide, bravo!
Well not sure how but my Home Mini stopped working so I dismantled it completely as per the instructions, put it back together and my god it’s working perfectly. Thanks Ifixit and Norman.
did you manage to know the specs of the hardwares plugged onto the motherboard?
I’ve seen youtube videos using a heatgun to soften the glue before using the spudger, which isn’t mentioned here. You say “move around with the spudger under the plastic plate until the adhesive has dissolved on the entire surface”, but how does a spudger dissolve the adhesive? Is this description missing application of a heat gun, or is the spudger heated?
Curious to know if heat is not needed to safely remove the rubber base.
Is the fabric thermoformed over the top part?
fix my google home mini because is broken with water or something
What is the name (reference) of the small white connector (Step 7) used to connect the speaker to the board ?
Is there any way to replace the speaker part into google nest mini which more clarity sound and double bass ..
Is it possible to somehow use an arduino or a raspberry pi to make the leds rgb?
my google mini is different i dont have the orange part to take off to expose the screws. i ddo see orange but its under the hard outer layer. perhaps i have another model or? its exactly the same except the screws are under the hard outer shell. help
Just had my speaker start saying the mic was muted when I hadn't touched the switch and it is set to ON. Flipping the switch back and forth only very temporarily helped. Took the bottom off per this guide to get access to the switch. Found even with the switch set to mic ON, there was ~1kΩ between the two pins that should be open circuit. Popped the metal cover of the switch itself off and found dendrite growth between the two terminals. Cleaned with isopropyl alcohol (rubbing alcohol) to remove build-up, added a small dab of dielectric grease (not necessary), and now 100% back to normal (full open circuit as expected). Thanks again iFixit!
I ripped the tip of the ribbon. How can I fix it?