Introduction
“All good things come in threes” is what the Dutch social enterprise must have thought when they were planning the Fairphone 3, their newest ethically-made mobile device, sporting a modular and repairable design. The Fairphone 2 from 2015 already set the bar high for smartphone repairability—only a teardown will tell if its successor can raise that bar further, as other big manufacturers continue to offer phones that are glued shut and increasingly hard to repair.
Check us out on Twitter, Facebook, and Instagram or subscribe to our tried-and-true newsletter to stay up-to-date with the latest news in the repair world.
What you need
-
-
It's the inner beauty that counts, but we'll get to that shortly. First, let's look over this smartphone's specs:
-
5.65" IPS display with 1080 × 2160 resolution
-
Qualcomm Snapdragon 632 SoC
-
4 GB of RAM and 64 GB of storage
-
12 MP rear camera with ƒ/1.8 and a front-facing camera with 8 MP ƒ/2.0
-
3,060 mAh battery
-
Fingerprint sensor, headphone jack, and IP54 rating
-
A huge thank you to Fraunhofer Institute for Reliability and Microintegration IZM, who provided us with this x-ray image of the Fairphone 3.
-
-
-
The Fairphone’s line of succession (from left to right): Primus, Secundus, and Tertius, as the Romans might have said, if they could count smartphones.
-
Note the evolution not only in size and style, but also in tech: this iteration features a USB-C port instead of the old Micro-USB connector, as well as a fingerprint sensor on its back for increased convenience.
-
Just how much bigger is it? The Fairphone 3 comes in at 158×71.8×9.89 mm and weighs 189 g.
-
-
-
We start off by simply removing the back cover—no tools needed.
-
Compared to the bumper-like casing of the Fairphone 2—as well as the two-piece 'slim' version that replaced it midway through the product cycle—this is definitely an improvement.
-
-
-
Removing the battery is also easy as Android 9—it lifts right out using the notch at the bottom.
-
At 11.781 Wh (3,060 mAh at 3.85 V), this juice box is not the biggest around these days. But it should get you through the day—and if it doesn't, you can just carry a spare and swap it out!
-
It beats the Google Pixel 3a in capacity (11.55 Wh) but cannot quite touch the iPhone Xs Max (12.08 Wh), let alone the Shift 6m (16.3 Wh).
-
The underside of the battery bears an encouraging message: "Well done. You're what progress looks like." Speaking of which, it's time to make some more teardown progress. Onward!
-
-
-
-
Fairphone decided to forgo the nifty display lock mechanism from the previous iteration, opting for standard Phillips #00 screws instead.
-
With the screws gone, we unsnap the display from the frame—revealing the same pogo pin connector plus breakout board configuration seen in the Fairphone 2.
-
Note the map of the Democratic Republic of Congo in this spot, illustrating the conflict-free sourcing of minerals like tantalum, tin, tungsten, and gold.
-
-
-
While the Fairphone 2 modules all made use of pogo pin connectors, the Fairphone 3 modules switch to easily accessible regular press-fit sockets.
-
A simple pry with the spudger and the modules are liberated.
-
-
-
The Fairphone 3 comes with this family of modules:
-
The top module, camera module, and bottom module are all here, much like in the Fairphone 2.
-
The loudspeaker now gets its own closed module (as opposed to being part of the bottom module), and connects to the rear of the bottom module.
-
-
-
Not satisfied with merely removing the modules, we bust out our Torx T5 screwdriver and an opening pick and tear down even more.
-
Starting with the top module:
-
The 8 MP ƒ2.0 selfie camera and earpiece speaker are both removable.
-
The headphone jack as well as the proximity and ambient light sensors are soldered onto the breakout board.
-
The camera module carries a modular 12 MP ƒ1.8 camera with a SONY IMX363 Exmor RS sensor. The flash LEDs are soldered onto the breakout board.
-
The bottom module contains the vibration motor, and a soldered-on USB-C port and microphone.
-
The loudspeaker module is the loneliest of the bits clinging onto the bottom module with its two contacts.
-
-
-
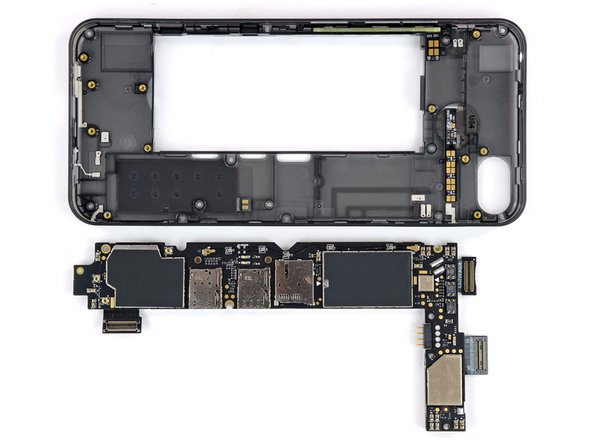
Removing the motherboard, we discover a bunch of spring contacts, which connect to the fingerprint sensor, the volume and power buttons, and a few antennas.
-
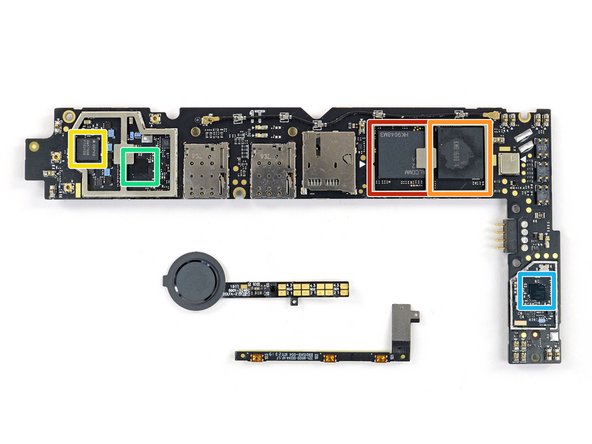
Pulling off the shields reveals:
-
Samsung KMRH60014A-B614 LPDDR3 with 64 GB
-
Qorvo QM57508 RF front-end module
-
Qualcomm WTR3925 RF transceiver
-
Qualcomm WCN3680B WiFi module
-
-
-
That's all for the Fairphone 3, right down to the screws and individual components. To sum up our findings:
-
The new enclosure is easy to open and showcases the transparency of the project.
-
An even more modular design makes for a tidy phone on the inside, with another layer of disassembly for repairing individual components.
-
Reassembling this phone won’t be much of an issue, and we're very confident it’ll still work.
-
Let's see what this means in terms of repairability...
-
- Key components like the battery and screen have been prioritized in the design and are accessible either without tools or just a regular Phillips screwdriver.
- Visual cues inside the phone help with disassembling and replacing its parts and modules.
- Replacing complete modules is very easy. Going for their internal parts is also possible and requires a Torx screwdriver.
- Replacement guides and spare parts are available via the manufacturer's website.
- Most components inside the modules are individually replaceable though some are soldered on.


Final Thoughts
Repairability Score


(10 is easiest to repair)

Team
