My Problem
My IPOD Video 80GB would no longer work unless it was docked - even though the battery indicater showed full charge, so I knew that the battery was probably dead. I dreaded having to shell out $250 for a new IPOD (even though I could use the larger capacity) so I looked around online to see if it was possible to replace the battery, and researched youtube videos to see if I could do it myself and what tools I'd need. I chose ifixit because of the 6 month battery warranty (OEM batteries can be notoriously hit or miss). I found cheaper batteries elsewhere but the warranty sealed the deal - most other places have only a 90 day warranty. I also did a search for ifixit coupons and found a code for $5 off, so overall I ended up saving anyway.
My Fix
I ordered the battery (and toolkit) and was pleased to receive it 4 days sooner than I expected (only 2 business days with USPS first class). I studied every youtube video I could find on how to replace the battery, and read the ifixit guide. Honestly, the videos helped much more than the guide...just because for this a video is better at showing exactly how to take the IPOD apart. But the guide on ifixit does follow closely with the procedures shown in youtube videos. I carefully started opening the IPOD wondering if I would have one that would be really stuck together like I heard about. As I explain below, the IPOD came apart easily using a few hints picked up in the videos, and lifting the battery out was easy too since I knew where the headphone cable was located because I researched ahead of time. The battery cable clip was no problem either, having been warned about it during my research and unlocking it precisely how the online guides tell you to. Case open, battery out, battery in, case closed....it was that easy. 10-15 minutes and most of that was just taking care to go slowly and gently.
My Advice
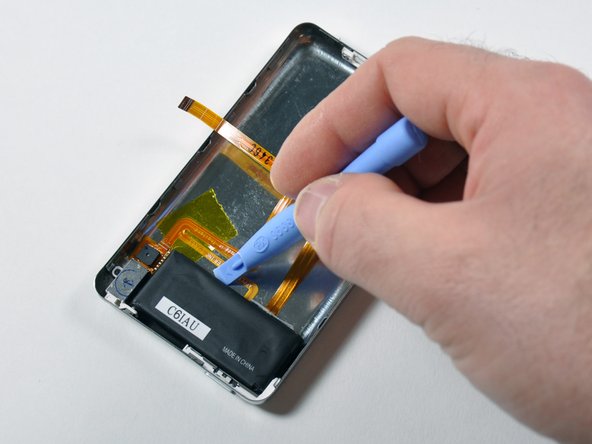
Youtube videos suggest to push slightly on the center of the back shiny panel when you start to insert the pry tool. This is helpful because it will buldge out the sides where the clips are, and allows easier entry for the pry tools and probably helped to "break the seal" on the clips that had never been opened before. Running the pry tool along the side of the IPOD, then along the bottom and top as the side clips disengaged, and twisting the pry tool more gradually as you go back to the side after the bottom and top clips disengage basically popped the back panel right off. My IPOD was much easier to open than I anticipated. The ifixit procedure calls for lifting up the HDD and disengaging the headphone cable, thus seperating the two halves of the IPOD. The youtube videos did not include those steps just to replace only the battery so I did NOT seperate the halves, it is not required for a battery replacement, and I don't recommend doing it because you don't want to chance unnecessary damage. One of the videos showed prying the battery free of the adhesive from the top side of the battery near the hold switch, instead of the bottom. I found this wise because the headphone cable under the battery runs along the bottom side of the battery, and you could damage it. I did a combination of lifting with the pry tool on the bottom side of the battery away from the cable, and on the top side being careful to only twist the pry tool and not lever it against the hold switch or the top of the case. The battery popped out pretty easily - with only two small adhesive stips holding it. The OEM replacement has a 3M adhesive strip covering the entire bottom of the battery. Although the video said use the existing adhesive to reattach the battery, and neither guide mentions any adhesive strip on the new battery, I decided to peel off the backing the use the new adhesive strip. I don't anticipate changing the battery again, but it is a concern as there is much more adhesive on the OEM battery so it might be harder to remove IF there is a next time. I had no problem with the tiny brown clip, and finessing it loose to free the cable was what I found most useful in watching a video over reading the ifixit procedure. I definently recommend watching a video showing how, and how not, to use the pry tools on the case, and how to work the brown clip. The ifixit guide simply says "repeat in reverse" to reassemble the IPOD. But it is worth noting, and the videos show this, that you should put the IPOD face down on a flat surface then press the shiny back cover back on evenly until the clips engage. I picked it up and did press around the edges afterwards to make sure it was secure. But you don't want to take a chance and crack the screen or hurt the click wheel....so keep it on a flat surface. Overall, this repair took me about 10 minutes, most of that time spent just going very slowly and carefully so that I wouldn't break anything. This saved me so much money replacing the battery, and I feel confident having made this choice because the battery has a 6 month warranty. I wasn't too nervous doing this because if the IPOD broke, I would have had to buy a new one anyway so risking $15 to try a battery switch was well worth it. And having it be a success makes it totally worth it.

0 Comments