why! N240BU Hard Drive M.2 Replacement

What you need

  1. why! N240BU Hard Drive M.2 Replacement, Battery: step 1, image 1 of 2 why! N240BU Hard Drive M.2 Replacement, Battery: step 1, image 2 of 2
    • Start by unlocking the right locking latch.

    • Then, by simultaneously unlocking the left latch, lift the battery out of its socket.

  2. why! N240BU Hard Drive M.2 Replacement, Access to main components: step 2, image 1 of 2 why! N240BU Hard Drive M.2 Replacement, Access to main components: step 2, image 2 of 2
    • Begin by spotting the dummy memory card.

    • Then, remove it and put it on your workplan.

  3. why! N240BU Hard Drive M.2 Replacement: step 3, image 1 of 3 why! N240BU Hard Drive M.2 Replacement: step 3, image 2 of 3 why! N240BU Hard Drive M.2 Replacement: step 3, image 3 of 3
    • Locate the 15 screws that hold the bottom cover of the device in place.

    • Unscrew them and place them on your work surface.

    • Then, un-clip the bottom cover, starting with the side shown in the third picture.

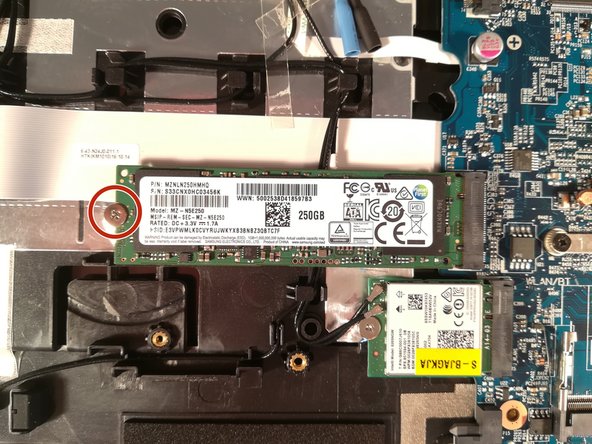
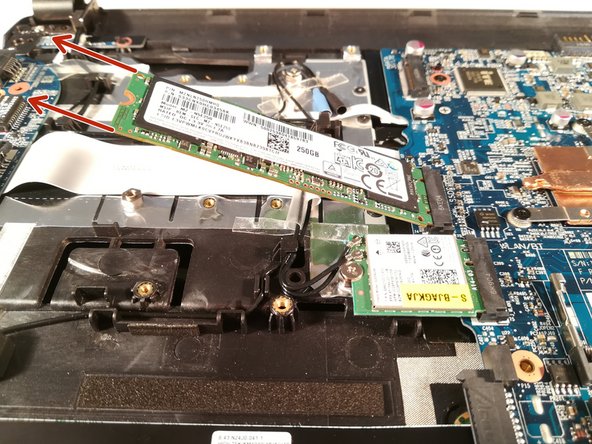
  4. why! N240BU Hard Drive M.2 Replacement, SSD Hard Drive: step 4, image 1 of 3 why! N240BU Hard Drive M.2 Replacement, SSD Hard Drive: step 4, image 2 of 3 why! N240BU Hard Drive M.2 Replacement, SSD Hard Drive: step 4, image 3 of 3
    • Unscrew the screw circled in red

    • Pull out the M.2 SSD in the direction of the red arrows

Conclusion

To reassemble your device, follow these instructions in reverse order.

One other person completed this guide.

Special thanks to these translators:

fr en

100%

These translators are helping us fix the world! Want to contribute?
Start translating ›

Felice Suglia

Member since: 06/15/13

30,731 Reputation

262 Guides authored

0 Comments

Add Comment

View Statistics:

Past 24 Hours: 1

Past 7 Days: 1

Past 30 Days: 1

All Time: 204