This translation may not reflect the most recent updates from the source guide. Help update the translation or view the source guide.

iPhone 6 前面板拆解

Prerequisite Only
This guide is only intended to be used as a prerequisite for other guides. It's incomplete by itself.

What you need

  1. iPhone 6 前面板拆解, 手动打开手机步骤: step 1, image 1 of 1
    • 如果你没有反向钳这个工具,使用单个吸盘来分离前面板。

    • 将吸盘按压在屏幕上,位置在Home键的正上方。

    • 按紧吸盘以保障气密性。

    • 如果你的iPhone屏幕严重破裂,用一层透明胶带覆盖它可能会使吸盘粘住。 或者,可以使用非常结实的胶带代替吸盘。 如果所有其他方法都失败了,您可以用强力胶将吸盘粘在破损的屏幕上。

  2. iPhone 6 前面板拆解: step 2, image 1 of 1
    • 用一只手固定机身,另一只手轻轻地拉起吸盘,使前面板从机身上分离。

    • 不要着急慢慢来,用力要恒定、持续。iPhone的前面板固定得比大部分设备结实。

    • 在一只手继续拉吸盘的同时,另一只手使用塑料撬棍轻缓地将前面板和机身后盖撬开。

    • 前面板由数个卡口固定在机身上,所以需要吸盘和撬棍共同用力来拆下前面板。

  3. iPhone 6 前面板拆解: step 3, image 1 of 2 iPhone 6 前面板拆解: step 3, image 2 of 2
    • 拨动吸盘上的塑料栓来解除真空密封状态。

    • 从前面板上取下吸盘。

  4. iPhone 6 前面板拆解, 打开手机: step 4, image 1 of 3 iPhone 6 前面板拆解, 打开手机: step 4, image 2 of 3 iPhone 6 前面板拆解, 打开手机: step 4, image 3 of 3
    • 以屏幕顶端为支点,从屏幕底端掀起前面板。

    • 顶部边缘的数个卡扣会起到类似铰链的作用。

    • 重新组装前面板时,将前面板的卡口对齐机身顶部,然后将前面板向屏幕顶部滑动,直到其上端与机身后盖完全扣合。

  5. iPhone 6 前面板拆解: step 5, image 1 of 3 iPhone 6 前面板拆解: step 5, image 2 of 3 iPhone 6 前面板拆解: step 5, image 3 of 3
    • 将前面板掀起至垂直,并且在你处理手机其他部分时用什么东西支撑撑着它。

    • 必要的时候,一听没有打开的罐装饮料可以很好地完成这个任务。

    • 用橡皮筋将前面板与支撑物固定住。这可以避免拉扯到显示排线。

  6. iPhone 6 前面板拆解, 移除电池排线保护罩的螺丝: step 6, image 1 of 1
    Tool used on this step:
    Magnetic Project Mat
    $19.95
    Buy
    • 卸下电池排线固定架上的两颗十字型螺丝。

    • 一个2.2毫米螺丝

    • 一个3.2毫米螺丝

    • 在你的维修过程中,请务必确认每一颗螺钉的位置,并确保安装的时候让螺钉回到原位,避免因型号不匹配对手机造成的损坏。

  7. iPhone 6 前面板拆解: step 7, image 1 of 1
    • 取下iPhone的金属的电池排线托架。

  8. iPhone 6 前面板拆解, 断开电池排线的连接: step 8, image 1 of 1
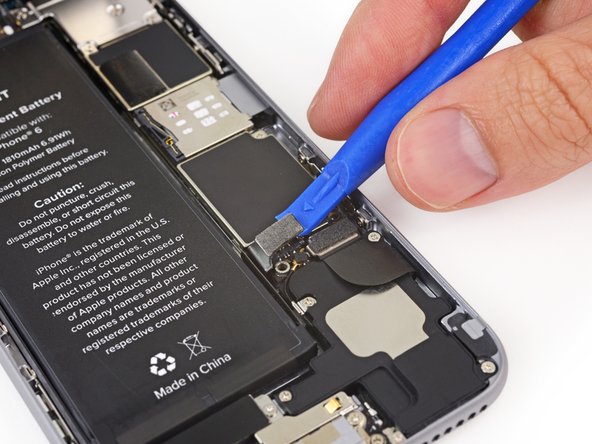
    • 用塑料撬棍从主板上撬下电池排线的接头。

    • 注意只在排线接口上用力,不要伤到主板上的接口插座。如果你撬到了接口插座,你可能会直接把接口弄坏。

  9. iPhone 6 前面板拆解, 移除前面板排线保护罩的螺丝: step 9, image 1 of 1
    • 卸下前面板排线固定板上的五颗十字型螺丝。

    • 三颗1.2 mm螺丝

    • 一颗1.7 mm螺丝

    • 一颗3.1mm螺丝

    • 安装过程中错误放置螺丝会造成iPhone 主板永久性损坏。

  10. iPhone 6 前面板拆解: step 10, image 1 of 1
    • 从主板上取下前面板排线固定板。

  11. iPhone 6 前面板拆解: step 11, image 1 of 2 iPhone 6 前面板拆解: step 11, image 2 of 2
    • 在接下来的四个步骤中,使用撬棒时注意只撬排线接口,而不是接口插座。

    • 使用撬棒或手指甲断开前摄像头和传感器排线接口。

  12. iPhone 6 前面板拆解: step 12, image 1 of 2 iPhone 6 前面板拆解: step 12, image 2 of 2
    • 用撬棍或手指甲断开Home键排线接口。

  13. iPhone 6 前面板拆解: step 13, image 1 of 2 iPhone 6 前面板拆解: step 13, image 2 of 2
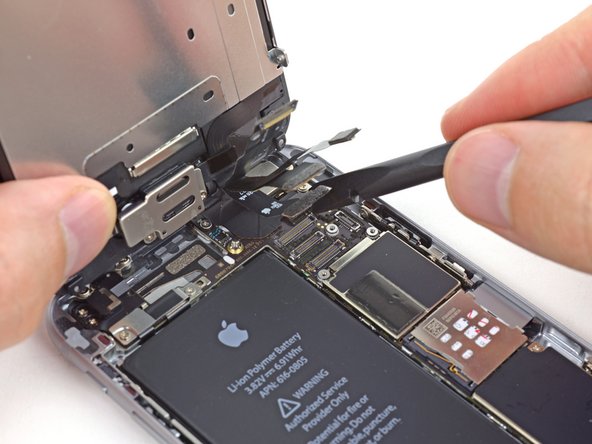
    • 在连接或断开这一步中的排线之前,请确保电池已经断开连接。

    • 用撬棒或手指甲断开显示排线接口。

    • 重新组装手机时,显示排线可能会从插座上松动,这回导致重开机时屏幕显示白线或者直接白屏。如果出现这种情况,只需再次装好排线并将手机电源重置一次。重置手机电源最好的方式就是将电池排线断开再装上

  14. iPhone 6 前面板拆解: step 14, image 1 of 2 iPhone 6 前面板拆解: step 14, image 2 of 2
    • 用撬棒的平头断开触摸层排线接头。

    • 当你要组装触摸层排线时, 请不要按压接头的中间地方。按压接头的一端, 接着再按压另一端。因为若是按压接头中间时, 有可能造成触摸层变形损坏。

  15. iPhone 6 前面板拆解, 前面板与机身的分离: step 15, image 1 of 1
    • 至此,前面板可以彻底与机身分离了。

Conclusion

将新的替换部件与原始部件进行比较 - 在安装之前,您可能需要转移剩余的组件或去除新部件上的背胶。

要重新组装您的设备,请按相反顺序执行上述步骤。

将您的电子废物带到 R2 或 e-Stewards 认证回收商

修复没有按计划进行? 尝试一些基本故障排除,或搜索我们的[链接|https://www.ifixit.com/Answers/Device/iP...|Answers 论坛]寻求帮助。

13 other people completed this guide.

Special thanks to these translators:

en zh

96%

These translators are helping us fix the world! Want to contribute?
Start translating ›

3 Comments

Undo the last edit, I was not trying to modify this guide

rwmj5 - Reply

how about replacing the battery ?

LON HOSKINS - Reply

Hi. I messed up with the screws in the cover guard sheet for the display ribbon and my iPhone 6 plus isn't turning on. Does that mean the logic board is dead or the battery ? Should I throw the phone in the garbage can ?

nzf - Reply

Add Comment

View Statistics:

Past 24 Hours: 0

Past 7 Days: 0

Past 30 Days: 2

All Time: 2,874