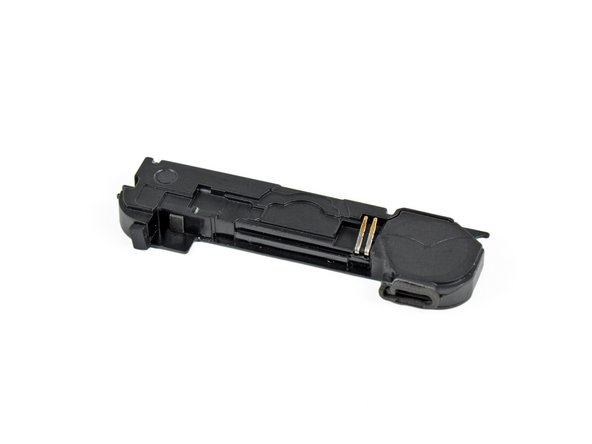
iPhone 4 Speaker Enclosure Replacement

What you need

  1. iPhone 4 Speaker Enclosure Replacement, Rear Panel: step 1, image 1 of 2 iPhone 4 Speaker Enclosure Replacement, Rear Panel: step 1, image 2 of 2
    • Before you begin, discharge your iPhone battery below 25%. A charged lithium-ion battery can catch fire and/or explode if accidentally punctured.

    • Power off your iPhone before beginning disassembly.

    • Your iPhone 4 rear cover may have either two #000 Phillips screws or Apple's 5-Point "Pentalobe" screws (second image). Check which screws you have, and ensure you also have the correct screwdriver in order to remove them.

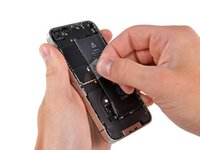
    • Remove the two 3.6 mm Pentalobe or Phillips #000 screws next to the dock connector.

    • Be sure the driver is well seated when removing Pentalobe screws, they are very easy to strip.

  2. iPhone 4 Speaker Enclosure Replacement: step 2, image 1 of 2 iPhone 4 Speaker Enclosure Replacement: step 2, image 2 of 2
    • Push the rear panel toward the top edge of the iPhone.

    • The panel will move about 2 mm.

  3. iPhone 4 Speaker Enclosure Replacement: step 3, image 1 of 1
    • Pinch the rear panel with your fingers and lift it away from the iPhone. Alternatively, use a Small Suction Cup .

    • Be careful not to damage the plastic clips attached to the rear panel.

    • If you are installing a new rear panel, be sure to remove the plastic protective sticker from the inside of the camera lens and the sticker from the large black area near the lens.

  4. iPhone 4 Speaker Enclosure Replacement, Battery: step 4, image 1 of 1
    • Remove the single 2.5 mm Phillips screw securing the battery connector to the logic board.

    • Some devices may have two screws, one of which holds down the contact pad which is located above the screw indicated in red in the photo.

  5. iPhone 4 Speaker Enclosure Replacement: step 5, image 1 of 1
    • Use a plastic opening tool to gently pry the battery connector up from its socket on the logic board.

    • Pry from the top and bottom of the connector bracket—there isn't as much of an overhang on the sides, and you may damage the connector.

    • Be very careful to only pry up on the battery connector and not the socket on the logic board. If you pry up on the logic board socket, you may break it entirely.

    • Remove the metal clip covering the antenna connector.

  6. iPhone 4 Speaker Enclosure Replacement: step 6, image 1 of 3 iPhone 4 Speaker Enclosure Replacement: step 6, image 2 of 3 iPhone 4 Speaker Enclosure Replacement: step 6, image 3 of 3
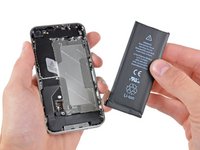
    • Use the clear plastic pull tab to gently lift the battery out of the iPhone.

    • If the tab breaks before the battery is freed, apply a few drops of high concentration (over 90%) isopropyl alcohol under the edge of the battery. Wait about one minute for the alcohol solution to weaken the adhesive. Carefully slide a spudger under the battery tab to release the adhesive.

    • Prying in other places may cause damage. Don't try to forcefully lever the battery out. If needed, apply a few more drops of alcohol to further weaken the adhesive. Never deform or puncture the battery with your pry tool.

    • If there's any alcohol solution remaining in the phone, carefully wipe it off or allow it to air dry before installing your new battery.

    • If your replacement battery came in a plastic sleeve, remove it before installation by pulling it away from the the ribbon cable.

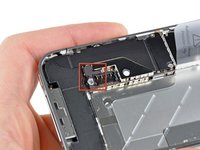
    • Before reconnecting the battery connector, be sure the contact clip (shown in red) is properly positioned next to the battery connector.

    • Before reassembly, clean metal-to-metal contact points with a de-greaser such as windex. The oils from your fingers have the potential to cause wireless interference issues.

    • Perform a hard reset after reassembly. This can prevent several issues and simplify troubleshooting.

  7. iPhone 4 Speaker Enclosure Replacement, Speaker Enclosure Assembly: step 7, image 1 of 2 iPhone 4 Speaker Enclosure Replacement, Speaker Enclosure Assembly: step 7, image 2 of 2
    • Remove the following two screws:

    • One 1.2 mm Phillips

    • One 1.6 mm Phillips

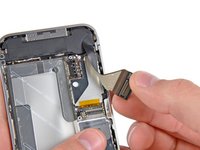
    • Remove the thin steel dock connector cable cover from the iPhone.

    • Before reassembly, be sure to clean all metal-to-metal contact points on the dock connector cable cover with a de-greaser such as windex. The oils on your fingers have the potential to cause wireless interference issues.

  8. iPhone 4 Speaker Enclosure Replacement: step 8, image 1 of 2 iPhone 4 Speaker Enclosure Replacement: step 8, image 2 of 2
    • Use a plastic opening tool to gently pry the dock cable connector up off the logic board from both short ends of the connector.

  9. iPhone 4 Speaker Enclosure Replacement: step 9, image 1 of 2 iPhone 4 Speaker Enclosure Replacement: step 9, image 2 of 2
    • Carefully peel the dock ribbon cable off the logic board and the lower speaker enclosure.

    • Do not use excessive force to peel the dock ribbon cable off the logic board. Doing so may tear the cable.

  10. iPhone 4 Speaker Enclosure Replacement: step 10, image 1 of 1
    • Use a plastic opening tool to pry the lower antenna connector up off its socket on the logic board.

  11. iPhone 4 Speaker Enclosure Replacement: step 11, image 1 of 1
    • Remove the following screws securing the speaker enclosure assembly to the outer case:

    • One 1.9 mm Phillips screw

    • One 2.4 mm Phillips screw

  12. iPhone 4 Speaker Enclosure Replacement: step 12, image 1 of 3 iPhone 4 Speaker Enclosure Replacement: step 12, image 2 of 3 iPhone 4 Speaker Enclosure Replacement: step 12, image 3 of 3
    • Use a plastic opening tool to lift the speaker enclosure assembly out of the case, being sure not to damage the EMI fingers on the attached Wi-Fi antenna.

    • Remove the speaker enclosure assembly.

    • Before reinstalling the speaker enclosure assembly's screws, be sure the Wi-Fi grounding fingers are installed below the lip in the iPhone's metal case as seen in the third picture.

    • Before reassembly, be sure to clean all metal-to-metal contact points between the grounding fingers of the Wi-Fi antenna and the case of the iPhone with a de-greaser such as windex or isopropyl alcohol. The oils on your fingers have the potential to cause wireless interference issues.

  13. iPhone 4 Speaker Enclosure Replacement, Cellular Antenna: step 13, image 1 of 1
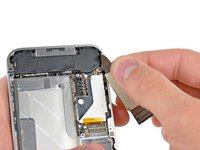
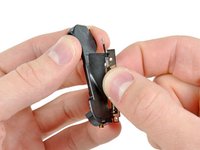
    • Remove the two Phillips screws securing the antenna to the speaker enclosure.

  14. iPhone 4 Speaker Enclosure Replacement: step 14, image 1 of 3 iPhone 4 Speaker Enclosure Replacement: step 14, image 2 of 3 iPhone 4 Speaker Enclosure Replacement: step 14, image 3 of 3
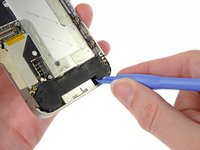
    • Starting near the cellular antenna cable, use the edge of a plastic opening tool to peel the antenna off the speaker enclosure. Make sure you insert the plastic opening tool under the plastic the antenna is mounted on, not the metal plate.

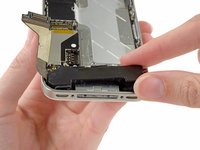
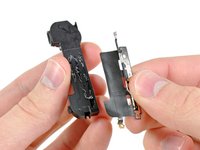
    • Continue peeling the cellular antenna off the speaker enclosure, being careful not to rip the gold bracket attached to one of its edges.

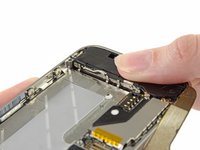
    • Remove the cellular antenna.

    • When installing a new cellular antenna, be sure to slide the gold bracket over the ear molded into the speaker enclosure before sticking the antenna down.

  15. iPhone 4 Speaker Enclosure Replacement, Speaker Enclosure: step 15, image 1 of 1
    • Speaker enclosure remains.

Conclusion

To reassemble your device, follow these instructions in reverse order.

179 other people completed this guide.

Attached Documents

7 Comments

My speaker was blown, just out of warranty. Apple wanted $199 to replace my phone. Bought the speaker enclosure, used your guide, put it all back together, and everything works perfectly! You save me a bunch of money! Great pics and instructions!

robrogg - Reply

ребята всё просто и понятно, глаза бояться руки делают! первый раз в жизни разбирал айфон ))) после сборки, всё окей :) процедура заняла 20 минут

slavamakarevich - Reply

I replaced my iPhone 4's speaker closure successfully with this guide. Note that:

1. I skipped Step 13 to 19, which seem to be irrelevant to replacement of speaker closure.

2. I did not pull the battery out. Only disconnect the battery connector.

yangchen - Reply

after i change my built in speaker my A/V cable which connect my iphone to my TV was out of order whta you think the danmage and would you suggest solution?my iphone 4 ios6.1.2

ranosom - Reply

Genius!

This is not a mere DIY guide but it is also an ethical handbook. You provide a boost to people's confidence, so that they can overcome their limits, as they are encouraged to overcome those technical barriers that huge companies (such as Apple) would like to be insurmountable. Furthermore, and maybe more important, you aim to reduce waste and excessive use of natural and human resources.

Thanks and Hurrah!

zizi - Reply

Add Comment

View Statistics:

Past 24 Hours: 0

Past 7 Days: 4

Past 30 Days: 39

All Time: 239,201