
iPad Pro 9.7" Battery Replacement

What you need

  1. iPad Pro 9.7" Battery Replacement, SIM Card Tray: step 1, image 1 of 3 iPad Pro 9.7" Battery Replacement, SIM Card Tray: step 1, image 2 of 3 iPad Pro 9.7" Battery Replacement, SIM Card Tray: step 1, image 3 of 3
    • Insert a SIM card eject tool, bit, or a paperclip into the small hole in the SIM card tray, located near the bottom edge of the iPad.

    • Press firmly to eject the tray.

    • Remove the SIM tray.

  2. iPad Pro 9.7" Battery Replacement, iPad Pro 9.7" Opening Procedure: step 2, image 1 of 3 iPad Pro 9.7" Battery Replacement, iPad Pro 9.7" Opening Procedure: step 2, image 2 of 3 iPad Pro 9.7" Battery Replacement, iPad Pro 9.7" Opening Procedure: step 2, image 3 of 3
    • If your display glass is cracked, keep further breakage contained and prevent bodily harm during your repair by taping the glass.

    • Lay overlapping strips of clear packing tape over the iPad's display until the whole face is covered.

    • This will keep glass shards contained and provide structural integrity when prying and lifting the display.

    • Do your best to follow the rest of the guide as described. However, once the glass is broken, it will likely continue to crack as you work, and you may need to use a metal prying tool to scoop the glass out.

    • Wear safety glasses to protect your eyes, and be careful not to damage the LCD screen.

  3. iPad Pro 9.7" Battery Replacement: step 3, image 1 of 1
    • The following steps involve using an iOpener to soften the adhesive holding the front panel assembly in place. When using the iOpener, be sure to heat it in the microwave for no more than 30 seconds.

    • Handling it by the tabs on either end, place a heated iOpener over the top edge of the iPad.

    • Let the iOpener sit on the iPad for two minutes to soften the adhesive securing the front panel to the rest of the iPad.

  4. iPad Pro 9.7" Battery Replacement: step 4, image 1 of 3 iPad Pro 9.7" Battery Replacement: step 4, image 2 of 3 iPad Pro 9.7" Battery Replacement: step 4, image 3 of 3
    • While the iPad looks uniform from the outside, there are delicate components under certain portions of the front glass. To avoid damage, only heat and pry in the areas described in each step.

    • As you follow the directions, take special care to avoid prying in the following areas:

    • Home Button

    • Front Facing Camera

    • Main Camera

  5. iPad Pro 9.7" Battery Replacement, Anti-Clamp instructions: step 5, image 1 of 3 iPad Pro 9.7" Battery Replacement, Anti-Clamp instructions: step 5, image 2 of 3 iPad Pro 9.7" Battery Replacement, Anti-Clamp instructions: step 5, image 3 of 3
    Tool used on this step:
    Anti-Clamp
    $24.95
    Buy
    • The next two steps demonstrate the Anti-Clamp, a tool we designed to make the opening procedure easier. If you aren't using the Anti-Clamp, skip down two steps for an alternate method.

    • For complete instructions on how to use the Anti-Clamp, check out this guide.

    • Elevate the iPad enough for the Anti-Clamp's arms to rest above and below the screen.

    • Pull the blue handle towards the hinge to disengage opening mode.

    • Position the suction cups near the top edge of the iPad—one on the front, and one on the back.

    • Push down on the cups to apply suction to the desired area.

    • If you find that the surface of your device is too slippery for the Anti-Clamp to hold onto, you can use packing tape to create a grippier surface.

  6. iPad Pro 9.7" Battery Replacement: step 6, image 1 of 3 iPad Pro 9.7" Battery Replacement: step 6, image 2 of 3 iPad Pro 9.7" Battery Replacement: step 6, image 3 of 3
    • Push the blue handle away from the hinge to engage opening mode.

    • Turn the handle clockwise until you see the cups start to stretch.

    • Make sure the suction cups remain aligned to each other. If they begin to slip out of alignment, loosen the suction cups slightly and realign the arms.

    • Wait one minute to give the adhesive a chance to release and present an opening gap.

    • Insert an opening pick under the screen when the Anti-Clamp creates a large enough gap.

    • If the Anti-Clamp doesn't create a sufficient gap, apply more heat to the area and rotate the handle clockwise half a turn.

    • Don't crank more than a half a turn at a time, and wait one minute between turns. Let the Anti-Clamp and time do the work for you.

    • Skip the next two steps.

  7. iPad Pro 9.7" Battery Replacement: step 7, image 1 of 2 iPad Pro 9.7" Battery Replacement: step 7, image 2 of 2
    • Place a suction cup over the iPad's front-facing camera and press down to create a seal.

    • To get the most leverage, place the suction cup as close to the edge as possible without going past the edge of the display.

  8. iPad Pro 9.7" Battery Replacement: step 8, image 1 of 3 iPad Pro 9.7" Battery Replacement: step 8, image 2 of 3 iPad Pro 9.7" Battery Replacement: step 8, image 3 of 3
    • Firmly pull up on the suction cup to create a small gap between the front panel and the rear case.

    • Do not pull too hard or you may shatter the glass.

    • Once you've opened a sufficient gap, insert an opening pick into the gap to prevent the adhesive from resealing.

  9. iPad Pro 9.7" Battery Replacement: step 9, image 1 of 3 iPad Pro 9.7" Battery Replacement: step 9, image 2 of 3 iPad Pro 9.7" Battery Replacement: step 9, image 3 of 3
    • Slide the pick along the edge of the display, towards the headphone jack.

    • If there is still a considerable amount of resistance when sliding the opening pick, repeat the iOpener heating procedure and apply additional heat.

    • Don't insert the pick past the bezel into the display area, or you will damage it.

    • A good rule of thumb is to never insert the opening pick more than a quarter inch into the iPad.

  10. iPad Pro 9.7" Battery Replacement: step 10, image 1 of 2 iPad Pro 9.7" Battery Replacement: step 10, image 2 of 2
    • Insert a second opening pick by the front-facing camera.

  11. iPad Pro 9.7" Battery Replacement: step 11, image 1 of 3 iPad Pro 9.7" Battery Replacement: step 11, image 2 of 3 iPad Pro 9.7" Battery Replacement: step 11, image 3 of 3
    • Slide the second pick along the top edge of the iPad, towards the Sleep/Wake Button.

  12. iPad Pro 9.7" Battery Replacement: step 12, image 1 of 2 iPad Pro 9.7" Battery Replacement: step 12, image 2 of 2
    • Insert a third pick by the front-facing camera.

  13. iPad Pro 9.7" Battery Replacement: step 13, image 1 of 3 iPad Pro 9.7" Battery Replacement: step 13, image 2 of 3 iPad Pro 9.7" Battery Replacement: step 13, image 3 of 3
    • Bring the right opening pick down and around the top right corner of the iPad.

  14. iPad Pro 9.7" Battery Replacement: step 14, image 1 of 3 iPad Pro 9.7" Battery Replacement: step 14, image 2 of 3 iPad Pro 9.7" Battery Replacement: step 14, image 3 of 3
    • Bring the left opening pick around the top left corner of the tablet.

  15. iPad Pro 9.7" Battery Replacement: step 15, image 1 of 1
    • Reheat the iOpener and lay it over the right edge of the display to loosen the adhesive underneath.

  16. iPad Pro 9.7" Battery Replacement: step 16, image 1 of 3 iPad Pro 9.7" Battery Replacement: step 16, image 2 of 3 iPad Pro 9.7" Battery Replacement: step 16, image 3 of 3
    • Slide the right opening pick roughly halfway down the display.

  17. iPad Pro 9.7" Battery Replacement: step 17, image 1 of 1
    • Reheat the iOpener and apply heat to the left side of the iPad.

  18. iPad Pro 9.7" Battery Replacement: step 18, image 1 of 3 iPad Pro 9.7" Battery Replacement: step 18, image 2 of 3 iPad Pro 9.7" Battery Replacement: step 18, image 3 of 3
    • Slide the left-hand opening pick about halfway down the edge of the display.

  19. iPad Pro 9.7" Battery Replacement: step 19, image 1 of 3 iPad Pro 9.7" Battery Replacement: step 19, image 2 of 3 iPad Pro 9.7" Battery Replacement: step 19, image 3 of 3
    • Slide the opposite opening pick down to the bottom right corner of the iPad.

    • If necessary, reheat the adhesive on the right edge to loosen the display assembly.

  20. iPad Pro 9.7" Battery Replacement: step 20, image 1 of 3 iPad Pro 9.7" Battery Replacement: step 20, image 2 of 3 iPad Pro 9.7" Battery Replacement: step 20, image 3 of 3
    • Slide the left-hand opening pick down the edge of the display until you reach the corner.

  21. iPad Pro 9.7" Battery Replacement: step 21, image 1 of 1
    • Use the iOpener to apply heat to the bottom edge of the iPad.

  22. iPad Pro 9.7" Battery Replacement: step 22, image 1 of 3 iPad Pro 9.7" Battery Replacement: step 22, image 2 of 3 iPad Pro 9.7" Battery Replacement: step 22, image 3 of 3
    • Bring the right-hand opening pick around the bottom corner of the iPad.

  23. iPad Pro 9.7" Battery Replacement: step 23, image 1 of 3 iPad Pro 9.7" Battery Replacement: step 23, image 2 of 3 iPad Pro 9.7" Battery Replacement: step 23, image 3 of 3
    • Repeat for the left-hand pick.

    • Reheat and reapply the iOpener as needed.

  24. iPad Pro 9.7" Battery Replacement: step 24, image 1 of 2 iPad Pro 9.7" Battery Replacement: step 24, image 2 of 2
    • Remove the right-hand opening pick at the bottom of the iPad.

  25. iPad Pro 9.7" Battery Replacement: step 25, image 1 of 3 iPad Pro 9.7" Battery Replacement: step 25, image 2 of 3 iPad Pro 9.7" Battery Replacement: step 25, image 3 of 3
    • Slide the left-hand opening pick along the bottom edge of the display, then remove it from the bottom right corner of the iPad.

    • Be very careful to not insert the pick more than a quarter inch into the display to avoid damaging the Home Button and display cables underneath.

  26. iPad Pro 9.7" Battery Replacement, Slice through the remaining adhesive: step 26, image 1 of 3 iPad Pro 9.7" Battery Replacement, Slice through the remaining adhesive: step 26, image 2 of 3 iPad Pro 9.7" Battery Replacement, Slice through the remaining adhesive: step 26, image 3 of 3
    • Use picks to ensure most of the adhesive has been cut through on the top, left, and bottom sides.

    • Twist the top and bottom picks to separate the display assembly from the rear case.

    • Do not attempt to remove the display—it is still attached to the rear case.

  27. iPad Pro 9.7" Battery Replacement: step 27, image 1 of 3 iPad Pro 9.7" Battery Replacement: step 27, image 2 of 3 iPad Pro 9.7" Battery Replacement: step 27, image 3 of 3
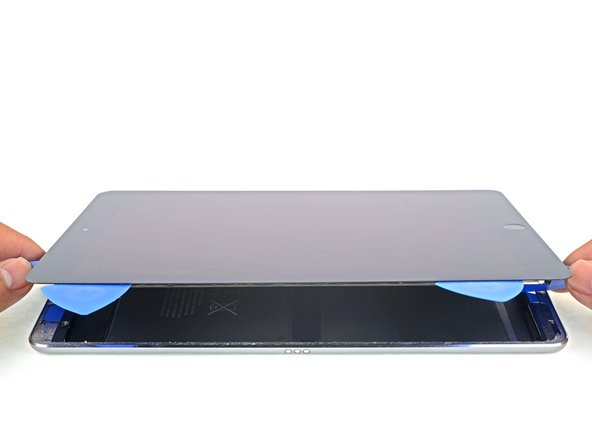
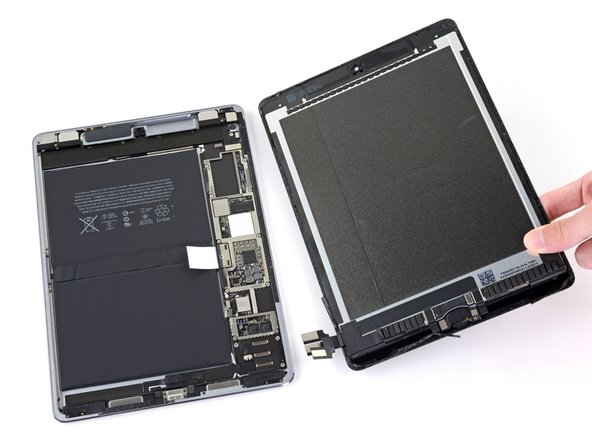
    • Swing the display assembly towards the right of the case, using the right edge as a hinge.

    • As you move the display assembly, make sure that the display ribbon cable is not being stressed.

    • Continue swinging the display assembly until it lays flat next to the rear case.

  28. iPad Pro 9.7" Battery Replacement, Disconnect the battery: step 28, image 1 of 1
    • Use a Phillips screwdriver to remove the eleven 1.3 mm screws securing the EMI shield.

  29. iPad Pro 9.7" Battery Replacement: step 29, image 1 of 1
    • Apply a heated iOpener to the EMI shield on the logic board for one minute.

  30. iPad Pro 9.7" Battery Replacement: step 30, image 1 of 3 iPad Pro 9.7" Battery Replacement: step 30, image 2 of 3 iPad Pro 9.7" Battery Replacement: step 30, image 3 of 3
    • Lift the logic board EMI shield, starting at the edge nearest the top of the iPad.

    • Slowly peel the EMI shield up from the logic board.

    • This takes a bit of force due to the many tiny clips securing the shield, and the shield may deform slightly. That's okay—try to keep the deformation to a minimum, and it will lay flat when reinstalled and screwed down.

    • Remove the logic board EMI shield.

  31. iPad Pro 9.7" Battery Replacement: step 31, image 1 of 1
    • Use a Phillips driver to remove the 1.7 mm-long screw securing the battery connector.

  32. iPad Pro 9.7" Battery Replacement: step 32, image 1 of 3 iPad Pro 9.7" Battery Replacement: step 32, image 2 of 3 iPad Pro 9.7" Battery Replacement: step 32, image 3 of 3
    • If the EMI shield has any sharp protrusions after removal, you should flatten them before reinstalling the shield.

    • Squeeze the sharp protrusion with a pair of pliers to flatten it.

    • Repeat the process for all sharp protrusions along the edges of the EMI shield.

  33. iPad Pro 9.7" Battery Replacement, Remove the display bracket screws: step 33, image 1 of 1
    • Use a Phillips screwdriver to remove the three 1.3 mm Phillips screws securing the display cable bracket.

  34. iPad Pro 9.7" Battery Replacement, Remove the bracket: step 34, image 1 of 2 iPad Pro 9.7" Battery Replacement, Remove the bracket: step 34, image 2 of 2
    • Remove the display cable bracket.

  35. iPad Pro 9.7" Battery Replacement, Disconnect the display assembly: step 35, image 1 of 2 iPad Pro 9.7" Battery Replacement, Disconnect the display assembly: step 35, image 2 of 2
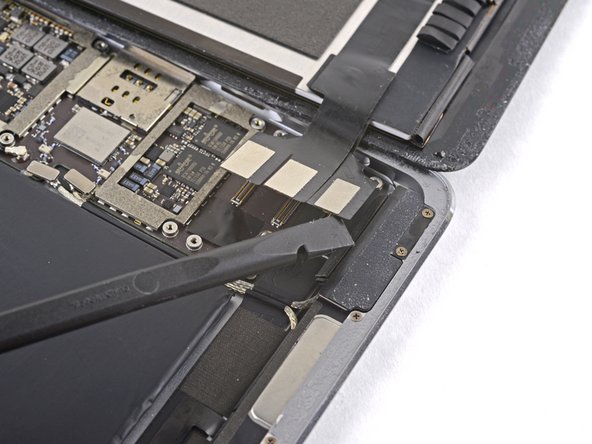
    • Use the flat end of the spudger to disconnect the display assembly connector from the motherboard socket.

  36. iPad Pro 9.7" Battery Replacement: step 36, image 1 of 2 iPad Pro 9.7" Battery Replacement: step 36, image 2 of 2
    • Repeat the previous step for the two remaining connectors.

  37. iPad Pro 9.7" Battery Replacement, Remove the display assembly: step 37, image 1 of 2 iPad Pro 9.7" Battery Replacement, Remove the display assembly: step 37, image 2 of 2
  38. iPad Pro 9.7" Battery Replacement, Battery: step 38, image 1 of 3 iPad Pro 9.7" Battery Replacement, Battery: step 38, image 2 of 3 iPad Pro 9.7" Battery Replacement, Battery: step 38, image 3 of 3
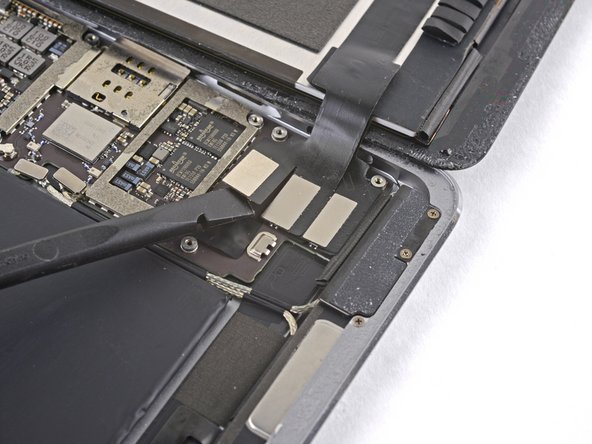
    • Use the point of a spudger to pry up and disconnect the two antenna cables which connect the logic board to the lower antennas.

  39. iPad Pro 9.7" Battery Replacement: step 39, image 1 of 3 iPad Pro 9.7" Battery Replacement: step 39, image 2 of 3 iPad Pro 9.7" Battery Replacement: step 39, image 3 of 3
    • Use the point of a spudger to pry up and loosen the adhesive holding the two disconnected antenna cables in place.

    • Be careful not to puncture the battery with the spudger.

    • Carefully route the cables out from between the battery and the logic board.

    • Push the cables away from the battery.

  40. iPad Pro 9.7" Battery Replacement: step 40, image 1 of 2 iPad Pro 9.7" Battery Replacement: step 40, image 2 of 2
    • Use tweezers or a spudger to gently pull up the end of the black tape nearest the Smart Connector. It covers the mid-battery circuit board residing between the two battery cells.

    • You only need to peel the tape back enough to reveal the connector underneath.

  41. iPad Pro 9.7" Battery Replacement: step 41, image 1 of 2 iPad Pro 9.7" Battery Replacement: step 41, image 2 of 2
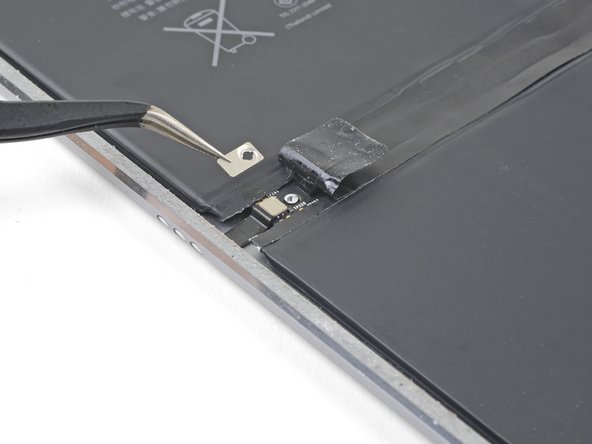
    • Remove the 1.7 mm Phillips screw holding the Smart Connector cable cover in place.

    • Remove the Smart Connector cable cover.

  42. iPad Pro 9.7" Battery Replacement: step 42, image 1 of 3 iPad Pro 9.7" Battery Replacement: step 42, image 2 of 3 iPad Pro 9.7" Battery Replacement: step 42, image 3 of 3
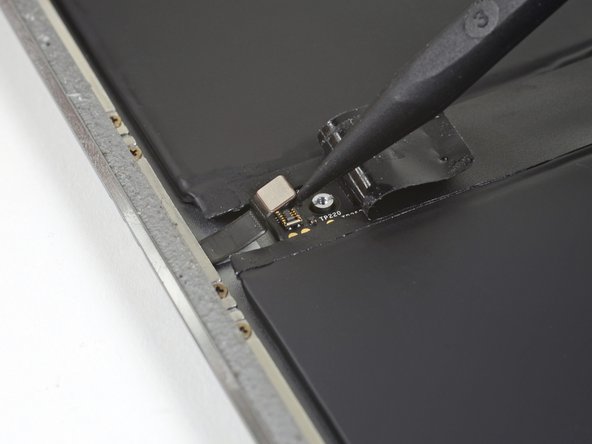
    • Use the point of a spudger to pry up and disconnect the Smart Connector's connector from its socket between the battery cells.

    • Push the Smart Connector flex cable up and out of the way.

  43. iPad Pro 9.7" Battery Replacement: step 43, image 1 of 2 iPad Pro 9.7" Battery Replacement: step 43, image 2 of 2
    • The next four steps detail how to mask off the iPad in preparation for the liquid adhesive remover. The tape will help block and absorb excess liquids, keeping major components safe.

    • Apply a piece of masking or painter's tape to the top speaker assembly. The tape should bridge the gap between the battery and the speaker assembly.

  44. iPad Pro 9.7" Battery Replacement: step 44, image 1 of 3 iPad Pro 9.7" Battery Replacement: step 44, image 2 of 3 iPad Pro 9.7" Battery Replacement: step 44, image 3 of 3
    • Use the flat end of a spudger to push the edge of the tape down into the crevice between the battery and the speaker.

    • This creates a tape "wall" which will help prevent any liquid adhesive from pooling behind it.

    • Slide the spudger across the entire length of the crevice, pushing tape down to create a boundary.

  45. iPad Pro 9.7" Battery Replacement: step 45, image 1 of 2 iPad Pro 9.7" Battery Replacement: step 45, image 2 of 2
    • Repeat the same procedure on the logic board side and the bottom side of the iPad.

    • Use two pieces of tape for the logic board side. Leave a gap over the Battery Blocker.

  46. iPad Pro 9.7" Battery Replacement: step 46, image 1 of 2 iPad Pro 9.7" Battery Replacement: step 46, image 2 of 2
    • Once complete, the masking should look like the first image.

    • The adhesive remover may discolor and eventually damage certain plastic components, such as the speaker housings—so check your work and take care not to spill.

    • Four strips of strong adhesive hold the battery in place.

  47. iPad Pro 9.7" Battery Replacement: step 47, image 1 of 2 iPad Pro 9.7" Battery Replacement: step 47, image 2 of 2
    • Prepare a work area where the iPad can rest in a tilted position, to allow adhesive remover to trickle down to the adhesive strips.

    • You can use books, boxes, etc. as long as they will not move.

  48. iPad Pro 9.7" Battery Replacement: step 48, image 1 of 2 iPad Pro 9.7" Battery Replacement: step 48, image 2 of 2
    • iFixit adhesive remover contains acetone, a mild skin and eye irritant.

    • Wear eye protection when handling and applying the adhesive remover. (Eye protection is included in your kit.)

    • Do not wear contact lenses without eye protection.

    • Protective gloves are highly recommended beyond this step, as the dissolved adhesive will be very tacky and hard to wash off.

  49. iPad Pro 9.7" Battery Replacement: step 49, image 1 of 3 iPad Pro 9.7" Battery Replacement: step 49, image 2 of 3 iPad Pro 9.7" Battery Replacement: step 49, image 3 of 3
    • Pull off the black rubber stopper from your bottle of adhesive remover.

    • Twist to loosen or remove the bottle cap before you cut the applicator tip.

    • This unseals the bottle and allows the pressure to equalize before you cut the applicator tip. If you skip this step, the adhesive remover may spray out unexpectedly when the tip is cut.

    • Use scissors to cut off the sealed tip of the applicator.

    • Cutting close to the narrow tip will give you better control so you can apply the adhesive remover in small amounts.

    • Twist and close the bottle cap securely before you proceed further.

  50. iPad Pro 9.7" Battery Replacement: step 50, image 1 of 3 iPad Pro 9.7" Battery Replacement: step 50, image 2 of 3 iPad Pro 9.7" Battery Replacement: step 50, image 3 of 3
    • Carefully insert a plastic card under the bottom right corner of the battery.

    • Slowly slide the plastic card across the bottom edge of the battery to make a gap for the liquid adhesive remover.

    • At this point, you do not need to push the card very deep under the battery. 0.5 inches (13 mm) is more than sufficient.

    • While some bending of the battery pack will be inevitable, try not to form any sharp creases, which will compromise the battery structure and potentially trigger a fire hazard.

  51. iPad Pro 9.7" Battery Replacement: step 51, image 1 of 3 iPad Pro 9.7" Battery Replacement: step 51, image 2 of 3 iPad Pro 9.7" Battery Replacement: step 51, image 3 of 3
    • Tilt the bottom of the iPad up.

    • Apply a few drops of adhesive remover evenly along the elevated edge of the battery.

    • A little bit goes a long way, so start with a very small amount. You can always add more later if needed. Applying the solvent in small amounts helps prevent unwanted leaks.

  52. iPad Pro 9.7" Battery Replacement: step 52, image 1 of 1
    • Rest the iPad in a slanted position, bottom edge up, and wait 2-3 minutes to allow the adhesive remover to penetrate and soften the first adhesive strip.

  53. iPad Pro 9.7" Battery Replacement: step 53, image 1 of 3 iPad Pro 9.7" Battery Replacement: step 53, image 2 of 3 iPad Pro 9.7" Battery Replacement: step 53, image 3 of 3
    • Slide a plastic card into the bottom edge of the battery.

    • Push slowly and firmly. Gently wiggle and twist the card to help it slice through the adhesive.

    • If you are struggling, tilt the iPad, apply a few more drops of adhesive remover and wait a minute before trying again.

    • As you are slicing, the Battery Blocker may fall out of position. If that happens, reposition the Battery Blocker before continuing with your work.

  54. iPad Pro 9.7" Battery Replacement: step 54, image 1 of 3 iPad Pro 9.7" Battery Replacement: step 54, image 2 of 3 iPad Pro 9.7" Battery Replacement: step 54, image 3 of 3
    • You can also approach the adhesive strip with the plastic card from battery's other bottom corner.

    • Continue slicing until you have separated the battery from the first adhesive strip.

  55. iPad Pro 9.7" Battery Replacement: step 55, image 1 of 3 iPad Pro 9.7" Battery Replacement: step 55, image 2 of 3 iPad Pro 9.7" Battery Replacement: step 55, image 3 of 3
    • Tilt the bottom of the iPad up.

    • Reapply adhesive remover into the gap for the second adhesive strip, located deeper underneath the bottom battery cell.

    • Repeat the application, waiting, and slicing process until the second adhesive strip is separated from the battery.

  56. iPad Pro 9.7" Battery Replacement: step 56, image 1 of 3 iPad Pro 9.7" Battery Replacement: step 56, image 2 of 3 iPad Pro 9.7" Battery Replacement: step 56, image 3 of 3
    • Slide an opening pick under the top edge of the battery, creating a gap large enough for a plastic card.

    • Insert a plastic card under the top edge and slide it across the entire length, creating a gap for the adhesive remover.

  57. iPad Pro 9.7" Battery Replacement: step 57, image 1 of 3 iPad Pro 9.7" Battery Replacement: step 57, image 2 of 3 iPad Pro 9.7" Battery Replacement: step 57, image 3 of 3
    • Apply adhesive remover into the gap to help weaken the third adhesive strip.

  58. iPad Pro 9.7" Battery Replacement: step 58, image 1 of 1
    • Rest the iPad in a slanted position, top edge up, for 2-3 minutes to allow the adhesive remover to weaken the third strip.

  59. iPad Pro 9.7" Battery Replacement: step 59, image 1 of 3 iPad Pro 9.7" Battery Replacement: step 59, image 2 of 3 iPad Pro 9.7" Battery Replacement: step 59, image 3 of 3
    • Use a plastic card to slice through the third adhesive strip.

    • If you are struggling, tilt the iPad, apply a few more drops of adhesive remover and wait a minute before trying again.

  60. iPad Pro 9.7" Battery Replacement: step 60, image 1 of 3 iPad Pro 9.7" Battery Replacement: step 60, image 2 of 3 iPad Pro 9.7" Battery Replacement: step 60, image 3 of 3
    • Repeat the application, waiting, and slicing process to release the last adhesive strip located deeper underneath the top battery cell.

  61. iPad Pro 9.7" Battery Replacement: step 61, image 1 of 2 iPad Pro 9.7" Battery Replacement: step 61, image 2 of 2
    • Slide the Battery Blocker out of its position and remove it.

  62. iPad Pro 9.7" Battery Replacement: step 62, image 1 of 3 iPad Pro 9.7" Battery Replacement: step 62, image 2 of 3 iPad Pro 9.7" Battery Replacement: step 62, image 3 of 3
    • Use the plastic card or your fingers to flip the bottom half of the battery over so that it rests on top of the upper half.

  63. iPad Pro 9.7" Battery Replacement: step 63, image 1 of 3 iPad Pro 9.7" Battery Replacement: step 63, image 2 of 3 iPad Pro 9.7" Battery Replacement: step 63, image 3 of 3
    • The end of the mid-battery circuit board closer to the Smart Connector is held down with adhesive.

    • Slide an opening pick underneath the mid-battery circuit board, near the Smart Connector.

    • Carefully slice underneath the board around the post to release the board from the rear case.

  64. iPad Pro 9.7" Battery Replacement: step 64, image 1 of 3 iPad Pro 9.7" Battery Replacement: step 64, image 2 of 3 iPad Pro 9.7" Battery Replacement: step 64, image 3 of 3
    • Use this step to create an optional extended Battery Blocker to help remove the battery from the case.

    • Place the Battery Blocker on top of the plastic card such that the top half of the Battery Blocker extends past the top of the card.

    • Wrap tape around the plastic card so that the Battery Blocker is held in place.

  65. iPad Pro 9.7" Battery Replacement: step 65, image 1 of 3 iPad Pro 9.7" Battery Replacement: step 65, image 2 of 3 iPad Pro 9.7" Battery Replacement: step 65, image 3 of 3
    • Slide the extended Battery Blocker under the battery where it contacts the logic board.

    • When positioned correctly, the Battery Blocker's prongs should rest under both the logic board and the battery contacts. They should also surround a screw post.

  66. iPad Pro 9.7" Battery Replacement: step 66, image 1 of 3 iPad Pro 9.7" Battery Replacement: step 66, image 2 of 3 iPad Pro 9.7" Battery Replacement: step 66, image 3 of 3
    • The goal is to lift the battery contacts high enough such that they clear the screw post underneath the logic board.

    • Slowly lever the extended Battery Blocker upwards, pushing the battery contacts and the logic board up.

    • The logic board is held to the rear case with strong adhesive. Try to lift just enough to loosen the adhesive surrounding the connector.

    • Do not lift the logic board up to the point where the top and bottom edge of the logic board separates from the case.

    • Once the extended Battery Blocker has lifted the battery contacts high enough to clear the screw post, pull the battery out of its position.

    • Remove the battery and the Battery Blocker.

  67. iPad Pro 9.7" Battery Replacement: step 67, image 1 of 2 iPad Pro 9.7" Battery Replacement: step 67, image 2 of 2
    • The next four steps detail how to install a new battery. Never reinstall a used battery.

    • Thoroughly clean the back case of all adhesive residue.

    • Apply adhesive remover or high concentration (over 90%) isopropyl alcohol to the residue.

    • Use an opening tool to scrape and loosen the residue.

    • Be sure to wipe the residue away in one direction to prevent smearing.

    • It is easier to wipe off the residue when it is sufficiently soaked. Once it starts drying up, the residue becomes incredibly tacky.

    • If you used adhesive remover, be sure to wipe the surface down with isopropyl alcohol to remove any adhesive remover residue.

    • You can remove the masking tape as well as any protective gear once you are done cleaning.

  68. iPad Pro 9.7" Battery Replacement: step 68, image 1 of 3 iPad Pro 9.7" Battery Replacement: step 68, image 2 of 3 iPad Pro 9.7" Battery Replacement: step 68, image 3 of 3
    • Slowly insert the extended Battery Blocker under the logic board.

    • If you feel any resistance, the Battery Blocker may have caught on one of the contact springs. Do not push any further. Remove the Battery Blocker, lift the board up slightly, and try again.

    • Lever the tool so that the the Battery Blocker's prongs barely push the logic board above the screw post.

  69. iPad Pro 9.7" Battery Replacement: step 69, image 1 of 3 iPad Pro 9.7" Battery Replacement: step 69, image 2 of 3 iPad Pro 9.7" Battery Replacement: step 69, image 3 of 3
    • Lay the replacement battery pack on top of the extended Battery Blocker.

    • Allow the battery pack to slide in place underneath the logic board as the battery's contacts clear the screw post.

    • If the battery pack's contacts do not slide into place, the contacts may be caught on the logic board's spring contacts. Slide the battery back out, lift one side of the logic board slightly higher, and try again.

    • Remove the Battery Blocker.

  70. iPad Pro 9.7" Battery Replacement: step 70, image 1 of 3 iPad Pro 9.7" Battery Replacement: step 70, image 2 of 3 iPad Pro 9.7" Battery Replacement: step 70, image 3 of 3
    • Lift the bottom edge of the battery up slightly.

    • Do not hinge the battery beyond 45 degrees, or you risk damaging the inter-cell connectors.

    • Use tweezers or your fingers to peel the single clear plastic covering off of the entire bottom side of the battery.

    • At this point, the battery's four adhesive strips are exposed. Be careful handling the battery and try not to touch the strips.

    • Align the battery such that it falls in place with the screw post near the Smart Connector.

    • Be sure not to trap the Smart Connector cable underneath the battery.

    • Gently lay the battery down into its recess.

    • Press the battery firmly into place.

  71. iPad Pro 9.7" Battery Replacement: step 71, image 1 of 2 iPad Pro 9.7" Battery Replacement: step 71, image 2 of 2
    • Separate the Battery Blocker from the plastic card if it is still taped together.

    • Reinsert the Battery Blocker between the logic board and the battery contacts.

    • Resume reassembly.

Arthur Shi

Member since: 01/03/18

252,733 Reputation

526 Guides authored

Team

iFixit Member of iFixit

Staff

135 Members

16,817 Guides authored

View Statistics:

Past 24 Hours: 76

Past 7 Days: 441

Past 30 Days: 2,026

All Time: 110,465