Introduction
按照本指南中的步骤更换 iPad Air 2 Wi-Fi 中的 Home 键组件,包括垫圈和线缆。 请注意,Home 键与其各自的逻辑板配对,因此在更换Home键组件后,触控 ID 将不再起作用。
警告:本指南中的电池隔离方法已经过时,可能会对逻辑板的电池引脚造成不可逆转的损坏,从而有效地破坏它。 如果你选择以这种方式隔离电池,请注意所有警告并极其小心地工作。 如果你选择在不隔离电池的情况下完成指南,除非在完全必要的情况下(例如拆除螺丝时),请避免使用金属工具,以防止电池短路和损坏敏感电路元件。
What you need
-
-
加热iOpener三十秒
-
在整个维修过程中,如果iOpener 冷却了,在微波炉中每次重新加热额外的三十秒。
DO NOT USE IN NON ROTATING MICROWAVE! It will pop a hole. I had it in for 45 seconds the first time. It wasn't very hot inside and I saw it started to leak on the paper towel I put under it. Just a fair bit of advice. I think I will just stick with the heat gun. Loud but useful.
I heated mine up for 30 seconds, tested, then again for 30 seconds. It felt adequately hot. Leaving it on the left side, per the instruction, for a minute did not loosen the adhesive. I ended up pulling the suction cup hard enough to shadder the old screen. Moral of the story, I don't think it gets hot enough safely to have an affect.
There is a clear problem here with the heating part using the iopener things....no details are given. Whoever is testing them needs to make it clear - What temperature does it need to be? And for which phone models, because they differ in what's needed. It's only £10-15 for a laser guided temp sensor unit, and the designers/repairers should have one of those already for doing these kinds of repairs. Explaining half a repair, is worse than not explaining at all :-(
All phones/devices differ it’s unrealistic and unsafe to put a exact time/temperature needed to soften the adhesive. It’s really quite simple you warm the device evenly and in a controlled manner just enough to enable pry tools and picks to begin separating. Best tool in my opinion but again this is because I have experience is a hot plate and heat gun both of which are used at nearly the lowest settings and I can handle flat palming the plate for almost 10 seconds I leave the device to conduct heat until approx it’s about 110 at most 120 ish this will be plenty to soften all the adhesive if any problem areas I use heat gun while prying. Again you need go slowly and learn with a throw away phone
If I may suggest include your microwave wattage so people can get an idea on time for there own
I agree with this.
I ended up using a hair dryer. That iOpener thing took forever.
30 seconds sure isn’t cutting it… 45 didn’t get the screen of my iPad air 2 to budge either… even after resting on the ipad for 4 minutes.
60 seconds in the microwave, the iOpener burst.
I’ll get a new one and try once more with heating it 45 seconds and repeat that for 30 minutes like others have said here. If that doesn’t work it’ll have to be the heat gun.
K
I can’t recommend the microwave. If the the iOpener becomes too hot, it bursts. Better put the opener in cooking water. Dry it and use it. Instead of an iOpener you can use hot/cool packs as well.
Great idea with using the heat packs. I will try that next time. Thank you
Collins -
Trust the directions! I forgot and left it in the Microwave too long and after 1 minute I had Mt Vesuvius - the iOpener burst and spewed the goodies out. The problem is, the Digitizer can be damaged by a hot air gun, so I had to tough out and remove the glue the hard way. I made it … with lots of patience! Tough lesson.
I also used a hairdryer. I used it on the low setting and I cut a piece of carboard to protect the rest of the screen. The iFixit tool and method is vert tedious and very time consuming in comparison. With the hairdryer method you can literally have the display apart in a few minutes. Using your other hand nearby the area you are heating it should be very hot but not enough to burn your hand. You only have to heat metal part of case near glass edge. If you have a cellular model then you need to be very careful because the black antenna area is plastic. So less heat and work your way up in adding heat just enough to separate around the area but not so much you melt the plastic!
iOpener was the worst part of the kit. Followed directions for :30 in microwave and took 4 trips to the microwave to loosen adhesive on left side of home button. I thought I was figuring it out and it was working well… even set a timer to wait 10 minutes between heating it up. Was on the right side and was on my 12th heat up when it exploded in the microwave. My only tip is that if you set it clear side up, as soon as you see any bubbles or boiling in the liquid, STOP! If you put a pot holder over the iOpener and press slightly to make good surface contact, that seemed to help. I finished heating with a “Corn Sack” that held heat better than the provided iOpener.
Mon iopener n'a pas tenu une réparation. Je ne vous conseille pas ce produit
Bonjour,
Nous sommes désolés que votre réparation ne se soit pas déroulée comme prévu. Il se peut que le produit était défectueux. Veuillez contacter notre service client support@ifixit.com (boutique américaine) ou eustore@ifixit.com (boutique européenne) en décrivant ce qui s’est passé.
Readers looking for temperature advice might check the comments of the previous instruction, as there are more there. I used an immersion bath to heat this to 180F and applied it to the device until the outside temperature of the opener read 150F with an IR thermometer. Removing the screen took very little force with this method.
Thank you for posting some actual temperatures. I have a heat gun with a very fine self-temperature regulation setting capability.
I will set it for 150-180 F, and use that to soften the adhesive.
Get a heat gun.
I followed the directions and heated my iOpener for 30 seconds in a 1000 watt microwave, and it came out at 160 degrees F, as verified by a infrared thermometer. A second heating about 15 minutes later in the micro and it came out at 190 degrees F. Plenty hot enough to soften the adhesive for removing the back on my S8. Based on the comments above I think people just need to use more patience.
I used various time settings. It got very hot. It would soften the glue but not a whole lot. If my screen had been intact and I was replacing something that was not a digitizer, it may have worked. A broken screen makes the process significantly more difficult. I ended up breaking the home button cable. Good bye TouchID…
It appeared 30 seconds were not enough, so I heated it more, by 5 seconds at a time until I got the right temperature about 70 degrees Celsius (measured with infrared pistol) to get the screen heated up to 60 C, the best for softening the glue. But the heat was quickly dissipating by the big aluminum back cover, so the best I got in 2 minutes of applying iOpener was around 45 C, which made the procedure difficult and having risk of breaking the screen. So I eventually abandoned iOpener and user a hot air gun with precise temperature setup. I set it to 90 C, which allowed me to open my iPad quickly and safely.
I, too, ended up using a hot air gun. I’ve done earlier versions of iPad before but the adhesive used on this IPad 5 A1822 was particularly difficult to remove.
Also, while the suction cup worked great when the glass is in tact, any cracks in the glass make the suction cup useless.
You need to remember here are different sizes of microwaves. I had the same issue.
Heating on a smaller unit I used 45-60 seconds. That worked but was time comsuming
Yeah, the iOpener didn't work for me either.... ended up using a hair dryer and that worked. The iOpener was too warm to soften the glue in my case.
-
-
-
把iOpener从微波炉中拿出来,捏着两边扁平边缘中的一个以避免碰到中心热的部分。
I did this repair. I used a hair dryer, I think it works better: gets very hot fast.
I did too, you get far more control and no expense on fancy equipment.
Readers looking for temperature advice might check the comments of the previous instruction, as there are more there. I used an immersion bath to heat this to 180F and applied it to the device until the outside temperature of the opener read 150F with an IR thermometer. Removing the screen took very little force with this method. I don’t know how much microwaves vary in heating consistency with these pads, but knowing how inconsistent the temperature of a bowl of plain rice gets in my microwave, I wasn’t interested in even trying to use it for this.
I vote for the hair dryer. The other methods work too but if you aren’t having any luck, switch to the hair dryer. While holding the iPad in my hand, I found that I am aiming the dryer at my finger at the same time and it gauges how hot it is. I stop when my finger can’t take it - maybe five seconds up close. Repeat as needed like I did.
If the maximum temperature for this iOpener is lower than the gadget glue minimum temperature, this device does not make sense.
I think the maximum temperature for this iOpener is below 100⁰C and most gadget glue minimum temperature is higher than 100⁰C. So the iOpener is useless for many opening steps in repair guides. But who knows because temperature range is not specified for this iOpener. -
-
-
在锅或平底锅里装满足够的水来完全淹没iOpener。
-
把水加热到沸腾。关火。
-
将iOpener放入热水中2-3分钟。确保iOpener完全浸入水中。
-
用钳子从热水中提取加热的iOpener。
-
用毛巾彻底擦干iOpener。
-
你的iOpener已准备好使用!如果你需要重新加热iOpener,请将水加热到沸点,关火,并将iOpener放入水中2-3分钟。
What do I do if I don’t have a iopener?
Use a hair dryer
2 or 3 cups Rice in a sock, heat for about 2 minutes. But, I recommend the iopener.
When boiling in water you can put the iopener in a ziplock to keep it dry.
Even if you don't put in a ziplock bag, I found that the surface is mostly hydrophobic so drying it is very easy. I also didn't have tongs, but the bag is denser than water, so it sank and I attached clothes pins to the ends and was able to remove it with those.
2-3 minutes in near boiling water, then 2-3 minutes on my s10+ and it was super easy to cut the glue off.
I have a question, if I have a pan, and I have water, and a mean to boil the water, won't it be easier and cheaper to just use that.
Have you tried it? Water limits your temperature to 100℃, whereas 'pan on the stove' can easily get up to twice that. If your pan is even slightly warped, you'll have a few hot spots of direct conduction with convection everywhere else, heating things unevenly. Assuming you get the device up to temperature, how will you get it out without scratching it or burning yourself? After you're finished, do you really want to prepare food in the pan you warmed up adhesives and trace manufacturing substances in?
.
Boiling something form fitting to heat your device with is a lot more foolproof, and not being foolish is easier and cheaper. Direct pan heating can work, but you are leaving yourself open to a lot more problems than just taking the safe route.
-
-
-
如果您的显示屏玻璃已经碎裂,防止显示屏玻璃在您维修时进一步伤害您,请使用胶带来固定已经碎裂的屏幕。
-
给iPad 的正面整面贴上胶带。
-
尽量根据下面的指南进行操作。但,一旦玻璃破碎,请停下拆解并使用金属撬刀撬出玻璃,避免更多的碎裂。
Why does it says in red letter to be sure not to damage the LCD screen? I thought the whole point of this guide is to replace a broken screen and the new screen comes with a new LCD since apparently they cannot be separated
Because some people are opening the ipad to replace the battery! Like me~
The picture is a picture of an ipad 4 lol
The opening procedure is the same on many iPad models, so some photos are reused for all models.
-
-
-
抓住已经加热的iOpener的任意一端,将其放置在iPad的顶端。
-
将iOpener放置至少2分钟来软化面板下方的粘合剂。
Yeah, this part took longer than written. Over 30 minutes and had to reheat the iOpenner since it got cool enough to only feel warm.
So true, the adhesive is really strong.
I would recommend using a hair dryer on high instead. Heat a certain area 60 seconds at a time and keep the hair dyer moving at a slow but constant speed.
Hi!
Is the quality of the iOpener so different, that for some people this guide works. but for most people including me, this 30 sec do not hotten the iOpener enough..
Couldn't anybody do a new guideline with proper info, how many sec on which watt, etc. Pretty please!
BUT, with that said, I would like thank You people on ifixit.com, for make all this tools. I f. love it! But plz make a new guide for at least iPad Air 2, screen replacement!
Big love from Sweden and me Magni =) <3
Hello Magni!
Microwave power can be vary, so you may need to microwave your iOpener longer in order to get it hot enough. The iOpener should be hot to the touch, about 80-100°C.
I saw in some “How To”videos, the repair shop had expensive heating pads to assist in screen removal. If I ever find myself making a similar repair to an iPad of iPhone, I’m going to try using a heating pad I have for my back. Set it to high and let the iPad/iPhone set on it screen down for 15 minutes or so. Should do the trick.
결국 히팅건을 사용했습니다. Bosch GHG 500-2 패드 알루미늄이 뜨거워질 때까지 가볍게 가열하십시오. 손가락으로 만지면 견딜 수 없을 정도로 뜨거워질 때까지 천천히 가열했습니다. iopener는 시간이 많이 걸리고 성공하지 못했습니다.
Did it with the IOppener! Just be patient. It seems the les harmfull way of doing it. I just had to reheat it few times.
-
-
-
在您按照本指南操作时,请小心下述区域。
-
Home键
-
前置摄像头
-
后置摄像头
you should be careful with the screen connector on the bottom right when opening
I accidentally cut the volume cable as when I tried to gently pry that corner area with the iFixit triangular plastic openers, one needed to be pushed quite hard to open the screen and slipped, the cable was stuck to both the screen digitiser glue and the case, so when I pried the screen off, the cable tore. iPad still works but annoying the glue is so strong.
Well, there is actually only 2mm at the bottom just around the home button. Be careful! I broke mine since iFixit didn’t point that out!
-
-
-
将 iPad 抬高到足以让 反向钳的铰链位于屏幕上方和下方的位置。
-
将蓝色手柄拉向铰链以解除开启模式。
-
将吸盘放在屏幕上主页按钮的正上方——一个在前面,一个在后面。
-
向下推吸盘以将吸力施加到所需区域。
-
-
-
将吸盘小心的放在刚加热的一侧,前置摄像头的位置。
This is the trickiest and scariest part of the procedure. (read all of the comments in Steps 1 and 2 and at the end of the guide). The iOpener also did not work for me - it simply would not soften the glue enough. I used a blowdryer. Have lots of patience and be gentle! I did not pull up on the suction cup very much. I softened the glue enough that I could get my fingernail under the glass, then I was able to wedge the pick in beside it. The rest of the screen removal went easy with the blowdryer and blue picks.
It helps to know that the adhesive is v narrow (2-3 mm) tapes, not great globs of bitumen. Once the seal is broken, you’ve won. Also, the shiny bezel is part of the metal body, not the screen, so get your widget between the glass and the bezel. And be patient. Even with a heat gun and IR thermometer it still took me 30 mins to get the screen off.
The screen glass can only be pulled up a fraction of a millimetre, just enough to insert the mere tip of an opening pick.
The glue then gives way very slowly. Give it time to release before moving the pick slowly further in. If you pull the pick out without wedging the gap open with another pick the glue will re bind and you are back where you started.
I used a very cheap Aldi laser thermometer to check temperatures. The glue seems to loosen at 41C+, although the heat takes time to penetrate.
When I purchased a new replacement battery, it came with a suction cup. That cheap cup wasn’t able to hold on the screen. luckily I had a set of heavy duty suction cups when I made a repair on my iMac. I recommend investing in the heavy duty cups.
Heavy-Duty Suction Cups (Pair)
These provide an excellent vacuum seal and leverage to lift the screen. Be careful and make sure you soften up the adhesive or you will crack the screen.
I agree with Charles, the suction cup from the kit just kept slipping off the screen. I too, have the heavy -duty cups from a Mac repair
-
-
-
牢牢地提起吸盘,以将前玻璃面板与后壳分离出一道小缝隙。
-
一旦打开一道缝隙请在缝隙处放置一个撬片。防止粘合剂将面板与后壳重新粘连。
Even using a heat gun in an effort to soften the remarkably tenacious adhesive, I found it impossible to use the suction cup to lift the edge of the screen sufficiently high to insert a pick. I ended up using an exacto knife and a single-edge razor blade to make the initial opening, after which I was able to insert and use picks per the instructions.
Indeed, heat and apply time matter. I took the shattered glass off from my LTE iPad Air 2 more easily than on the donor wifi iPad Air 2, I couldn't seem to separate it on the donor device. I decided to increase heating and apply time: heated the iOpener 1 minute, and applied the heat for 5 minutes (doubled everything) and yes, it now moved just enough and I could get the picks in!
As others have said, this is the hardest part. Heat and time are your friends, I folded a piece of aluminium foil around the edge of the iPad and the iOpener to help the heat transfer. Left it like this for five to six minutes and then the adhesive yielded to physics.
-
-
-
将撬片在显示屏边缘处一直滑动到耳机孔处。
-
如果在滑动的时候遇到了很大的阻力,请重新加热iOpener,来进一步融化粘合剂。
I think I accidently slid my tool into the fused lcd and front panel and now the entire screen is doing weird lines and different colors and just is not natural its not even usable. I was gonna replace the battery because the batter was popping the entire front panel and lcd off of the base of the device and then when i was openingit up the rest of the way I slipped and it hit something and now its all glitchy. what should i do?? is it even worth fixing anymore? it;s too old for apple care and I already voided the warranty and displays are expensive what should I do? email me @ andrew.heidorn1@gmail.com thanks :)
“a quarter of an inch” might be OK for the US/UK… what about pretty much the rest of the world using the metric system? When giving measurements, please always include them also in mm/cm
A quick google search will give you the answer
Metric is for engineers. Last place on earth to use inches is US car industry. NASA uses metric. You know it makes sense.
I shattered the glass on my iPad during this step.
To melt the adhesive, you have to heat the glass A LOT, to at least 80°C. I was using a portable infrared thermometer while doing this. Heating the iOpener in my microwave for 60 seconds only raised its temperature to about 90°C, and leaving it on the glass for a few minutes didn’t raise the temperature of the glass to more than about 40°C. I switched to a hair dryer and heated the glass to about 70°C, which was barely enough to be able to insert one pick. As soon as I tried to slide it across, the glass broke.
I recommend having a reliable way to measure the temperature, and finding something that can heat more effectively than the iOpener. Also take caution to heat all along the top, not just the point where you’re inserting the pick. In theory the iOpener is designed for this, but it doesn’t get hot enough.
I wish the iOpener came with a specific heat rating. It has many warnings against overheating it but it’s not clear exactly how much is too much.
6mm is far too much at the side. There is only 4mm from edge of glass to the display unit . I guess I damages my display because the pledge had gone between glass and display.
warning! The gap just below the home button is 2mm. Be very careful. It is the thinnest space!
Yep, this is the single most important instruction and where I like others screwed up. You really can't insert the pick more that 4mm otherwise it risks going between the screen and the digitiser. There is almost no resistance so it is very easy to do. It is almost worth marking a 4 mm depth on each pick before starting. Getting the adhesive to lift was really easy it the screen is hot enough, sticking the pick in too far is also too easy :(
Purchase an electric griddle for pancakes, etc. Set the temp control until the hotplate measures 100 deg C, using a cheap IR thermometer to check the surface temp. Lay the display face down.
Leave the device (iPad, smartphone, whatever) directly of the plate for about 2 minutes. Use heatproof gloves or thick cotton gloves to lift the device off the plate, placing it on a flattened towel, face up, to begin the prying process. Heating the entire device allows you to continue all the way around the outer edge without reheating, but work quickly.
Plastic picks should be trimmed to 2mm or 4mm, tapering the edge down with sandpaper until it can slip between the display and the frame. Use a very thin knife blade, single edge razor blade, or thin stainless steel spudging blade to start the lifting process. Do NOT cause any bending distortion of the very thin LCD glass - it will break instantly! You must be below the front glass AND the LCD screen. Be absolutely sure!
PATIENCE! Go no faster than the adhesive will release.
I was unable to use the pick provided to get my first opening or separation. I use the knife from the upgrade parts kit. Being a former bench tech. That was the tool I used most often to crack open laptop cases. After I had separation I did use the plastic pick as suggested.
-
-
-
-
滑动右边的撬片到显示屏一半的位置。
take care not to insert more than 4mm!
100% agree with the above comment - this wrecked my screen
You need to heat it for more than 2 minutes, more like 4 minutes. I cracked my glass a few cm above the middle. This part needs a caution added to it.
-
-
-
滑动右边的撬片一直到iPad底部那个角的位置。
This is it. This was the step where I cracked the screen and ruined the device. Things had been going so well up to this point. Like many others I struggled with the iOpener, so I used a heat gun along with a temperature sensor and very carefully and slowly went back and forth along the edges keeping the temperature at exactly 200 degrees F. I got the pick in, went around the top corners, down the sides to the middle. But on this step where you finish sliding the pick to the bottom right corner, I got 3/4ths of the way down and CRACK. The glass shattered pretty badly in the corner, and there’s a crack running diagonally along the entire device. I put clear packing tape on top to keep it from cracking further, but sections of the screen are non-responsive. I can’t tell you how upset my 5 year old is going to be when he wakes up tomorrow and I have to tell him daddy wrecked his iPad. :( I believe strongly in the Right to Repair and this kit is fine. But GO SLOWLY, and BE CAREFUL.
-
-
-
滑动左边的撬片一直到iPad底部那个角的位置。
I made it one step farther than the person above me. Made it about 1 inch from the bottom left corner and the screen shattered. I probably let it cool too much as I think I was getting a little impatient by now. The kit is great though. I successfully removed the rest of the screen even after it broke with no damage to anything else. I continued on to replace the battery and bought a new LCD (This was a roughly $130 mistake). I stress, go slowly, heat often. Kit worked great otherwise.
-
-
-
移开右侧的撬片。
F…ing cracked the glass. This repair is a waste of time and money. The iOpener is b.s. You need to use a heat gun and/or a blow dryer. I had used the heat gun and a blow dryer to successfully separated the glass from the body until I reached the bottom. This is becuase I had left the heated iOpener on the bottom for at least 20 minutes. I used the blow dryer for the top and sides and it worked. When I turned the corner on the bottom, the glass shattered. The tip of pick was not in very far, maybe 2mm. Guess my only option now is a new iPad.
same here, and I’m not using their $2 dinky microwave palm rest, I have a head gun and I’ve been heating this thing for 20 mintues side by side. Still cracked the class. Don’t attempt this, to do this successfully you should’ve had cracked 10 screens.
-
-
-
使用左边的撬片在显示屏底部滑动然后在iPad的右下角拿走它。
-
小心不要将撬片插入主页按钮的任一侧超过四分之一英寸(6 毫米),以免损坏下方的显示屏排线。
warning! The gap just below the home button is 2mm. Be very careful. It is the thinnest space!
Well, there is actually only 2mm at the bottom just around the home button. Be careful! I broke mine since iFixit didn’t point that out!
Thanks for the comments! I’ll add the warning into the step.
-
-
-
在前置摄像头一侧继续提起。
-
将显示屏稍微从底部拉出,将其与后壳完全分离。
-
继续提起直到屏幕大致与iPad主体垂直。
The display must remain perpendicular to the back panel (frame) during these next steps. Because it can easily get away from you, place the back panel on a non-slippery surface with the display propped open as shown, against a stack of books or a solid object. This will allow you to work without performing a balancing act needing more hands. Do NOT apply any tugging forces on the attaching cables.
At step 30, I knew I was in trouble. Wrong instructions provided. After 4 plus hours of getting the glue separated, the glass came up as shown, but not the display screen. That had 4 screws holding it down. Bracing the glass, for it had wiring attached, I unscrewed screen. And there was the battery. Success! It was short lived. I was sent the wrong battery!! Re glue, I used both I opener and a hair dryer and proceeded slowly and carefully. Patience grasshopper…
In the iPad Air 2 the screen is firmly glued to the glass, and is not secured with screws. It is impossible to peel off only the glass. I think you're talking about another model here.
Orsuem -
-
-
-
移除单个固定电池端子与逻辑板连接的 1.8 mm Phillips螺丝。
Be very careful when replacing the screws not to lose them. They are micro small. I would even think about ordering a couple extra of each size just in case.
What I did was, initially using a magnetic screwdriver bit, after removing putting them on a magnetic mat, then after removing cables I screwed them back into the original holes to hold them in safe place while completing the repair.
Yes, those screws are some of the tiniest screws I have seen, on par with mechanical watch mechanism screws.
Drop one of them, and you are screwed.
I have damge this battery terminals to their contacts on the logic board when I remove the battery. So how to fix this? Can buy that hardware to make replacement? Urgent! Need Help!
Hi jackwong,
If you are talking about the small springs that contact the battery, there is no easy way to replace them. You can try removing the board, applying a lump of solder on the contact with the broken spring, and see if that will be sufficient to connect to the battery contact when the board is screwed down.
If the LTE version being worked on, ensure the sim tray is removed before attempting to isolate the battery.
Is the logic board on the iFixit battery replacement thicker than the Apple battery? I can’t screw in this 1.8mm screw.
same issue i cant screw it back in, do i need a new replacement screw, i rechecked and the screw does go in but when putting back in it just doesnt tighten with the bracket on top to keep the battery and connectors together
The black screw is for the battery. The metal cover is attached to the logic board, that is not clear in here. I skipped from #37 to #67 and removed the battery by sitting the housing on a metal beam heated to about 150F. As the iPad back warmed up, a few strips of a flat side from a milk carton (2-3" x 5") were made as long as the battery. The IFixit credit card size separators were used were there was room and not touching any electronics. Between the milk carton and IFixIt separators (stronger, stiffer, dont soften as much with heat) the batter was separate and left sitting on the carton strips to prevent reattachment. With battery still attached - - By this time the logic board was eager/easy to lift and the battery tab UNDER the logic board was lifted enough for the old battery tab to clear the case stud. New one installed immediately.
-
-
-
将电池隔离片滑到逻辑板的电池连接器区域下方,并在工作时将其留在原位。
-
或者,使用扑克牌制作电池阻断器 并将其滑到主板接口下方以断开电池连接。
Where am I supposed to get this part? I got the ifixit pro toolkit and didn't get this isolation pick
Since the battery blocker is a specialized tool used only for iPad repairs, we do not include it in the toolkit. You can purchase one here, or you can make one yourself by cutting a notch out of an opening pick.
Can’t you just disconnect the battery?
Orochi: right?? Come on guys, don’t tell us the method is outdated and then not explain what the better method is
A couple points: 1) You have piqued my interest! I’m now looking for the new, improved way to isolate the battery before embarking on the repair. 2) I have an iPad Air 2 with LTE, the area on ifixit.com for the LTE variant of the model does not have all the procedures that this WIFI only variant page has.
Hey bentley,
If you find a way to safely isolate the battery without the risk of damaging the connector pins, keep us posted!
I did not do this part and had no problems. Just don’t bridge any metal parts with the screwdriver. (at least I assume this is what would cause a short)
Actually you can cause some shorts with your fingers too. You can skip this step, but you must bee very carefull going on.
Heat motherboard then use plastic stick or guitar pick to gently unstick motherboard enough to insert peace of paper where battery contacts are.
Thank me later.
I took a business card and notched it like the shown pick. Just wide enough to fit and notched to clear the screw post. Worked like a champ.
마더보드는 바닥판에 접착되어 있습니다. 이것은 배터리 접점에서 들어 올려져야(약간 구부러져야) 합니다. 사진을 자세히 보시면 터미널의 좌우 기판도 보입니다.
I recently successfully replaced a battery on this unit.
I did not see why the warning at the top of this repair guide is necessary, as the battery is connected via several contacts surrounding the screw hole, and the insulating pick they show, or something similarly shaped, should work at isolating the battery. Of course this is only my observation, so take it as you may, I make no assurances of anything.
Removing/replacing the battery is whole ‘nother ballgame however.
The ipad’s contacts are pressed down on the battery contacts, around the hole, that screw hole has an elevated bump which the battery connections have to be slid up and over that bump, requiring the lifting of the ipad connector and possibly part of the motherboard — which is also thermal glued to the case; you may have to heat up the bottom of the case to release that enough to lift.
I am going to post this info also on the battery replacement repair section for this model.
I broke a pin here. My kit came with a tool that resembles a pick with a cutout, so I used it, rather than modify a pick. It would not stay in as pictured and would not go in as far. So I kept pushing it in and expecting it to go further. There is an opportunity for more detailed explanation here. I was able to bend back one of the small pins, but the other bent one broke while I attempted to bend it back. So, there were 3 little pins, now there are two. I put it back together, anyway, and am happy it all works. I am hoping it is a redundant system, and will not overheat the battery right away and explode. If anyone knows the tale of the three little pins, I would like to know.
Although I put it together anyway with the broken battery connector pin and it worked, it would not charge. iFixit is out of replacement motherboards. It may be that the thumbprint button is keyed to your original motherboard, so changing either without the other will lose that capability? It cost the same as a motherboard to ship it out for micro soldering a new battery connector. The connector is like $2. I ordered one and will take my chances microdesoldering the old battery connector off and micro soldering the new one on.
-
-
-
切断在连接线下方其余两个线缆。
I don’t know where this repair guide is going at this point.
It is supposed to be a guide to replace the battery, but goes on to a complete disassembly of the iPad. You don’t have to disassemble the whole iPad to replace the battery.
The battery is inserted underneath the motherboard’s power connection slot. There is a screw that secures it, which is removed during battery replacement. The screw hole is on an elevated bump which the battery contacts have to be slid up and over, requiring the partial lifting of the motherboard at the battery connection — if necessary heat up the bottom of the case there to lift it up.
When secured, the insert contacts sit around the hole. The tricky part is lifting that part high enough so that the battery connector can get over the bump, and the holes line up.
I have found a hack that makes this a lot easier. Simply snip a small slot at the front of the hole of the battery connector. This way it does not have to lift over the bump, but can slide around it on both sides.
I would love to see a guide on how to replace the charging/data connector.
There was a comment under the part-page that mentioned it was tricky to replace due to the soldering involved.
Do i need a hot-air station or will my fine tipped iron be enough?
I agree with G Trieste, there is no reason for complete disassembly to replace the battery. I placed a pick on the battery side of the battery connector underneath the new battery, gently pried up on the motherboard next to the battery connector and was able to slip the battery connection right into place.
-
-
-
将前面板与后壳分离。
-
如果你计划重复使用原来的显示器组件,那么你将需要更换显示器粘合剂。 按照我们的iPad 粘合剂指南重新涂抹显示器粘合剂并重新密封你的设备。
Note on my iPad Air there was a little plastic cover around the front facing camera. Take that off an put it to one side as you will need it later for reassembly.
At this stage I found you do not need to do most of the rest of this guide although it does come with a warning. The battery is tethered to a metal ring which is the base of the retention screw in step 29. After Step 33, you can separate out the batteries from its adhesive now with a blow dryer or the iOpener (step 56). You will then find the battery free but hooked onto the ring. Take the blue opening tool (see step 55 for which tool this is) and wedge it where the battery is to make a gap. You can then lift the battery contact from its hook. After removing the battery, insert the new one into the small gap created by the wedge. The caveat is that you are bending the logic board a bit with the wedge so use this technique at your discretion.
Thanks a lot! For my Celluar version (A1567 Air 2 Wi-Fi + Cellular), I followed the instructions to step 45 to remove all cables and connectors around the battery. Then I also jumped to step 56. To remove the middle part of the battery, I used a longer tool, a ruler, in addition to the enclosed "Plastic Cards". The glued battery could be removed by using the iOpener several times. In the end, the battery was only hanging on the clamp.
Only now I understood that the battery was hanging on an eyelet on the back. The lever with the "iPad Battery Isolation Pick" was not enough. Therefore I cut an additional credit card with a small slot. The clamping point slipped out of the eyelet. The clamping point of the new battery could be plugged in again immediately.
Thank you Raza for this shortcut. I used it as you explained and made a slight change. I noticed that the eye on the battery’s contact is not really locking the battery in place. It is the powerful glue that does. In addition, the screw in step 29 secures the contact assembly. So, to facilitate the positioning of the replacement battery, I cut the eye to make it a U, so that I could slide the eye around the holding ring without risking to bend the logic board.
I understand the process and reasoning for snipping the ring of the new battery to get it around that post, but how are you removing the old one without bending the logic board? You still have to get the ring of the old one up and over that raised post portion?
2022-02-27 update: Manage to skip step 35 onward. I can change the battery without removing the logic board for my iPad Air 2 . It’s similar to the steps in iPad Air LTE Battery Replacement. Thanks Raza for the tips.
This is a very important passage and should be explained (and illustrated) better in the guide. The battery is not only glued but is also hooked, at the screw hole, to a rear metal pin. So after unscrewing it and unscrewing the screw, it is necessary to lift it very gently from behind at the connector, so as to release it from the pin. I used a fairly long screwdriver, insulated with plastic tape. Be careful, of course, not to damage the logic board.
In any case, you don't need to disassemble the entire iPad as shown in the next steps.
-
-
-
使用塑料打开工具撬起Home键后的支架。
-
-
-
移走Home键支架,并剥去连接其的胶带。
-
尽可能多地刮掉支架上的旧粘合剂残留物,然后用丙酮或高浓度(90% 或更高)的异丙醇清洁它。
-
用热熔胶、强力胶或高强度双面胶带固定支架。 在让你的粘合剂固化之前,请确保支架正确对齐,否则按下Home键时不会发出咔嗒声。
attention à cette étape de ne pas décoller en même temps la gappe du bouton. Celui ci peux etre tordu et difficile à remettre.
-
-
-
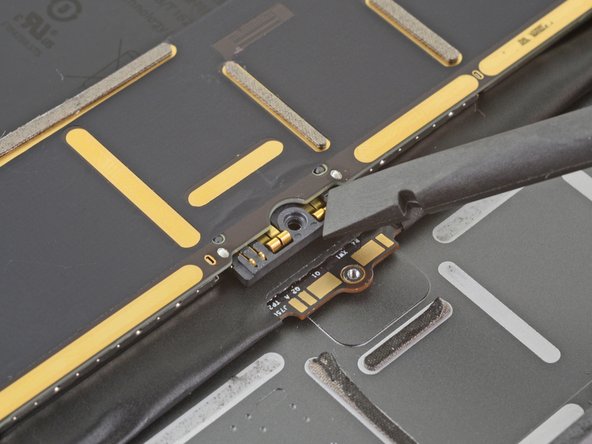
剥离覆盖在Home键ZIF连接器上的胶带。
Recommendation -> Buy replacement tape ahead of time if you don’t have it. I used iFixit Polyimide Tape.
This special tape does not restick. Had this been mentioned in the steps, I would have purchased it ahead of time. The tape was hard to find, and search results (including recommendations for alternatives) were confusing - as was the purpose for the tape. Also, tape was not widely available and I had to wait a week to get it. It is used elsewhere in devices such as this iPad, and in other places within this iPad, including over the 2 speaker ZIF connectors. (I did not remove all the parts in the steps for replacing the battery, so there could be other places here that I did not come across.) Research showed tape to be temperature resistant and an electrical insulator. One place said an anti-static version is available. This last may be the main purpose for it and don’t know if iFixit’s meets this. Recommend that you confirm your choice for yourself to be safe.
-
-
-
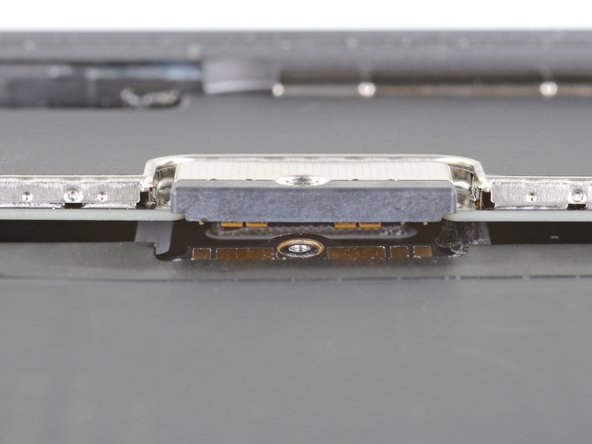
撬起在角落剩余的Home键线缆。
What is the purpose of the contact finger that is exposed on the corner of the home button ribbon cable. What connects to this?
-
-
-
重新加热您的iOpener,将其放置在显示屏的底端,来融化Home键按钮垫圈上的粘合剂。
Most screens don’t come with the home button adhesive so during reassembly the residue from the home button gasket is enough but the bracket needs new glue.
-
-
-
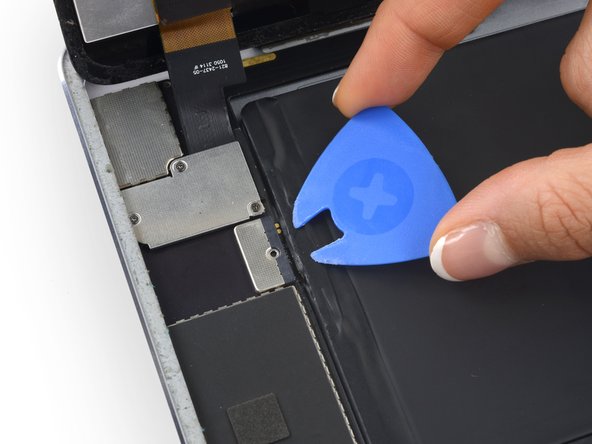
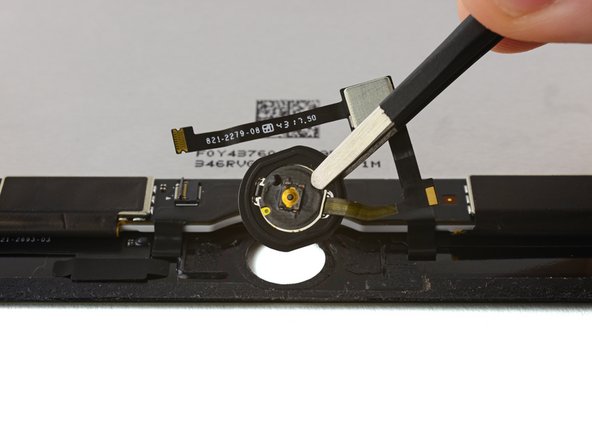
使用撬棒尖端来轻轻地从显示屏上撬起Home键组件。
Another option… heat it up a bit and then apply gentle pressure from the front of the button. Start with one “corner” and work your way around.
Mine came out like very smoothly with this process.
Good luck!
-
-
-
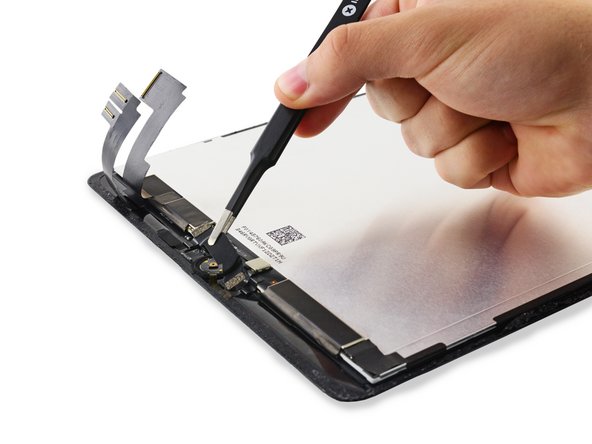
移除Home键组件。
-
如果你要更换 LCD 组件,某些组件的 Home 键连接器位置略有不同,你需要将 Home 键电缆折叠成“S”形,如图所示。
There is also a plastic waster around the hole which can be lifted and placed on the new screen - not just the grommet.
Yeah, that’s a big problem with this guide. Not to mention the home button bracket needs the little magnet in the circle dimple. I broke my original home button from trying to get the darn thing to work using a new home button bracket until I used the old bracket with the tiny magnet and suddenly it worked. Since the original home button ribbon had broken I can no longer use touch ID.
Overall this guide is really lacking in critical details, like how exactly the home button assembly is put together and taken apart, like where the little plastic washer, and grommet go.
And this picture is out of focus, making it hard to differentiate the items that are mentioned/warned about in the written portion.
-


按照本指南相反的步骤来重新组装你的设备。
按照本指南相反的步骤来重新组装你的设备。
Cancel: I did not complete this guide.
40 other people completed this guide.
Special thanks to these translators:
100%


These translators are helping us fix the world! Want to contribute?
Start translating ›

11 Comments
There is a small black plastic ring between the back of the glass and the home button gasket that no one seems to be mentioning. Do you see it? It does not appear on any of the photos. What's up with that?
Its the washer, better to transfer to new screen if the screen does not come with the washer. Without the washer the home button will work fine, just feel weird. Good luck
As I understand it, the touch ID chip on the home button ribbon cable is paired to the logic board at the factory. Unless you put the same home button assembly back, you will lose the touch ID when a replacement home button assembly is installed. The home button will work but without touch ID
I just received iFixit LCD/digitizer/glass replacement assembly for iPad Air 2 (A1566) and see the distance between the IC’s on either side of the home button ribbon cable is narrower than on the original LCD! There is no room for the Touch ID chip since the distance from the Ziff connector (where the home button ribbon cable attaches) to the IC next to where the Touch ID chip goes is narrower by about 8mm!
Is there a new version of the home button with a shorter ribbon cable or is this a mistake in the replacement screens? To re-use the original home button you would have to fold its ribbon cable or put the Touch chip up on the IC so it would probably not allow the screen assembly to seat properly.
Has anyone else had this problem?
James, I am having the same problem. I think the iFixit stock is goofy in this regard. Not good.
Anyone have a fix for this? I am having a similar problem and can't get the home button to work
Same issue. Their solution is to put an “s” curve on the ribbon. Mine has a stiff piece on it and I’m afraid I’ll tear it if I remove it. Very frustrating and very little help
Jack -
I replace the new screen of iPad Air 2 successfully with original same home button. Everything works except finger prints failed. I tried to fix from software but finger prints does not work, only home button function works. Any idea what is solution ?
I didn't find this to be as hard as I had built it up in my mind to be; HOWEVER, saying that I need to say years ago I was the local Nokia service center in my town. But many years ago right after they got rid of analog times. Yeah. A classic installer/repairer mistake when starting something they haven't fixed or installed before is picking up the instructions, flipping through them; maybe even reading a section that is new-then tossing the instructions over the shoulder. "I got this." This usually comes right before something major gets broke. And I can tell you when you try to do it yourself and then mess it up horribly then take it to the repair shop. Well we called that "I can do it myself" syndrome and charged extra to put back together what they brought in in the box. Now knowing all this - I can't stress this enough because I am stupid, stupid, stupid. COVER YOUR SCREEN IN CLEAR BOXING TAPE AND READ ALL THE INSTRUCTION BELOW THROUGH TO THE END BEFORE EVEN ATTEMPTING THIS FIX. Take my advise.
windizy - Reply
I didn't have an iOpener, so I used a wheat type heat bag. If you do this though, make sure you put a layer of plastic between your Mac and the bag, or you'll get condensation in places you don't want it.
Martin Gray - Reply
I started out using the iOpener but switched to my wife's hairdryer. A heat gun or hair dryer proved to be much more convenient and is a time saviour. You can heat more and the glue becomes more fluid make the next steps with the opening picks much easier
Jan Van Puymbroeck - Reply
I know this is obvious, but backup your iPad with iTunes before you start. I'd also turn off your passcode if you have one.
Laurie Higgins - Reply
Ther first time you heat up the iOpener for this repair when its room temperature I had to heat it up for more than 30 seconds. I remember I had to heat it up for around 45 seconds. However, after that when you need to reheat it again during the repair 30 seconds will be enough.
Yousef Ghalib - Reply
I used the wheat bag in a sensor microwave heating up to 65-70 deg C (155 def F).
ian cheong - Reply
Get yourself a cherry pit bean bag the size of your iPad. Heat it, put the iPad on it for 3 to 5 minutes or so, reheat the cherry pit bean bag, again put your iPad on it. Then heat the iOpener and start working. The cherry pit bean bag will have to be reheated several times, but it will soften the adhesive so you have less problems with the iOpener
Tim Feyaerts - Reply
The heating can be done very effectively (and quickly) with 3d printer heated bed. Make sure the bed is clean. Set the temperature to 60c, (130f ) and put the ipad face down for +/- 10 minutes. Repeat as needed throughout the “gentle prying” stages.
polleyphony - Reply
The iOpener did not work at all for me.
I had to use a heat gun and bring the edges of the case up to ~200 degrees (used an infrared thermometer to measure) before the glue would weaken. This obviously superheated the metal frame, so I also had to wear gloves to handle the phone while prying the back off with the included picks.
Mike Jeanette - Reply
Repair instructions worked like a charm. Had to be patient with the iOpener and getting the screen off. I tried repeatedly without success until shifting the suction cup a bit to the left side where perhaps the glue had loosened up a bit more.
Kyle - Reply
The iOpener, in my opinion, is of no help. Many warnings to say “don’t warm it too much”, but the glue doesn’t melt if not warm enough. As a result, a complete waste of time and energy. In addition, too much liquid in it, so it doesn’t lay on the device on a sufficient surface. I took a hairdryer and it worked much much better.
laurentvidu - Reply
I used an immersion bath to heat this to 180F and applied it to the device until the outside temperature of the opener read 150F with an IR thermometer. Removing the screen took very little force with this method.
breadandbits - Reply
My experience. I was replacing the screen which had been cracked and a little shattered in some places. The iopener is pretty much useless, so was the suction cup. The suction cup would probably be more useful if I was doing something besides the screen. Also you probably want the clean the screen before using it so it can get good suction. I used a hair dryer on high for a couple of minutes at a time (someone on this tread suggested that). I used my exacto knife and a razor blade to get into the adhesive. First the exacto to get the initial cut, then the razor blade to go a little deeper. Could have probably just used the razor blade, but the exacto has a little more finesse. I got the razor blade in and a little under the glass then I used the picks to wedge in. I didn’t want to risk anything using the razor blade too much. Used tape to keep the shattered glass together.
trebor65 - Reply
My experience pt2
Fortunately the shattering was mostly on the edges and most of it had adhesive on the back so it stuck together. Just take your time and work your way around following the guide to get the screen off. Have some goof off or goo be gone to clean the frame when putting the new glass on or putting the existing one back. (someone suggested that also, very good idea). Be careful of the LCD (you should know that). The cable on my LCD was pretty tight, so I propped it up while taking the cable cover off and when I put it back on I did the same thing. I just put a bottle on the battery and leaned the back of the LCD on that while attaching the cables and putting the screws back on the cover. Also be careful with the home button and the bracket on the back of it. I had enough old adhesive on left on the bracket that it stuck back to the new glass fine. So far only 12 hours in, so we will see how that holds up when the kids get at it.
trebor65 - Reply
Another alternative if you do not have the iopener is to use a bed time hotwater bottle. Do not over fill it though. Just put enough hot water in to support the phone while you work around the adhesive.
I use both the hot water bottle and iopener together on Samsung's. It makes life easier
gazza667 - Reply
I followed the directions and heated my iOpener for 30 seconds in a 1000 watt microwave, and it came out at 160 degrees F, as verified by a infrared thermometer. This allowed me to separate the last bit of the back of my Samsung S8, which was already coming off due to a swollen battery (hence the reason for the repair).
Dennis - Reply
Hallo,habe den Akku erfolgreich getauscht.Doch seitdem gibt es bei Telefonaten eine Rückkopplung für den anrufenden.Bei mir ist alles normal.Woran liegt das?Mfg
Manu R - Reply
If you follow these instructions, you will crack your screen like I did. Heating the iOpener for 30 seconds, using it to melt glue, then waiting 10 minutes to reheat is useless. The iOpener can be used to maybe warm the glue on whatever side you aren’t working on. You need a hairdryer and/or a heat gun to melt the glue and separate the glass from the iPad.
Anyone want to buy an old iPad with broken glass and a dead battery?
mpulliam - Reply
Not everybody has a microwave. You should provide a target temperature for the iOpener and instructions for a conventional oven, or pot of warm water, or whatever. Although I will probably use a heat gun …
Esmond Pitt - Reply
Three times heating opener and no luck. Tried pressing down gently on opener with a towel, and the opener broke. Wondering if I now replace table mats, fancy table cloth, etc. or will this stuff wash out.
Not impressed so far. Maybe the hair dryer next.
doug - Reply
I support the comments about the iOpener. Everyone has a hair drier, FHS, so get a cheap IR thermometer (£18) and blow heat until the area is 60+ deg C. Still takes w while, and getting the screen off is v scary, but just add more heat if you feel resistance.
The rest of the kit is good, esp the magnetic screwdrivers.
Richard O'Brien - Reply
No, everyone does not have a hairdryer. Some of us don’t even have hair. Thank goodness I already had an IR thermometer, though.
nin10doh -
#### WARNUNG WENN MINIMALSTER SPRUNG IM DISPLAY IST FUNKTIONERT DAS NICHT!!! ######
Hatte einen winzigen, minimalen Sprung im Display. Ich dachte es könnte gehen, weil der Sprung “abgeschlossen” war. Er hat in einer Ecke ein winzige Glasteil rausgeschnitten. NEIN! Geht nicht. Habe alles mit viel Geduld dem iOpener und einem Föhn erhitzt. Es ist trotzdem sofort über das komplette Display zersprungen…
T z - Reply
I’ve started with iOpener but changed very quickly to a heatgun. That was more efficient.
Mizzoo, s.r.o. - Reply
I could not get the iOpener hot enough to melt the glue on my ipad 6. I heated for 45 seconds once and it was boiling and it still never worked. Thank goodness contributors mentioned using a hair dryer. Using an 1700w hair dryer on high did the trick to get the screen off. Still took some time and the case got pretty hot but be patient. It took twice as long and a lot more patience to get the battery out.
Randal Haufler - Reply
I have an Ipad with touch screen issue, if i replace this part it should be Ok?
janderson martin - Reply
WARNING - DO NOT MICROWAVE ON A METAL MICROWAVE RACK
The metal microwave rack can heat up and melt through the iOpener cover letting the contents leak out.
Not a big issue for me as I have a heat gun and used that instead.
Run Up A Tree - Reply
I opened my iPad with the iOpener. Be patient! It may take quite a bit longer to it the iOpener in the microwave than it says in the guide. My microwave can only do 800W and I had to put the iOpener in several times (maybe a total of 90-120 seconds). I recommend that you have the transparent side up an watch the bag carefully. As long a the bag doesn't bloat up and the liquid doesn't start bubbling you should be fine. But I recommend to take the iO out from time to time to check it. (More comments in Step 6.)
marcelflueeler - Reply
I gave upon the I opener and used a hairdryer. (Fixed an iPad 6)
Tom Weber - Reply
iPad mini gen5. I used the iOpener. My microwave is 1200w with carousel. 30 sec got the iOpener to 155ºF. For the 2nd heating, after 10 minutes sitting, the temp was still around 125º so I only cooked it for 15 sec. Not enough increase so +5 sec more which me to 165-170ºF. This should be considered ballpark info because who knows the real output of the various microwaves and the quality of the IR tool used to determine temp.
To successfully open my iPad mini I applied the iOpener twice to the left edge and twice to bottom. & once to R edge. Using the suction cup was difficult for me (I'm in my 70's so my hands don't work too well anymore). I had trouble holding the guitar pick and slipping them in (at an downward angle). In the end, sliding my thumbnail along the edge opened it very slightly and allowed the pick to get into the gap. I marked the ends of all my picks with a sharpie pen for the recommended 2mm insertion to avoid going in too deep. To get the screen open it took me approx 1 hour.
jharrison - Reply
Can’t you just use a hair curler instead?
Aspect22 - Reply
A hairdryer or heat gun works, if heating is kept around 100 deg C (212 deg F - boiling point of water). But… heating this way is cumbersome. Using a hotplate, set to 100 deg C, measured carefully with a fairly inexpensive IR gun, is simpler and easier, if you can afford the hotplate (I used an old pancake griddle with a thermostat knob). It works great for phones, setting them face down for 2 minutes, then picking them up with insulated gloves - cheap, wool gloves work fine. This may require repeated reheating to continue the display removal, but its much simpler.
Because its almost impossible to repeatedly lay an iPad/tablet on the hot plate, I propose an alternative.
Initially lay the larger iPad/tablet, face down, for 2 min, to heat all of the adhesive surrounding the display. Lift and begin the picking process describe in your removal steps. Then lay an iOpener on the hotplate for 2 min (already set to the exact, desired temp) to bring it to working temp for the remaining operations.
Dan Smith - Reply
For iPads in particular, it makes sense to construct a simple, aluminum window frame, laid on a hotplate (see my comment above) that only touches the edges of the display, heating only the adhesive underneath. This prevents general heating of the entire device. Four strips of aluminum, placed together as a frame, would be the simplest and allow variations for all devices - envision it as a pinwheel of strips, radiating outward. Use it for any size device.
Dan Smith - Reply
BTW, always read all comments at each step. New, and possibly useful, suggestions appear on occasion that can be crucial.
Dan Smith - Reply